This hot water inlet valve is designed to regulate water flow into the washing machine during operation. Featuring a standard hose fitting inlet and a single water outlet, it opens as needed to allow ...
The blue plastic detergent dispenser holds the detergent and then dispenses it into the washer during the wash cycle. If the detergent dispenser is broken, lost, or if the detergent is not dispensed d...
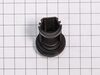
This replacement pump filter, also known as a filter assembly, is a genuine OEM part for your washer or washer/dryer combo. Before beginning this repair, turn off the power and water supply to your wa...
This genuine OEM drum seal gasket prevents water from leaking between the outer tub and spin basket of your washer. It is made of black rubber and measures 2.5 inches in diameter. If your washer is le...
The spider, or rear tub support, is located behind the outer tub of your washer, and provides support to the outer tub. It has 3 legs and each measures approximately 10 inches long. If your washer mov...
Keep your laundry running smoothly with this dispenser assembly for front-load washers. It stores detergent and fabric softener and releases them at the right time for a thorough clean. If your old di...
When your LG washing machine isn't performing like it used to, this Vent Hose with Bellow is just what you need to bring it back to life. Crafted as a genuine OEM part, it offers the guaranteed qualit...
This clamp assembly secures hoses, boots, or fittings in place to prevent leaks and maintain proper connections. Designed for a tight, reliable hold, it is replaced when clamps loosen, corrode, or fail.
$35.15
In Stock
Questions And Answers for 40021
Be the first to ask our experts a question about this model!
✖
Ask a Question
Ask our experts a question on this model and we'll respond as soon as we can.
Unplug the washer! Turn off the HOT water valve. Remove the hot water hose at the connection on the back of the washer. Remove the two Phillips head screws holding the top of the washer. Slide the lid toward the rear until you feel it disengage, then lift it off, setting it aside. Unplug the electrical connector on top of the hot water valve (just pulls off).using pliers compress the hose clamp, slide it away from the hot water valve and pull the hose off the valve fitting(it will have some water remaining so lift it up and secure it to the brace above the hoses). Remove the two phillips head screws that hold the valve in place. Pull the valve toward the front of the washer to remove it and compare it to the new valve. To install the new valve, reverse all steps insuring tight water hose clamp and electrical connection. Install hot water hose, plug it in and turn on water. Test run and check for leaks. Unplug it and reinstall top.


 – Part Number: 40021")