Models > 1196458011

1196458011 Kenmore Wall Oven - Overview

Sections of the 1196458011

[Viewing 4 of 4]
Keep searches simple, eg. "belt" or "pump".
Terminal Block Kit – Part Number: 5303935058
Terminal Block Kit
★★★★★
★★★★★
(33)
PartSelect #: PS470125
Manufacturer #: 5303935058
This surface burner terminal block kit comes with interchangeable mounting brackets, terminal box, ceramic wire nuts, heat shrink protective tubing and wires.
$18.12
  In Stock
Main Terminal Block Kit – Part Number: 5304409888
Main Terminal Block Kit
★★★★★
★★★★★
(8)
PartSelect #: PS471605
Manufacturer #: 5304409888
Terminal blocks (also called terminal boards or strips) provide a convenient means of connecting individual electrical wires.
$11.95
  In Stock
Burner Switch Kit – Part Number: 5303935086
Burner Switch Kit
★★★★★
★★★★★
(3)
PartSelect #: PS470145
Manufacturer #: 5303935086
This switch controls the stove top surface burner.
$51.18
  In Stock
Screw – Part Number: 5304500008
Screw
PartSelect #: PS11703829
Manufacturer #: 5304500008
Sold individually.
$26.38
  In Stock
BROILER PAN & INSER – Part Number: 5304442087
BROILER PAN & INSER
PartSelect #: PS979826
Manufacturer #: 5304442087
$106.46
  Special Order
Hinge - Right Side – Part Number: 318348800
Hinge - Right Side
PartSelect #: PS1151517
Manufacturer #: 318348800
$86.11
  Special Order
Door Hinge - Left Side – Part Number: 318348801
Door Hinge - Left Side
PartSelect #: PS1151518
Manufacturer #: 318348801
This hinge is located on left side of the oven door.
$95.97
  In Stock
NUT – Part Number: 316205500
NUT
PartSelect #: PS735646
Manufacturer #: 316205500
$14.35
  In Stock
HANDLE – Part Number: 318360001
HANDLE
PartSelect #: PS1529537
Manufacturer #: 318360001
$71.38
  Special Order
COVER – Part Number: 3203808
COVER
PartSelect #: PS446331
Manufacturer #: 3203808
  No Longer Available
LINER-OVEN – Part Number: 5303286860
LINER-OVEN
PartSelect #: PS461030
Manufacturer #: 5303286860
  No Longer Available
MODEL 9018813 – Part Number: 3009334
MODEL 9018813
PartSelect #: PS432334
Manufacturer #: 3009334
  No Longer Available

Questions And Answers for 1196458011

Be the first to ask our experts a question about this model!

Common Symptoms of the 1196458011

[Viewing 6 of 6]
Element will not heat
Fixed by
these parts
Fixing Fixing Fixing
Show All
Little to no heat when baking
Fixed by
these parts
Fixing
Show All
Will Not Start
Fixed by
these parts
Fixing Fixing
Show All
Door won’t close
Fixed by
these parts
Fixing Fixing
Show All
Oven not heating evenly
Fixed by
these parts
Fixing Fixing
Show All
Little to no heat when broiling
Fixed by
these parts
Fixing
Show All
Keep searches simple. Use keywords, e.g. "leaking", "pump", "broken" or "fit".
Cord was not tightened enough by delivery crew.
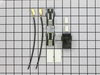
PF alarm appeared on display. Noticed clicking when cord was moved. Had arced for some time and melted original block. New part slightly different. Only has 3 lugs, old one had six. Stack using washers provided. Take note of colors before disassembly. Use caution while working through access opening. The edges are sharp. Only tools needed are phillips screwdriver, deep socket for lug nuts. Nut driver optional. Hope this is helpful.
Parts Used:
Main Terminal Block Kit
  • Timothy from Spring Valley, AL
  • Difficulty Level:
    Really Easy
  • Total Repair Time:
    15 - 30 mins
  • Tools:
    Screw drivers, Socket set
95 of 148 people found this instruction helpful.
Was this instruction helpful to you?
Thank you for voting!
High heat reluctant to turn down.
Most of the job is simple fastener mechanics.
Use a nut driver or Phillips screwdriver. Remove rear panel.

Pull out control knob. If it is stuck, wrap a small rag around the back of it and pull the rag steadily.

Carefully match marked terminals on the replacement switch with those on original. Switch terminals may not be in the same location. Replace wires one for one, one at a time.

Carefully select the correct knob filler for the switch post. Several are supplied. Proceed with logic and measure the shaft length and the filler length and type to match.
Parts Used:
Burner Switch Kit
  • George from New Port Richey, FL
  • Difficulty Level:
    Easy
  • Total Repair Time:
    15 - 30 mins
  • Tools:
    Nutdriver, Pliers, Screw drivers
45 of 49 people found this instruction helpful.
Was this instruction helpful to you?
Thank you for voting!
Right front burner would over-heat
First of all I removed the top panel then removed the switch. I then took pictures of the switch & drew a sketch with all the info. Then I went to your web site, matched up the switch & ordered.
When the switch arrived I went thru the above replacing the bad switch.
Parts Used:
Burner Switch Kit
  • Melvin from Attica, MI
  • Difficulty Level:
    Really Easy
  • Total Repair Time:
    15 - 30 mins
  • Tools:
    Nutdriver, Screw drivers
23 of 27 people found this instruction helpful.
Was this instruction helpful to you?
Thank you for voting!