This dryer drum roller kit is designed to restore smooth and quiet operation in a wide range of dryer models. It includes two drum rollers, four tri-rings, and one to two retaining washers, providing ...
$22.56
In Stock
Order within the next 12 hrs and your part ships today!
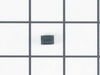
If you notice that your dryer is noisy or will not tumble, you may need to replace the tri ring. This part is triangular, and is less than an inch in size. Tri rings can be found both on the idler pul...
$17.01
In Stock
Order within the next 12 hrs and your part ships today!
If your dryer drum isn’t spinning, the motor might be the issue. This replacement motor works with many Whirlpool-brand dryers made before 1996 and comes with the pulley already attached. It powers th...
$143.77
In Stock
Order within the next 12 hrs and your part ships today!
The blower wheel is a squirrel cage type wheel whose purpose is to move the air through the room or appliance. The blower wheel spins on the motor shaft to blow air through the dryer drum and out through the exhaust.
$46.44
In Stock
Order within the next 12 hrs and your part ships today!
This part senses if the igniter is hot enough to ignite the flame for heat, allowing the gas valve to open. The sensor is three inches long and is used for many gas clothes dryers. If your dryer is no...
$60.74
In Stock
Order within the next 12 hrs and your part ships today!
This silicone carbide igniter with ceramic holder kit includes the 3" flat igniter, bracket, 4" wire leads, and the plug. It can replace both round and flat igniters. This kit is used for many gas clothes dryers.
$51.40
In Stock
Order within the next 12 hrs and your part ships today!
This is a genuine OEM part. The push-to-start switch is composed of metal and plastic components. Compatible with dryers, the Whirlpool switch powers the appliance after the button is pressed. With a ...
$37.35
In Stock
Order within the next 12 hrs and your part ships today!
Questions And Answers for 1107062111
Be the first to ask our experts a question about this model!
✖
Ask a Question
Ask our experts a question on this model and we'll respond as soon as we can.
Received your parts, Popped them both right into place, Even though only one side needed to be replaced, I wanted them to match up. It was amazing how easy this was. My husband was quite impressed I had ordered these rather then look for either a new or used dryer from some other source.
The best part of my repair was I had everything back in service in 3 days. And one of these days was to consider just buying a new dryer. Had parts overnited and all parts fit and easy to replace.
1) Removed back - 6 screws 2) Removed dryer vent - 2 screws on top, 3 on bottom 3) Popped the top open 4) Removed Front of dryer cabinet - 2 screws 5) Removed Belt 6) Removed Drum 7) Cleaned up all lint 8) Pop off motor retainers front and back Here is the tricky part for me. 9) Removed vent fan on back of motor. I did not know that the back of the fan was square, and you could put an open ended wrench on it to hold it while you also have a vice grip on the front motor shaft. Then its a simple left to loosey operation. I first tryed to turn the fan blade to take it off, but proved to be to tight. 10) Repeat backwards to reassemble
While I had it apart I also replaced the Drum support rollers & Installed a new belt. Not that diffucult of a repair Good Luck, was certainly better than buying a new one at + $300.00 at Black Friday rates.
You open up the lint filter access door and remove the two small screws that hold it to the top of the dryer. Once they are removed, you insert a flat blade screwdriver under front-top of the unit and the top will pop off. Exerting a little pressure towards you will help lift to top off the mounts. There are no other screws to remove. The new switch comes attached to a clip. You just pull off the old clip and replace it with the new one and discard the old switch.


 Diagram and Parts List for Kenmore Dryer")