The drum support roller kit (Dryer Repair Kit) allows the dryer to tumble properly by supporting the drum cylinder. The idler pulley provides the tension required for a multi-ribbed belt. The belt att...
This 18 ml bottle of white appliance touch-up paint is used to cover scratches or marks on your appliance. The white touch-up paint can be used on refrigerators, microwaves, ranges, clothes dryers, an...
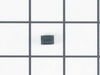
This manufacturer-certified dryer lint filter is used to collect lint during the dryer cycle, to prevent damage to the machine and to prevent lint from sticking to clothes. This model comes in white a...
If your dryer drum isn’t spinning, the motor might be the issue. This replacement motor works with many Whirlpool-brand dryers made before 1996 and comes with the pulley already attached. It powers th...
If your dryer is taking longer to dry clothes or feels like it’s losing heat, the door seal might be the problem. This flexible, heat-resistant gasket wraps around the door opening to keep hot air in ...
Ensure your dryer operates smoothly with this replacement door catch, which helps keep the door firmly closed throughout each cycle. It’s compatible with various models and replaces older versions. Co...
This dryer motor pulley is a genuine OEM replacement part designed for select dryer models. It connects to the motor shaft and supports the drive belt, enabling smooth rotation of the drum during oper...
This kit is used for the bottom and side exhaust. The kit includes both the straight and elbow vent.
$92.88
In Stock
Questions And Answers for 11060222510
Ask our experts a question about this model and we'll get back to you as soon as possible!
1 question answered by our experts.
< Prev
1
Next >
Sort by:
Search filter:
Clear Filter
Your search term must have 3 or more characters.
Keep searches simple. Use keywords, e.g. "leaking", "pump", "broken" or "fit".
Sorry, we couldn't find any existing answers that matched.Try using some different or simpler keywords, or submit your new question by using the "Ask a Question" button above!
Randy
January 8, 2023
the heater element comes on but only stays hot for about 1 min then goes cold. What would cause this and what would be a good start for replacment part/parts. Im thinking thermal overload or heater element.
Thanks
Randy
For model number 11060222510
Hi Randy, thank you for reaching out. The following parts need to be checked to fix the issue: Thermal Fuse, part number PS11741460, Thermal Cut-Off Kit, part number PS334299, and Heating Element, part number PS334313. We hope this information helps! If you need help placing an order, customer service is open 7 days a week. Thanks again for your great question.
Grow a second set of hands. Always unplug any appliance. Remove lint screen. remove two screws (philips Head). I took a wooden shim lightly tapped w/hammer to pop front of dryer top free. Mine worked on hinges and just flipped back til it rested against the wall. Removed two 5/16 screws inside holding face on carefully raise face section off the support clips at either side on the bottom. Pull drum out (I have the large style drum commercial size [approx.). Clean the inside free of all lint (known to be fire hazard). Sling new belt around drum. Get newly grown set of hands to hold drum in place. Pinch belt to fit between tensioner, lift tensioner and place belt around motor pulley. Spin drum couple times to make certain belt isn't twisted. Reverse dismantle proccess to put back together. Replace all parts that come with kit, you'll feel better knowing you got a new dryer, almost.
1. Removed the screws from the lint catcher 2. Removed the bolts from upper rear of dryer 3. Pried off the dryer top from the front (it rests on rear hinges) 4. Disconnected dryer door wiring 5. Removed bolt from inside upper front corners; removed front panel (be careful: the edges are sharp and the tumbler will fall when it loses support) 6. Removed broken belt and lint from interior parts; removed tensioner (which had fallen out of place). Note: The newer models have a tensioner pulley; my older model had a smooth semicircle that was confusing at first glance 7. Flipped dryer onto its back (for easier reinsertion of new belt and tumbler) 8. Placed new belt on tumbler; reinserted tumbler 9. Inserted new belt through tensioner, inserted tensioner "legs" into grooves on floor. Note: The belt will pull the tensioner upright when it's inserted properly (which isn't obvious at first) 10. Made sure belt and tumbler seal were properly installed 11. Replaced parts in reverse order The process took over an hour because I couldn't figure out how to insert the belt through the tensioner. The trick is to insert the folded belt through the tensioner and onto the motor pulley. If I had to do it again, it would take about 30 minutes (including cleaning lint)
After looking on the website for advice I walked throught the simple steps of disassembling the front, removing the drum, removed the back, disconnected the wire harness. Then removed the blower housing in the back. The blower, mounted on the back side of the motor was very tight. I used a pipe wrench wedged in place and help by my 10 year old Grand-daughter while I used an adjustable wrench to turn the shaft on the front of the motor. Spun the blower off, removed the two clips holding the motor. Then reversed the process when I received the new motor. Care should be taken to avoid damaging the blower fan if a lot of pressure is required.