This 18 ml bottle of white appliance touch-up paint is used to cover scratches or marks on your appliance. The white touch-up paint can be used on refrigerators, microwaves, ranges, clothes dryers, an...
Having a problem with a funky-smelling washing machine, or one that just doesnt seem to clean your clothes as well as it used to? Say hello to the Affresh Washing Machine Cleaner by Whirlpool. This po...
This is a replacement lid hinge for your washer. It is approximately 2.5 inches in length and 1.5 inches in width. The lid hinge is what the lid for your washer pivots on. If the lid hinge is damaged,...
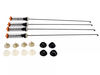
Are you dealing with a faulty washplate in your washing machine? Meet the Whirlpool Washer Washplate Screw, your personal helper for securing loose or broken washplates. This genuine OEM part is highl...
This lid lock assembly is designed for use in various top-load washing machines and serves as a critical safety feature. Located beneath the washer lid, it includes the locking mechanism and wiring ha...
If your washer isn’t spinning, agitating, or cleaning clothes like it used to, the gearcase might be the issue. This part powers the agitator and spin basket, helping your machine run smoothly. It fit...
This clutch slider kit is part of the transmission system in select washing machines, helping control the movement and speed of the agitator during wash and spin cycles. The kit includes a clutch band...
This water inlet valve is a key component in washing machines, responsible for regulating the flow of hot and cold water into the appliance during the fill cycle. It features two separate inlets and c...
$156.31
In Stock
Questions And Answers for 11026132410
Ask our experts a question about this model and we'll get back to you as soon as possible!
21 questions answered by our experts.
< Prev
1
2
3
Next >
Sort by:
Search filter:
Clear Filter
Your search term must have 3 or more characters.
Keep searches simple. Use keywords, e.g. "leaking", "pump", "broken" or "fit".
Sorry, we couldn't find any existing answers that matched.Try using some different or simpler keywords, or submit your new question by using the "Ask a Question" button above!
Michael
September 5, 2022
During spin cycle there is a lot of noise,also leaking-seems to be coming from motor/ gearbox area
For model number 11026132410
Hello Michael, thank you for your inquiry. The noisy spin cycle is usually caused by a faulty gear case (part number: PS12741641) which can sometimes cause a leaky motor. We hope this helps, please feel free to contact customer service if you need assistance with purchase or repair. Thank you.
How do i get the console open on this model? Where are the retaining clips?
For model number 11026132410
Hello, Thank you for your question. On this diagram, the clips are part#5. https://partselectcom.azureedge.net/Schematics/Whirlpool/2B09DD7BC56078653386115010303E660DE41E17.gif We hope this helps, good luck with this repair.
Was this helpful?
Thank you for voting!
Judy
October 12, 2021
Display shows "drn". I can't get it to drain. How do i empty washer and then clean out washer drain. Is there some type of built in drain to clean. So far i just put a tablet in when it says to clean washer.
For model number 11026132410
Hello Judy, thank you for your question. First unplug the washer for 1-3 minutes. Plug it back in and try to start a drain cycle. If this does not work. Unplug the washer. If it is hard-wired into your electrical system, switch off the appropriate circuit breaker. You will need a bucket and some towels. Place the towels around the washing machine and disconnect the drain hose from the pipe. Hold it above the washing machine, so water doesn’t spill out. Grab your bucket and carefully lower the drain hose into it and let gravity do the work. Once the bucket is full, reconnect the drain hose back to the pipe so you can discard water into a sink or basin. Repeat until the drum is emptied. Check the pump and drain hose for any blockages. Your washer has a filtering device down and near the pump called a drain filter, check this filter for debris. You can test the drain pump with a multimeter. Unplug the appliance from the electrical outlet before you begin. Touch a probe to each of the terminals on the pump. A reading of zero or infinity, means the pump requires replacement. Part number: PS11756530. We hope this helps.
As soon as I turn the washing machine on, you will think everything is ok then it shuts itself off.
For model number 11026132410
Hello Margaret, Thank you for the question. Depending at what point of the cycle the appliance stops, you may need to replace the Lid Lock Assembly. When the Lock is defective it will prevent the appliance to start as a safety measure. We hope this helps!
Hello Heidi, Thank you for the question. The F5 E3 alert indicates there is issue with the lid lock and it will need to be replaced. We hope this helps!
1.) disconnect power to your washer. Turn off water supply and disconnect from the washer.
open the washer top and remove plastic cap from the wash plate
2.) using 7/16 socket, remove bolt from the wash plate. If you can't remove it with a socket , I recommend using impact wrench.
3.) remove wash plate ( you might need to spray penetrating oil or wd40 inside the bolt hole to loosen it. Check to make sure the wash plate gear grooves are not worn down, if they are, replace it.
4.) using your Maytag specific spaner nut wrench, remove the spaner nut from the shaft of the gear case. This should be right underneath where the wash plate was. If you can't turn it by hand , use a rubber mallet or hammer to encourage it.
5.) some people remove the wash basket at this point. I don't think it is necessary.
6.) close your washing machine. Tape the top closed to keep it from flying open. Tilt your washer back and prop it up where you have access to the underside of the washing machine.
7) remove motor rotor bolt and pull rotor off of the motor.
8.) disconnect the two wire connectors that supply power to motor. using a socket, remove bolts that are keeping motor attached to the gear case.
9.) Now that the gear case is all the is remaining on the underside, you can remove the 4 bolts that are holding the gear case to the washer. Now try to pull gear case out.
10.) if gearcase will not pull out, lower washer back to upright position. Spray penetrating oil or wd40 around the shaft of the gearcase and allow it to sit for 5-10 minutes. Using a hammer, lightly tap on the shaft of the gearcase and it should now fall out. ( you might have to apply penetrating oil again, or apply more force with the hammer.
11.) reinstall motor to new gearcase. Insert new gear case to the washer. Reinstall bolts and reconnect power supply wires.
12. ReInstall spaner nut inside the washer, reinstall wash plate.
Removed two screws on back of lid to raise top removed tub one bolt and one spanernut pulled tub lowered top reinstalled screws laid washer down to get to bottom of washer unplugged wiring removed four bolts pulled gear box and motor removed motor from gear box installed motor on new gear box reassemble washer
This product comes in a bottle with a brush like Liquid Paper. It goes on incredibly easy. A second coat might be needed. I wanted to prevent rust from setting in so I covered the scratches and dings. The paint is a little brighter since my washer is 10 years old but it still looks great.


 Diagram and Parts List for Kenmore Washer")