


10650022210 Kenmore Refrigerator - Overview
Sections of the 10650022210
[Viewing 13 of 13]


Keep searches simple, eg. "belt" or "pump".

Light Bulb - 40W
PartSelect #: PS884734
Manufacturer #: 8009
This an authentic OEM 40-Watt replacement light bulb, used in a number of household appliances. It is specially designed to withstand extreme temperatures, which is why these replacement bulbs are mos...
$24.14
In Stock
Order within the next 12 hrs and your part ships today!

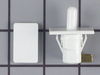
Refrigerator Lower Door Closing Cam
PartSelect #: PS11739042
Manufacturer #: WP2182179
The lower door closing cam is used in refrigerator doors, it can be located on the fresh food side or the freezer side. It helps hold the door open. This cam is made out of plastic, so it might crack ...
$14.04
In Stock
Order within the next 12 hrs and your part ships today!

Refrigerator Ice and Water Filter
PartSelect #: PS11701542
Manufacturer #: EDR1RXD1
The EDR1RXD1 water filter uses advanced filtration technology to reduce over 20 types of contaminants, including pharmaceuticals, pesticides, and lead. Certified to meet NSF/ANSI standards, it deliver...
29% OFF
$49.99
$69.99
In Stock
Order within the next 12 hrs and your part ships today!

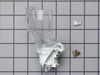
Refrigerator Crisper Drawer With Handle
PartSelect #: PS11739122
Manufacturer #: WP2188664
This OEM, clear convertible meat drawer can be used to store meats or vegetables and is designed for the lower portion of your refrigerator, generally. It has its own cold air duct to allow cold air f...
$98.90
In Stock
Order within the next 12 hrs and your part ships today!

Touch-Up Paint - White
PartSelect #: PS385132
Manufacturer #: 72017
This 18 ml bottle of white appliance touch-up paint is used to cover scratches or marks on your appliance. The white touch-up paint can be used on refrigerators, microwaves, ranges, clothes dryers, an...
$17.95
In Stock
Order within the next 12 hrs and your part ships today!

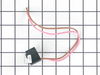
Refrigerator Bimetal Defrost Thermostat
PartSelect #: PS11750673
Manufacturer #: WPW10225581
If ice is building up in your freezer or if your freezer is getting too warm on the defrost cycle you may need to replace the bi-metal thermostat.
$47.95
In Stock
Order within the next 12 hrs and your part ships today!

Refrigerator Slide-Out Shelf with Glass
PartSelect #: PS11751713
Manufacturer #: WPW10276348
This OEM glass shelf assembly is designed for use in a variety of refrigerator models, offering reliable support and visibility for stored food items. It features a sturdy white plastic frame measurin...
$269.10
In Stock
Order within the next 12 hrs and your part ships today!

Gallon Door Bin - Clear
PartSelect #: PS11757236
Manufacturer #: WPW10710203
Need a new shelf bin for your fridge door? This clear bin fits select Whirlpool, Kenmore, and Maytag models and snaps right into place—no tools needed. It’s made from strong, food-safe plastic and is ...
$45.95
In Stock
Order within the next 12 hrs and your part ships today!

Refrigerator Screw
PartSelect #: PS11757021
Manufacturer #: WPW10661886
This mounting screw is a genuine OEM replacement part for the door handle in your refrigerator. If you are having trouble shutting the refrigerator door, or opening it, replacing this screw can help s...
$16.12
In Stock
Order within the next 12 hrs and your part ships today!

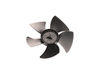
Evaporator Fan Blade
PartSelect #: PS11738973
Manufacturer #: WP2169142
If your refrigerator or freezer is too warm, or making noises, you may need to replace the fan blade. The fan blade attaches to the evaporator motor, which is in the freezer section, to help circulate...
$39.55
In Stock
Order within the next 12 hrs and your part ships today!

Screw
PartSelect #: PS11742755
Manufacturer #: WP489483
This screw is sold individually.
$17.33
In Stock
Order within the next 12 hrs and your part ships today!

Crisper Cover with Glass
PartSelect #: PS4082908
Manufacturer #: W10508993
This part is also known as a shelf frame. This drawer cover is for refrigerators.
Drawer cover has rail brackets under the cover that hold the drawer and allow the drawer to slide in and out on th...
$224.57
In Stock
Order within the next 12 hrs and your part ships today!
Common Symptoms of the 10650022210
[Viewing 21 of 21]Door won’t open or close
Fixed by
these parts
these parts


Show All
Fridge too warm
Fixed by
these parts
these parts

Show All
Noisy
Fixed by
these parts
these parts

Show All
Leaking
Fixed by
these parts
these parts


Show All
Ice maker won’t dispense ice
Fixed by
these parts
these parts


Show All
Ice maker not making ice
Fixed by
these parts
these parts


Show All
Light not working
Fixed by
these parts
these parts

Show All
Freezer not defrosting
Fixed by
these parts
these parts


Show All
Clicking sound
Fixed by
these parts
these parts


Show All
Freezer section too warm
Fixed by
these parts
these parts
Show All
Fridge and Freezer are too warm
Fixed by
these parts
these parts

Show All
Not dispensing water
Fixed by
these parts
these parts

Show All
Frost buildup
Fixed by
these parts
these parts


Show All
Fridge too cold
Fixed by
these parts
these parts
Show All
Door Sweating
Fixed by
these parts
these parts

Show All
Too warm
Fixed by
these parts
these parts
Show All
Freezer too cold
Fixed by
these parts
these parts
Show All
Will Not Start
Fixed by
these parts
these parts
Show All
Ice maker dispenses too much ice
Fixed by
these parts
these parts

Show All
Ice maker dispenses too little ice
Fixed by
these parts
these parts
Show All
Fridge runs too long
Fixed by
these parts
these parts
Show All


Keep searches simple. Use keywords, e.g. "leaking", "pump", "broken" or "fit".
Plastic bits dispensed from Ice Dispenser in Door
Removed Ice bin from Fridge
Removed all bolts on bin with nut driver...about six
Removed housing...be careful with spring on crusher/cube control rod
Removed C clamp on end of auger with small slotted screw driver and needle nose pliers.
Removed plastic nut on end of auger shaft
Removed Ice crusher jaws and laid them out in the correct order
Removed Ice propeller and installed new part
Put back together in opposite order
Easy
Parts Used:

-
john from seaford, VA
-
Difficulty Level:Easy
-
Total Repair Time:15 - 30 mins
-
Tools:Nutdriver, Pliers, Screw drivers, Socket set
205 of 254 people
found this instruction helpful.
Was this instruction helpful to you?
Thank you for voting!
Fridge was getting too warm, ice buildup on coils.
WARNING: REPLACING THIS PART REQUIRES CUTTING AND SPLICING ELECTRICAL WIRES. RISK OF ELECTRICAL SHOCK OR FIRE. DO NOT ATTEMPT THIS REPAIR IF YOU ARE NOT EXPERIENCED WITH ELECTRICAL WIRING.
Part Info:
The bi-metal strip is clipped onto the evaporator coils and is designed to regulate the defrost coil temperature. If it is not functioning properly you may notice ice buildup preventing air flow (and preventing proper refrigeration), or more rarely the freezer side may get too warm during the defrost cycle.
Materials:
* Replacement bi-metal strip
* Wire cutters
* Wire strippers
* Wire nuts
* Electrical tape
* 10MM socket
Steps:
1: UNPLUG THE FRIDGE! If there is ice buildup, wait until the ice has melted. A box fan blowing at the ice will help melt it more quickly.
2: Remove the panel covering the evaporator coils. It's located inside the fridge, on the freezer side.
3: Un-clip the bi-metal strip from the evaporator coils.
4: Unplug the wires from the evaporator fan, defrost coil and bi-metal strip, then disconnect the main connector that is plugged into the rear wall.
5: Clip both wires to the old ( bad ) bi-metal strip. Cut close to the casing of the bi-metal strip so there are long wires to splice onto.
6: Strip 1/4 to 1/2 inches of insulation off of the ends of the wires ( depending on the size of the wire-nuts you use). Twist the bare wires slightly to prevent fraying.
7: Do the same for the ends of the wires on the (new) bi-metal strip.
8: Take the ends of the wires belonging to the (new) bi-metal strip and the wires coming from the main plug. Take the like-colored wires, and twist the bare metal ends together.
9: Twist on wire nuts, for both sets of wires. Make sure they are snug, with no bare wire showing.
10: Tape over the wire nuts with electrical tape. Tape over the wires nuts in a spiral fashion, completely covering the nut and both wires that are now spliced together. This will prevent accidental shorting.
11: Plug the main plug back into the rear wall of the fridge. Also re-connect the connectors to the evaporator fan and defrost coil. Make sure the clips on the connectors are snug to ensure a good connection.
12: Clip the new bi-metal strip onto the coils, in the same spot as before. ( Usually just after the small incoming copper tubing that connects to the coils, known as the expansion valve. That is usually the coldest spot on the coils during operation).
13: Replace the panel that covers the coils.
14: Plug the fridge back in... Now you fridge should defrost correctly. If it does not, your defrost coil could be burned out, or the control board could be faulty.
Parts Used:
-
Cathy from Winter Park, FL
-
Difficulty Level:A Bit Difficult
-
Total Repair Time:15 - 30 mins
-
Tools:Nutdriver
159 of 186 people
found this instruction helpful.
Was this instruction helpful to you?
Thank you for voting!
evaporator fan stopped working
1) removed the face plate that runs 3/4 way up the back of the freezer side. a total of 8 screws. (6")
2) disconnected the three electrical connections.(30sec)
3) removed the fan of the the old evaporator fan motor (5sec)
3) removed the fan motor (1")
4) put in the new fan motor (1")
5) put on the old fan on the new fan motor(5sec)
6) reconnected the three electrical connections (30sec)
7) replaced the face plate on the back of the freezer (6")
Had re-frozen meat within 1 hour.
Parts Used:

-
Antoni from vail, AZ
-
Difficulty Level:Really Easy
-
Total Repair Time:Less than 15 mins
-
Tools:Pliers, Screw drivers
97 of 107 people
found this instruction helpful.
Was this instruction helpful to you?
Thank you for voting!