


How To Fix A Dryer That Won't Tumble

by Steve Ash
A dryer that’s not tumbling can be frustrating and repairing it through a serviceman can be expensive. Even for someone who may not consider themselves handy, repairing a dryer is not a difficult process. Below we've provided you with a list of the most common parts that fix a dryer that’s not tumbling. Use this information to help troubleshoot which part is broken, and then enter your model number in the search box to find the right part for you, along with tons of helpful information like our step by step installation videos and instructions.
Belt
Dryers use a belt connected to a motor to turn the drum. Overtime the belt can wear out or become brittle. If the dryer isn’t tumbling then inspect the belt to see if it is worn or broken. The belt should be flexible and have lots of grip on both sides. You will need to disconnect the power and remove the front panel to replace the belt.


More About This Repair
- Customers rate this repair as Easy
- less 30 - 60 minutes
We have 482 installation instructions
We have 3 step-by-step videos
Idler Pulley Assembly
The idler pulley assembly on a dryer is used to provide tension on the drum belt so that the belt will not slip on the drive motor pulley or drum when the dryer has a load in it. The idler pulley rotates at high speed and over time may fail due to increased friction. One of the symptoms created is a squeaking or squealing noise that can progress to a loud scraping or thumping noise in time.
Another symptom is the loss of traction of the belt on the drum, resulting in a slow or non tumble condition. With the belt removed the idler pulley should turn freely on the shaft with no play. Also, check the shaft for signs of wear and replace if required. The spring tension should pull the belt tight and if not then the spring or assembly will need to be replaced. The idler pulley and shaft are normally located next to the drive motor at the bottom of the dryer and can be serviced with the lower access panel or front panel removed.
Another symptom is the loss of traction of the belt on the drum, resulting in a slow or non tumble condition. With the belt removed the idler pulley should turn freely on the shaft with no play. Also, check the shaft for signs of wear and replace if required. The spring tension should pull the belt tight and if not then the spring or assembly will need to be replaced. The idler pulley and shaft are normally located next to the drive motor at the bottom of the dryer and can be serviced with the lower access panel or front panel removed.


More About This Repair
- Customers rate this repair as Easy
- 30 - 60 minutes
We have 191 installation instructions
We have 5 step-by-step videos
Maintenance Kit
Some dryer manufacturers produce a dryer maintenance kit that consists of the typical parts that might fail with normal use. The kits will typically include parts that may cause the drum to not tumble such as belts, idler pulley, drum rollers or bearings. Once you determine which part or parts that have failed, you may find it more economical to purchase a maintenance kit.


More About This Repair
- Customers rate this repair as Easy
- 30 - 60 minutes
We have 36 installation instructions
We have 0 step-by-step videos
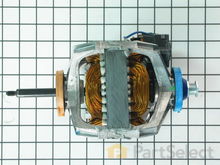
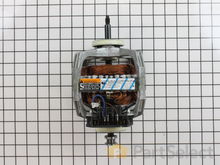
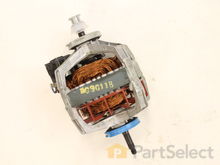
Drive Motor
Gas and electric dryers have a motor that turns the blower and the dryer drum. A defective motor can cause your dryer to not start or tumble and may even produce a humming noise from a bad winding or switch on the motor. To check for a defective motor you will need to remove the front panel and the drum to gain access. You will then need to supply line voltage to the proper terminals on the motor to verify if it is defective. This is a live voltage test and should only be performed by qualified persons.
More About This Repair
- Customers rate this repair as Easy
- 1 - 2 hours
We have 111 installation instructions
We have 1 step-by-step videos
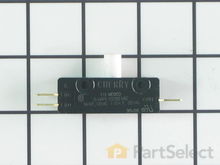
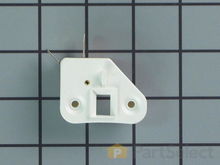
Door Switch
On all dryers, the door switch allows the dryer to start tumbling only when the door is closed. If the dryer does not tumble when the door is closed then the door switch may be defective. In most brands of dryers, the switch is located behind the front panel with the switch button protruding into the door opening. The switch and can be tested with a multi-tester for continuity and it may have two or more terminals. The test should be made between the terminals marked “C” and “NO” and should read “0” ohms when the door is closed or the button is depressed. This test should only be made with the power removed from the dryer.
More About This Repair
- Customers rate this repair as Easy
- 15 - 30 minutes
We have 191 installation instructions
We have 5 step-by-step videos