


See part K250 in the diagram
( Grid squares measure 1x1 inch )


Get in touch, we're here to help!
1-866-883-8386
Monday to Saturday
8am - 8pm EST
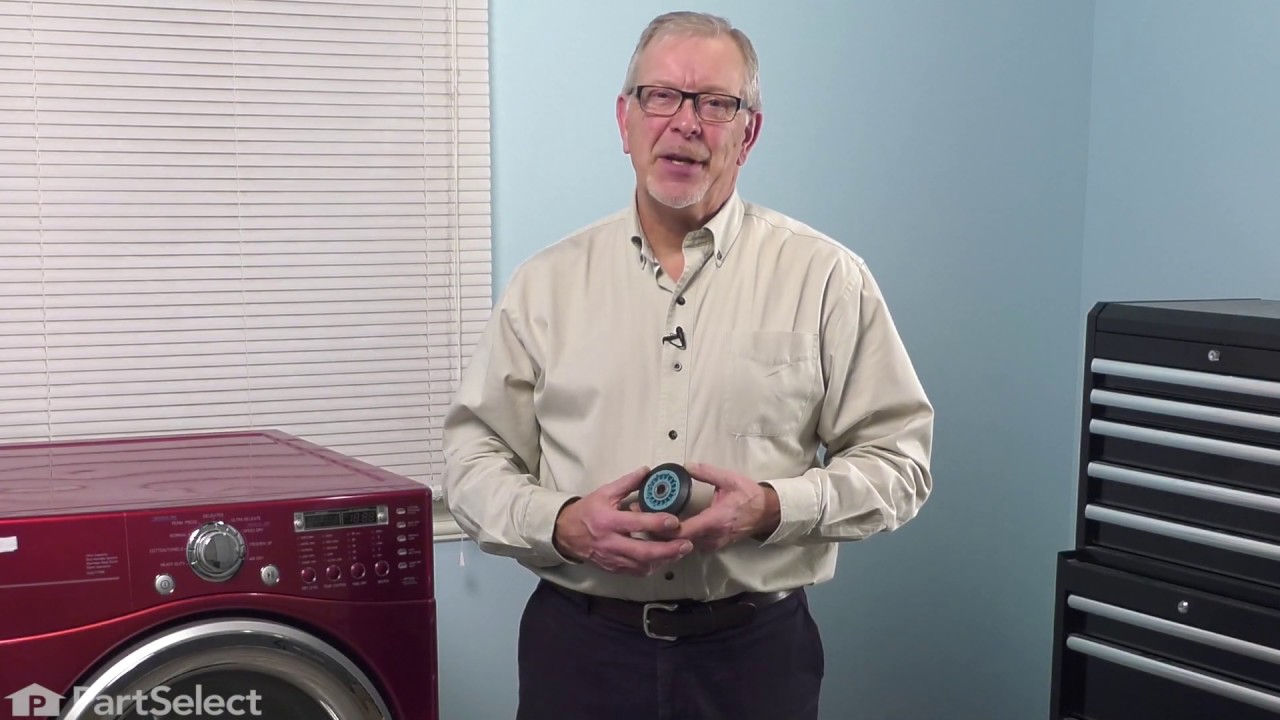
4 PACK ROLLER ASSEMBLY 4581EL2002L
$182.93
In Stock
Does this part fit my model?
Need help finding your model number?PartSelect Number
PS17269866
Manufacturer Part Number
4581EL2002L
Manufactured by
LG
Product Description
4 PACK ROLLER ASSEMBLY Specifications
The drum support roller for your dryer holds the drum in place while the drum turns on the support wheels. The drum roller is round with a bearing in the middle and measures approximately 3 inches in diameter. If the dryer is noisy, won’t tumble, or takes too long to dry, you might need to replace the support roller. It is recommended that you replace both rollers at once. The bearing inside this roller is self-lubricating, so no grease will be required. Please remember to disconnect the power to your appliance before starting your repair. This is a genuine OEM part.

How Buying OEM Parts Can Save You Time and Money
Troubleshooting
This part fixes the following symptoms:
Noisy | Drum Not Spinning
This part works with the following products:
Dryer, Washer Dryer Combo, Washer.
This part works with the following products:
LG, Kenmore, General Electric.
Part# 4581EL2002L replaces these:
4581EL2002A, 4581EL2002B, 4581EL2002C, 4581EL2002D, 4581EL2002E, 4581EL2002H, 4581EL2002J, 4581EL3001A, 4581EL3001C, 4581EL3001E, 4581EL3001F, AGM75510755
Customer Reviews
Filter By Rating:
- < Prev
- 1
- 2
- Next >
Sort by:
Search filter:
Clear Filter
Your search term must have 3 or more characters.
Keep searches simple. Use keywords, e.g. "leaking", "pump", "broken" or "fit".
Sorry, we couldn't find any existing reviews that matched. Try using some different or simpler keywords.
Linda O - June 13, 2025
Verified Purchase
Better than buying a new dryer
Husband and I are over 70. We took dryer apart in kitchen, thanks YouTube. Rollers were easy to install and now my dryer is running quiet.
Emile C - November 14, 2025
Verified Purchase
Part worked excellent
The part arrived on time and the YouTube video on how to install was easy to follow. Dryer sounds almost as good as new
Craig&Amy K - June 22, 2021
Verified Purchase
Roller repair with updated part.
I needed to order another roller/axle from parts select,as the other one I preferred did not come with the axle as stated. Much better with sealed roller bearings instead of a greased bushing. Ensure it comes with a new axle for the updated roller as the original roller axle is much larger in diameter and is not compatible.
Christina H - November 12, 2021
Verified Purchase
Fit perfectly
Looked different than the original part but worked perfectly and easy to install.
GRAHAM B - September 9, 2021
Verified Purchase
LG Dryer rollers
The lady I dealt with was extremely helpful and professional. The parts arrived within two days and after viewing YouTube for complete installation instructions all four drum rollers were replaced and it works fine now. No doubt if I had to have a service man do the work it would not have been worth the cost. I pretty sure the lady I spoke to was Mona and I would like to thank her for processing my order. She was great!
Jeff R - April 29, 2022
Verified Purchase
Dryer Repair
Call in support was fantastic. Together we identified the correct parts. Parts arrived in a couple days as expected and with all the correct parts. Dryer is back in business thanks to the Team at PartSelect
Jack M - July 20, 2021
Verified Purchase
dryer roller assembly
Was easy to install works good
Brad S - September 23, 2021
Verified Purchase
The right parts , fantastic phone service by one of your east coast operators,Joanne , the best experience I could hope for!
All parts needed were included. Arrived the next business day.
Lawrence H - April 6, 2021
Verified Purchase
Dryer roller assembly.
The dryer roller was a little different from the original in the dryer but it fit all the needs required just the same. All back together in 15-20 minutes and functioned serviceable. Fast delivery of the part was impressive to me!! Thanks and Cheers!!
Jim P - February 25, 2022
Verified Purchase
Worked perfect
Part was great. Fit perfect. Unfortunately, the circuit board died shortly afterwards rendering my fix irrelevant.
- < Prev
- 1
- 2
- Next >
Customer Repair Stories
Average Repair Rating: 2.9 / 5.0, 21 reviews.
What's this?
- < Prev
- 1
- 2
- 3
- Next >
Sort by:
Search filter:
Clear Filter
Your search term must have 3 or more characters.
Keep searches simple. Use keywords, e.g. "leaking", "pump", "broken" or "fit".
Sorry, we couldn't find any existing installation instruction that matched.
Dryer making a thumping and squealing noise when running
Had to replace front drum support rollers. Removed screws underneath top in back that held bracket that keeps top in place. Slid top towards rear and lifted up. Removed 4 screws that hold plastic front panel in place (inside..2 on each corner) Unplugged front panel electric plugs to remove panel. Opened door..removed 2 screws at bottom of door opening. Removed screws on top of front panel. Unplugged door switch plug. Removed front panel. Removed right front roller with 9/16th wrench for nut. Adjustable for back of stud. Lifted up on drum to get roller out. Reversed to install. Left roller a bit harder to get to stud. Removed and installed same as right side. Did not attempt to replace rear rollers. Have them if needed but very much more involved to replace.
Other Parts Used:
-
Mark from WAVERLY, OH
-
Difficulty Level:Easy
-
Total Repair Time:30 - 60 mins
-
Tools:Screw drivers, Wrench (Adjustable), Wrench set
128 of 162 people
found this instruction helpful.
Was this instruction helpful to you?
Thank you for voting!
Screeching during operation
Found disassembly video and watched several times. Suspected that one of the drum wheels had seized up. Found extreme volume of lint and hair inside unit as well as a dryer sheet melted on top of heating unit. Front left drum wheel was worn down from lint and hair jamming its movement. Video made it easy, not a really complicated piece of machinery. Replaced all 4 wheels due to normal wear on other three. Wanted to be sure drum evenly balanced on all 4. Parts came quickly and were easy to install. My sister and I did this together. Would not recommend doing it alone. Took time to vac and wipe down entire unit. Now it runs so quiet we have to look to see if it is operating. Got a brand new machine out of it, saved a couple of hundred dollars in repair bills, and found 11 cents inside the machine. For your own piece of mind, if you have had your dryer for several years, you need to open it up and clean it out. Its not hard... added note, we are both in our 60's... so if we can do it so can you.... Such a feeling of accomplishment, can't buy that in a store....
Other Parts Used:
-
CAROL from NAMPA, ID
-
Difficulty Level:Really Easy
-
Total Repair Time:More than 2 hours
-
Tools:Pliers, Screw drivers
64 of 93 people
found this instruction helpful.
Was this instruction helpful to you?
Thank you for voting!
Very noisy when running
We bought 2 roller wheels to replace the ones up front that turn the drum. We watched a video prior to ordering the parts, then followed along with it as we did the repair. It was really easy to complete, with the hardest part being getting some of the screws to loosen at first. Now it purrs like a kitten. We are so happy to have silences the racket. One wheel was completely worn away, with shreds of rubber sitting inside the cabinet.
Other Parts Used:
-
CAROLYN from LEBANON, TN
-
Difficulty Level:Easy
-
Total Repair Time:30 - 60 mins
-
Tools:Screw drivers, Socket set
17 of 22 people
found this instruction helpful.
Was this instruction helpful to you?
Thank you for voting!
Noisy when drying. A bumping noise

-
Arthur from SOUTHLAKE, TX
-
Difficulty Level:Really Easy
-
Total Repair Time:30 - 60 mins
-
Tools:Screw drivers, Socket set, Wrench set
13 of 13 people
found this instruction helpful.
Was this instruction helpful to you?
Thank you for voting!
1 of 4 Drum Rollers Froze Preventing drum rotation.
Replaced idle pulley wheel, worn drum belt and all 4 rollers (1 frozen) due to dryer age. Site video re general disassembly/re-assembly easily adapted to this model and very helpful with exception of replacement of drum rollers. New rollers received (AGM75510755) were pre-mounted on included shafts. This required removal of existing roller shafts to replace with new shaft/roller units. Site video shows placing a new roller on existing shafts after removing a plastic retaining clip. New roller/shaft assembly is a better option and fortunately I did not order extra retainer clips! Rear drum roller shafts have small carved out space to fit a box end wrench to remove shaft nut. Watch out for sharp edges on internal steel parts!
Other Parts Used:

-
Mark from OSHKOSH, WI
-
Difficulty Level:Easy
-
Total Repair Time:1- 2 hours
-
Tools:Pliers, Screw drivers, Socket set, Wrench set
11 of 11 people
found this instruction helpful.
Was this instruction helpful to you?
Thank you for voting!
LG dryer making loud noise (older model)
I followed a Repair Clinic Urube video except the video had a model with the controls in front and my dryer has the controls on a back panel. The difference was in how to get the top of the dryer off after removing all the screws. The video
said to push back on the top panel which did not work because of the back controls. Instead I had to push up on the front to release it and then push back. The rollers were also in a slightly different place but were easily found and replaced. The dryer is now back to normal.
said to push back on the top panel which did not work because of the back controls. Instead I had to push up on the front to release it and then push back. The rollers were also in a slightly different place but were easily found and replaced. The dryer is now back to normal.
Other Parts Used:
-
Darline from DREXEL, MO
-
Difficulty Level:Easy
-
Total Repair Time:1- 2 hours
-
Tools:Screw drivers, Socket set, Wrench (Adjustable)
11 of 11 people
found this instruction helpful.
Was this instruction helpful to you?
Thank you for voting!
Replace 4 roller bearings.
Following the reference video, step by step and taking progress photos along the way, organizing screws and hardware as they were removed.
The discrepancy I found was the new rollers that I received were complete with the shaft. The video with the older rollers instruct removing the rollers from the shaft.
To use the new rollers with the new shaft, requires removing an additional panel at both the front 2 and also the full back panel for the rear 2, to get a wrench on both ends of the shaft, and then attach the new roller bearing shaft assembly and re-install the panel.
Other than that, it went very smoothly and the result was a quiet rotating drum. No more thumping!
My dryer actually required 2 moisture sensors, but had only ordered one pack, which only came with 1 sensor. For whatever reason, I thought the pack would have had the 2 pieces.
Another reviewer made note to wear work gloves as some of the hardwares metal edges are quite sharp. Following that advice I completed the repair in 3 hours without a scratch. Thanks for the detailed video Partselect team and good luck to all attempting repairs.
Other Parts Used:

-
ed from NATICK, MA
-
Difficulty Level:Easy
-
Total Repair Time:More than 2 hours
-
Tools:Nutdriver, Pliers, Screw drivers, Socket set
10 of 11 people
found this instruction helpful.
Was this instruction helpful to you?
Thank you for voting!
Loud thumping when dryer was turned on
Completly disassembled dryer removed 2 rear rollers installed 2 new rollers. Reassemble dryer in including new drum belt. Dryer is nice and quiet again running fantastic, thank you for your support
Other Parts Used:
-
Barry from ROSELLE PARK, NJ
-
Difficulty Level:Very Easy
-
Total Repair Time:30 - 60 mins
-
Tools:Screw drivers, Wrench (Adjustable), Wrench set
9 of 9 people
found this instruction helpful.
Was this instruction helpful to you?
Thank you for voting!
Frozen up roller on rear of dryer
Removed top of dryer
I carefully removed wires from back of control panel
Removed control panel
Most of screws hold cabinet together
Unhook wire from light on door and sensor on the front panel.
Remove the front door and panel together
I changed both front rollers on front panel
If you have to change rear rollers lift tub up by belt
Remove screws on back of dryer that will let you lift out inside rear panel that holds the rear rollers
Change rollers and just revearse procedure to put back together
Other Parts Used:
-
Joseph from PIQUA, OH
-
Difficulty Level:Easy
-
Total Repair Time:1- 2 hours
-
Tools:Pliers, Screw drivers, Socket set
8 of 8 people
found this instruction helpful.
Was this instruction helpful to you?
Thank you for voting!
Drum roller seized up
Handed the parts to my son-in-law he's very mechanically inclined had the job done in 20 minutes
Other Parts Used:
-
chet from WIMAUMA, FL
-
Difficulty Level:Easy
-
Total Repair Time:30 - 60 mins
-
Tools:Nutdriver, Screw drivers
8 of 10 people
found this instruction helpful.
Was this instruction helpful to you?
Thank you for voting!
- < Prev
- 1
- 2
- 3
- Next >
Questions and Answers
We're sorry, but our Q&A experts are temporarily unavailable.
Please check back later if you still haven't found the answer you need.
- < Prev
- 1
- Next >
Sort by:
Search filter:
Clear Filter
Your search term must have 3 or more characters.
Keep searches simple. Use keywords, e.g. "leaking", "pump", "broken" or "fit".
Sorry, we couldn't find any existing answers that matched.Try using some different or simpler keywords, or submit your new question by using the "Ask a Question" button above!
Lawrence
March 15, 2024
What is the procedure to replace the original drum rollers with these new ones?
Part number 458EL2002L
For model number DLE2516W

Hello Lawrence, thank you for your question. The Roller is PS12749664 and sold individually. Good luck with this repair.
4 people found this helpful.
Was this helpful?
Thank you for voting!
Max
March 7, 2025
Do all the replacement wheels have the ball bearings like mentioned in a video I saw regarding replacing the rollers?
For model number LG Senson Dry DLEX4370K
Hi Max,
Thank you for your question. Yes, the rollers do contain ball bearings. We hope this helps!
Was this helpful?
Thank you for voting!
- < Prev
- 1
- Next >
Related Parts

$83.58
In Stock
Dryer Drum Belt
$83.58
PartSelect Number: PS11705916
The drive belt is made to wrap around the drum, working with the tension pulley to rotate the drum. If your dryer drum will not turn, then you may need to replace your belt. This drive belt is 1/4-inch wide with 4 ribs a... 
$27.28
In Stock
Produce Preserver Filter
$27.28
PartSelect Number: PS3503014
Fresh Flow Produce Preserver is made for your refrigerator to help keep produce fresh for longer by absorbing the chemical, ethylene, that causes your fruits and vegetables to ripen quicker. Your produce could be fresh f... 
$25.31
In Stock
Affresh Washing Machine Cleaner - 3 pack
$25.31
PartSelect Number: PS1960673
Having a problem with a funky-smelling washing machine, or one that just doesnt seem to clean your clothes as well as it used to? Say hello to the Affresh Washing Machine Cleaner by Whirlpool. This powerful washing helpe... 
$21.95
In Stock
Affresh Dishwasher Cleaner Tablets - 6
$21.95
PartSelect Number: PS12345667
Affresh dishwasher Cleaner is specially formulated to help remove limescale and mineral build-up that can be unsightly and could affect your dishwasher's performance. Each tablet is designed to clean inside your machine ... 
$37.89
In Stock
Refrigerator Deodorizer
$37.89
PartSelect Number: PS12739141
Refrigerator deodorizers help to reduce bacteria growth and therefore reduce smells and extend the life of food. 
$32.93
In Stock
Cooktop Cleaning Cream
$32.93
PartSelect Number: PS12717774
Make your cooktop shine with Frigidaire ReadyClean Glass and Ceramic Cleaner. Our scratch-free, streak-free formula removes smudges, grease, burnt-on food, dirt and oil, while protecting and polishing to repel dust and d... 
$35.68
In Stock
Model Cross Reference
This part works with the following models:
PartSelect Number: PS17269866
Manufacturer Part Number: 4581EL2002L
Manufacturer Part Number: 4581EL2002L
Brand
Model Number
Description
Get in touch, we're here to help!
1-866-883-8386
Monday to Saturday
8am - 8pm EST