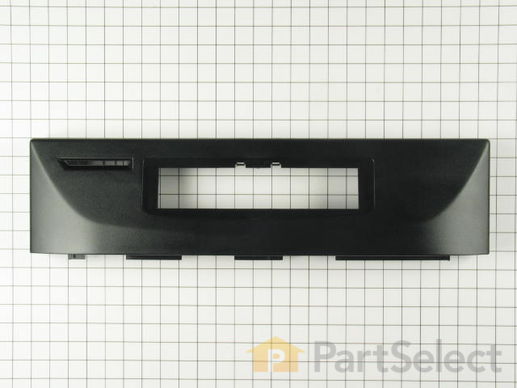
Part Location Diagram of WP9743591 Whirlpool Control Panel - Black
See part 1 in the diagram
( Grid squares measure 1x1 inch )
Customer Service Representative

Get in touch, we're here to help!

Daily 8am - 9pm EST

customerservice@partselect.ca

Control Panel - Black

$163.23
  Special Order
PartSelect Number PS11747085
Manufacturer Part Number WP9743591
Manufactured by Whirlpool
Product Description

Control Panel - Black Specifications

This panel does not include the touchpad insert.
How Buying OEM Parts Can Save You Time and Money

How Buying OEM Parts Can Save You Time and Money

Troubleshooting
This part fixes the following symptoms:
Door latch failure
This part works with the following products:
Dishwasher.
This part works with the following products:
KitchenAid.
Part# WP9743591 replaces these:
AP6013858, 9743340, 9743341, 9743577, 9743578, 9743591, 9743592, 9743744, 9743745, 9743753, 9743754, WP9743592
Back to Top
Customer Repair Stories
 Average Repair Rating: 3.6 / 5.0, 6 reviews. What's this?
  • 1
Sort by:
Sorry, we couldn't find any existing installation instruction that matched.
Bought new ref. and stove and it didn't match in color
No repair just changing color. As a women I went online and ordered all the parts I thought I would need and they arrived within a few days. Everything went together perfect. We used the parts list from online. First time everything was right and worked perfect. My husband put everything together and I kept my fingers crossed.
Other Parts Used:
Access Panel Door Handle Control Panel Insert - Black Toe Panel with Insulation Panel, Front (Black)
  • SUSAN from CLEARWATER, FL
  • Difficulty Level:
    Really Easy
  • Total Repair Time:
    1- 2 hours
  • Tools:
    Nutdriver, Screw drivers
14 of 46 people found this instruction helpful.
Was this instruction helpful to you?
Thank you for voting!
control panel cracked and touch pad worn through
I had changed dishwasher in the house I now live in with the dishwasher in the house that I'm moving to. The KitchenAid had a worn touch pad so I decided to change in when I had them out. On removing the control panel I found it to be cracked on both sides. I was able to order both parts from PartSelect at a much lower price and received them much quicker.
Thank You.
Other Parts Used:
Control Panel Touch Pad Insert - White
  • Paul from Vermillion, SD
  • Difficulty Level:
    Really Easy
  • Total Repair Time:
    15 - 30 mins
7 of 17 people found this instruction helpful.
Was this instruction helpful to you?
Thank you for voting!
The four Torkx screw studs on the black plastic control panel assembly broke off. The dishwasher was useless.
I wish I knew a couple of things before doing this repair. 1) As you take off the panel, remove slowly and pay close attention to how the latching mechanism and spring works, 2) The mylar cover over all of the buttons (the panel that say s "Kitchenaid Superba, on, off, etc) does not come with the panel and costs $45 more. I was determined to save it. I used a flat Xactor blade to separate it from the broken control panel. As careful as I tried to be, I cut it a few times. Had I known I was dealing with a contact cement, I would have known to get it started and slowly peel it off. It will readhere to the new control panel without new adhesive. I replaced the vinyl waterproof cover for the circuit board, and installed the latching mechanism and spring. I positioned the new panel and screwed in the four screws. It works fine.
Other Parts Used:
  • Andrew from Peachtree City, GA
  • Difficulty Level:
    A Bit Difficult
  • Total Repair Time:
    30 - 60 mins
  • Tools:
    Screw drivers
6 of 6 people found this instruction helpful.
Was this instruction helpful to you?
Thank you for voting!
We had to change the color of the dishwasher as the almond color insert was no longer available. We had just changed the other appl. color earlier.
First the parts arrived quickly. Unscrewed the holding screws removed the console. Had to unscrew the touch pad. Remove the foam pad by the vent and use it on the new console. Remove the black plastic shield and transfer it to the new console. Most difficult part was removing the door opening handle and transfer it to the new console. Install the touchpad, install the console then apply the console panel insert.
Other Parts Used:
Dishwasher Panel Insert - Black
  • Stephen from Farmington, NH
  • Difficulty Level:
    Easy
  • Total Repair Time:
    30 - 60 mins
  • Tools:
    Nutdriver, Screw drivers
3 of 6 people found this instruction helpful.
Was this instruction helpful to you?
Thank you for voting!
several of the locations of the mounting screws for the panel had broken, and the latch mechanism became unreliable
after removing the fascia below the control panel (optional wood inlay in this case), remove the 4 phillips screws holding the control panel. it can be eased away from the door assembly, and fully separated after the two electrical connectors are detached from the circui board in the door (disconnect power to the unit before attempting this). The plastic control screen must be gently pried off from the old panel and repositioned on the new one. You may need to add some adhesive. The latch mechanism also needs to be transferred, and this requires careful prying. Replace the electrical connections, and replace the control panel. Be certain the large flanges at the bottom of the panel are behind the metal panel on the door. There are some small flanges that stay on the outside. On this installation the small extensions on the flanges were snipped off to accommodate the custom wood panel
Other Parts Used:
  • Jeffrey from Nashville, TN
  • Difficulty Level:
    Easy
  • Total Repair Time:
    15 - 30 mins
  • Tools:
    Screw drivers
2 of 3 people found this instruction helpful.
Was this instruction helpful to you?
Thank you for voting!
door handle and control panel broken
remove the top 4 screws, tilt out, pull up and away from door. remove screws holding circut board. lay panel on counter and remove metal rod and put in new handle, it can only go one way. install handle into panel and snap in place. reinstall circut board, slide bottom of panel in first, reinstall 4 screws.15-20 min job. I also installed a new cover over the front panel because the old one was bad.
Other Parts Used:
Door Handle
  • doug from south bend, IN
  • Difficulty Level:
    Really Easy
  • Total Repair Time:
    Less than 15 mins
  • Tools:
    Screw drivers
1 of 4 people found this instruction helpful.
Was this instruction helpful to you?
Thank you for voting!
  • 1
Questions and Answers

Be the first to ask our experts a question about this part!

Related Parts
Model Cross Reference
This part works with the following models:
PartSelect Number: PS11747085
Manufacturer Part Number: WP9743591
Brand
Model Number
Description
KitchenAid
KUDI24SEAL0
Dishwasher
KitchenAid
KUDI24SEAL1
Dishwasher
KitchenAid
KUDI24SEAL2
Dishwasher
KitchenAid
KUDI24SEAL3
Dishwasher
KitchenAid
KUDI24SEAL4
Dishwasher
KitchenAid
KUDI24SEAL5
Dishwasher
KitchenAid
KUDI24SEBL0
Dishwasher
KitchenAid
KUDI24SEBL1
Dishwasher
KitchenAid
KUDI24SEBL2
Dishwasher
KitchenAid
KUDI24SEBL3
Dishwasher
KitchenAid
KUDI24SEBL4
Dishwasher
KitchenAid
KUDI24SEBL5
Dishwasher
KitchenAid
KUDI24SEWH0
Dishwasher
KitchenAid
KUDI24SEWH1
Dishwasher
KitchenAid
KUDI24SEWH2
Dishwasher
KitchenAid
KUDI24SEWH3
Dishwasher
KitchenAid
KUDI24SEWH4
Dishwasher
KitchenAid
KUDI24SEWH5
Dishwasher
KitchenAid
KUDM24SEAL0
Dishwasher
KitchenAid
KUDM24SEAL1
Dishwasher
KitchenAid
KUDM24SEAL2
Dishwasher
KitchenAid
KUDM24SEAL3
Dishwasher
KitchenAid
KUDM24SEAL4
Dishwasher
KitchenAid
KUDM24SEAL5
Dishwasher
KitchenAid
KUDM24SEBL0
Dishwasher
KitchenAid
KUDM24SEBL1
Dishwasher
KitchenAid
KUDM24SEBL2
Dishwasher
KitchenAid
KUDM24SEBL3
Dishwasher
KitchenAid
KUDM24SEBL4
Dishwasher
KitchenAid
KUDM24SEBL5
Dishwasher
Customer Service Representative

Get in touch, we're here to help!

Daily 8am - 9pm EST

Contact Customer Service