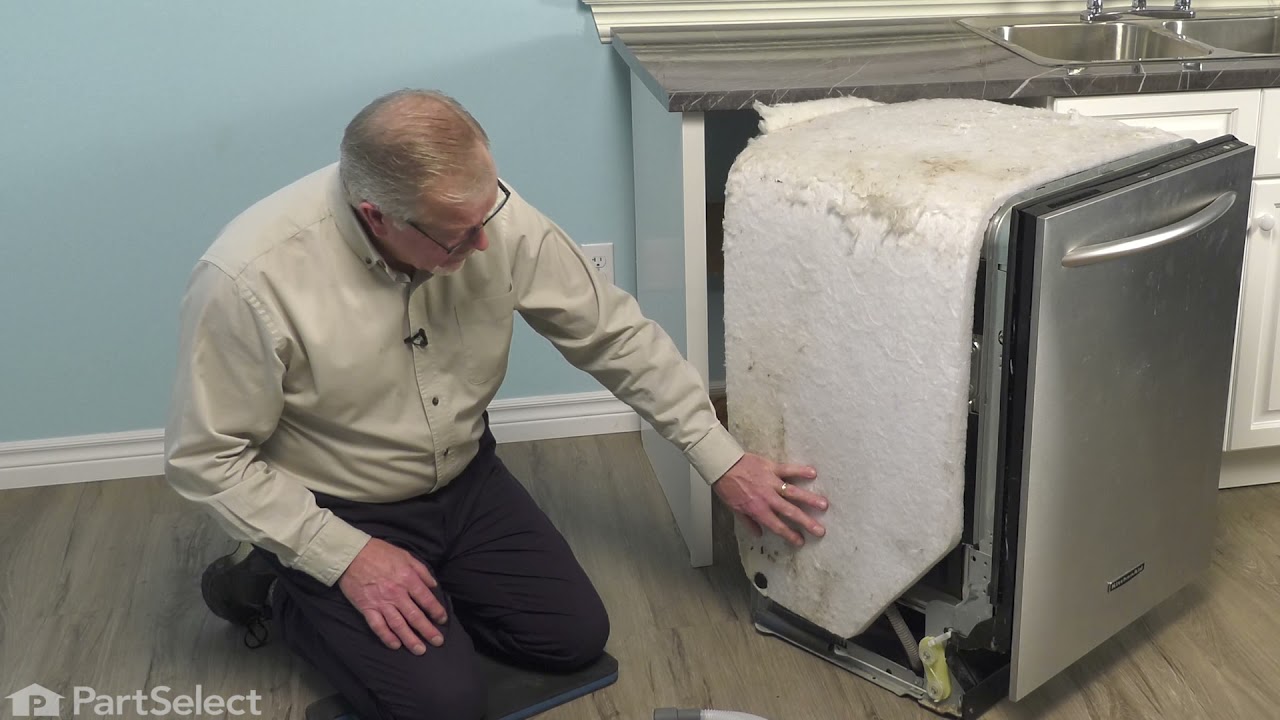
Having trouble with your dishwasher? This genuine Whirlpool Air Vent Gasket could be just what you need to fix it. This important piece of equipment ensures a secure seal between your dishwasher's door panel and vent duct. Why does this matter? It helps your dishwasher operate more efficiently and keeps it working better for longer. This Air Vent Gasket is straight from the manufacturer, so you can be confident that it's a perfect fit. Plus, it's compatible with a wide range of appliances. Not only does it fit various Whirlpool models, it's also right for many KitchenAid, Maytag, Jenn-Air, Amana, Inglis, and Magic Chef dishwashers. Just make sure to check your model number before placing your order. Before installing your new Air Vent Gasket, remember safety first: don't forget to switch off the circuit breaker or unplug your appliance. And while you're at it, consider wearing work gloves to protect your hands. With the correct installation of this OEM part, your trusty dishwasher could soon be operating like it's brand new again. Restore its optimal functionality and extend its life with this genuine Whirlpool Air Vent Gasket. Consider it a small investment into the longevity of an appliance you rely on daily.
How Buying OEM Parts Can Save You Time and Money
Troubleshooting
This part fixes the following symptoms:
Leaking
This part works with the following products:
Dishwasher.
This part works with the following products:
Kenmore, KitchenAid, Whirlpool, Maytag.
Part# WP8269259 replaces these:
AP6012299, 8269259
Customer Reviews
Average Rating:
★★★★★
★★★★★
3 Reviews
4.7
Filter By Rating:
5 Stars
2
4 Stars
1
3 Stars
0
2 Stars
0
1 Star
0
< Prev
1
Next >
Sort by:
Search filter:
Clear Filter
Your search term must have 3 or more characters.
Keep searches simple. Use keywords, e.g. "leaking", "pump", "broken" or "fit".
Sorry, we couldn't find any existing reviews that matched. Try using some different or simpler keywords.
★★★★★
★★★★★
Stan S - September 1, 2018
Verified Purchase
Prefect fit
Fast service, Quality part
★★★★★
★★★★★
Peter G - February 2, 2021
Verified Purchase
Fast delivery
The part is great and fast delivery but it didn't fix my issue. I have now ordered a different part hoping it will be the right one.
★★★★★
★★★★★
Dave G - December 11, 2023
Verified Purchase
Arrived quick but ecpensive
Expensive for a rubber gasket. Replaced but still leaked, had to back up with a little silicone, now is okay. 4 star is because the parts from EA always arrive quickly with no hassles. Parts prices from all suppliers seem way too high
< Prev
1
Next >
Questions and Answers
We're sorry, but our Q&A experts are temporarily unavailable.
Please check back later if you still haven't found the answer you need.
5 questions answered by our experts.
< Prev
1
Next >
Sort by:
Search filter:
Clear Filter
Your search term must have 3 or more characters.
Keep searches simple. Use keywords, e.g. "leaking", "pump", "broken" or "fit".
Sorry, we couldn't find any existing answers that matched.Try using some different or simpler keywords, or submit your new question by using the "Ask a Question" button above!
Charles
August 3, 2017
Part select number: Ps11745506. I need installation instructions for this air vent gasket. Do you have them? I couldn't find anything on your web site.
Hi Charles,
Thank you for the great question. You will have to start by first turning off the electricity to your appliance. Then you will unscrew all of the screws holding the inner and outer panels of your door together.
You will need to remove the back panel of your door. Separate the two panels and then rotate the electronic control board retaining latch out of the way. Then use a flat head screw driver to gently pry back the mounting clips so that you can get your electronic control board out of the way. You should not let your electronic control board just hang from the door, so if you can, try to attach the board with a little twist tie to the back panel of the door. That will help reduce strain on the wires.
Then you will lift off the outer door panel and set it aside, perhaps on a towel to avoid scratching. Then, using a flat head screw driver, on the back panel of your door rotate the air vent counter clockwise to remove it. Now you can detached the inner door vent from the inner door panel. You can remove the gasket and then replace it with your new one. Follow these steps in reverse to put your panel back into place.
I hope that helps!
4 people found this helpful.
Was this helpful?
Thank you for voting!
Derrick
August 20, 2021
I change the vent gasket and is still leaking what else could it be
For model number Wdf520padw3
Hello Derrick, Thank you for your question. The most common parts to check would be the Drain Hose PartSelect Number PS2358130, Hose Clamp PartSelect Number PS11743008, Inlet Valve PartSelect Number PS12578165 and the Door Gasket PartSelect Number PS16221222. We hope this helps.
My dishwasher leaks from the outer door. The insulation under the outer door is getting wet and it leaks onto the floor. I replaced the door gasket and the overflow control switch. Would the air vent gasket or bottom door seal cause this leak?
For model number WDT720PADM0
Hello Dave, Thank you for your inquiry. We have researched the model number you have provided and the bottom seal is only available as part of the inner door assembly. We also would recommend checking the inverter motor, the water inlet valve and the hoses. We hope this helps and if you need help placing an order, customer service is open 7 days a week. Please feel free to give us a call. We look forward to hearing from you!
Hi David, thank you for reaching out. The parts on diagrams #4 and 5 are the air vent gasket and the vent assembly, respectively. To get these off, separate the outer and inner door panels by removing the screws that are holding the panels together. Rotate the air vent cover counterclockwise to remove it. You can now detach the air vent from the inner door panel and can remove the gasket from the air vent assembly. We hope this helps.
Fresh Flow Produce Preserver is made for your refrigerator to help keep produce fresh for longer by absorbing the chemical, ethylene, that causes your fruits and vegetables to ripen quicker. Your produce could be fresh f...
Having a problem with a funky-smelling washing machine, or one that just doesnt seem to clean your clothes as well as it used to? Say hello to the Affresh Washing Machine Cleaner by Whirlpool. This powerful washing helpe...
Affresh dishwasher Cleaner is specially formulated to help remove limescale and mineral build-up that can be unsightly and could affect your dishwasher's performance. Each tablet is designed to clean inside your machine ...
Make your cooktop shine with Frigidaire ReadyClean Glass and Ceramic Cleaner. Our scratch-free, streak-free formula removes smudges, grease, burnt-on food, dirt and oil, while protecting and polishing to repel dust and d...
[{"position":0,"name":"Home","title":"Home","url":"/"},{"position":1,"name":"Seal or Gasket","title":"Seal or Gasket","url":"/Dishwasher-Seals-and-Gaskets.htm"},{"position":2,"name":"WP8269259","title":"WP8269259","url":""}]