This part is a one-time use thermal fuse which attaches to the blower wheel housing of your clothes dryer. It cannot be re-set and must be replaced when there is no longer continuity between the pins....
$22.77
In Stock
Order within the next 6 hrs and your part ships today!
These agitator directional cogs are commonly referred to as dog ears. They come four to a package and are usually used with direct drive washing machines.
$7.31
In Stock
Order within the next 6 hrs and your part ships today!
This Idler Pulley includes the tri-ring and gasket and everything included here is manufacturer-certified. This part maintains correct tension on the drive belt in order to spin the drum properly. If ...
$32.93
In Stock
Order within the next 6 hrs and your part ships today!
The drum support roller kit (Dryer Repair Kit) allows the dryer to tumble properly by supporting the drum cylinder. The idler pulley provides the tension required for a multi-ribbed belt. The belt att...
$51.13
In Stock
Order within the next 6 hrs and your part ships today!
The Drive Belt is a 93 1/2" belt which wraps around the dryer drum to allow tension and movement. If broken the dryer will not turn properly, or there may be loud noises. The part is rated as "medium"...
$30.59
In Stock
Order within the next 6 hrs and your part ships today!
This dryer drum roller kit is designed to restore smooth and quiet operation in a wide range of dryer models. It includes two drum rollers, four tri-rings, and one to two retaining washers, providing ...
$22.56
In Stock
Order within the next 6 hrs and your part ships today!
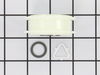
If you notice that your dryer is noisy or will not tumble, you may need to replace the tri ring. This part is triangular, and is less than an inch in size. Tri rings can be found both on the idler pul...
$17.01
In Stock
Order within the next 6 hrs and your part ships today!
This 18 ml bottle of white appliance touch-up paint is used to cover scratches or marks on your appliance. The white touch-up paint can be used on refrigerators, microwaves, ranges, clothes dryers, an...
$15.95
In Stock
Order within the next 6 hrs and your part ships today!
If your washer is noisy, spins slowly, or leaves clothes soaking wet, this splutch cam kit might be the fix. It helps your machine switch between washing and spinning by connecting the motor to the ba...
$49.29
In Stock
Order within the next 6 hrs and your part ships today!
Protect your clothes and keep your dryer running smoothly with this replacement screen door grille. As the top cover for the lint filter, it helps prevent snags and supports proper airflow. If your cu...
$35.89
In Stock
Order within the next 6 hrs and your part ships today!
Questions And Answers for YWET4027HW1
Be the first to ask our experts a question about this model!
✖
Ask a Question
Ask our experts a question on this model and we'll respond as soon as we can.
First I unplugged the dryer, then removed the back panel, this exposed most all of the wiring and I could see the heater coils. Not knowing what the problem was I started looking at the coils and could not see any broken parts. So then checked the thermal fuse for continuity I removed the two wires from it with a small pair of needle nose pliers, it was held in place by two screws, once they were removed the fuse came out easily, I checked continuity with a volt meter placing the meter on X1 Ohms and could not get a reading. I replaced with a new one and put it all back together the way I took it apart. Then I plugged it in and it worked first time, I now have warm dry clothes.
First pry off the cap of the agitator. Then using a socket remove the bolt that holds the plastic cup in place. Remove this cup by prying it loose from the two tabs that hold it in place. Once this cup is removed you can get to the broken cogs. Slip the new cogs into the underside of the cup, and slide the cup back down in the agitator housing using the slots on the side for a guide. (You may want to remove the entire agitator and assemble everything upside down, then flip it all back over to mount, so the cogs don't fall out). Tighten the bolt, snap the cap back in place on top of the agitator and your'e done. Easy repair.
Cleaning the lint out of the whole machine took quite a bit of time--it was everywhere. Underneath the lint trap was a collection that ultimately ruined the thermal fuse where it restricted the air flow considerably.
Ascertaining the problem was the most time consuming part.
The actual repair was quite simple and didn't take but 15-20 minutes.