This 18 ml bottle of white appliance touch-up paint is used to cover scratches or marks on your appliance. The white touch-up paint can be used on refrigerators, microwaves, ranges, clothes dryers, an...
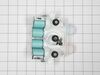
This washing machine inlet valve is a genuine OEM replacement part designed to regulate water flow during the fill cycle. Controlled by an internal solenoid, the valve opens and closes as needed to al...
Having a problem with a funky-smelling washing machine, or one that just doesnt seem to clean your clothes as well as it used to? Say hello to the Affresh Washing Machine Cleaner by Whirlpool. This po...
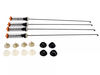
If your washer isn’t cleaning clothes like it used to or making strange noises, the washplate might be the problem. This part sits at the bottom of the tub and helps move clothes through the water for...
Are you dealing with a faulty washplate in your washing machine? Meet the Whirlpool Washer Washplate Screw, your personal helper for securing loose or broken washplates. This genuine OEM part is highl...
If your washer isn’t spinning, agitating, or cleaning clothes like it used to, the gearcase might be the issue. This part powers the agitator and spin basket, helping your machine run smoothly. It fit...
This drain pump is engineered for top-load washing machines and plays a vital role in the appliance’s drainage system. During the drain cycle, it efficiently removes water from the washer tub and chan...
Ask our experts a question about this model and we'll get back to you as soon as possible!
13 questions answered by our experts.
< Prev
1
2
3
Next >
Sort by:
Search filter:
Clear Filter
Your search term must have 3 or more characters.
Keep searches simple. Use keywords, e.g. "leaking", "pump", "broken" or "fit".
Sorry, we couldn't find any existing answers that matched.Try using some different or simpler keywords, or submit your new question by using the "Ask a Question" button above!
Jeannie
September 6, 2021
My washer has power to it when I push the power button. When I push the start button, it will only beep. I am not able to change any of the settings on the control panel either, they just beep as well. I used it yesterday but today it will not work.
For model number WTW7500GW2
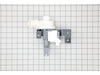
Hello Jeannie, Thank you for the question. If the appliance has Power but is not starting the cycle, you may have a defective Lid Latch Switch, PartSelect Number PS11731620. The Switch tells the controls when the Lid is closed and it is safe to start the cycle. We hope this helps!
can the drain line clog to slow down drainage, if so how do you unclog, clean, etc?
For model number WTW7500GW2
Hi Steve, thank you for your question! Yes, the drain line clogs slow down the drainage. Lint and related fragments occasionally find their way into the drain and muck up the pipes, leading to a clogged drain. Remember, all of the dirt and grime on your clothes doesn’t just disappear. It goes down the drain. So any grease, oils, and general debris on clothing can lead to clogs over time. Hot water and baking soda make for a simple, powerful, and low-cost solution here. This combination is one of the best homemade solutions for unclogging a drain. Start by unplugging the washing machine and gently moving it away from the drain. Do this slowly so as not to disturb the hoses on the back. Boil at least 1 gallon of water and have it ready to go. Between the hoses where the machine hooks up to the water supply, you will find the washing machine drain hose. Remove it from the drainpipe, and you will be able to see directly down the pipe. Slowly and carefully pour the hot water down the pipe. You can use a funnel with a narrow-mouthed pitcher to avoid spills. Add the baking soda and pour it down the drain. Pour approximately 1 cup for every gallon of boiling water. Make sure to do this after pouring the water, not with the water. For an added boost, make a 1:1 mixture of vinegar and water and pour this down the drain last. Repeat as necessary. You can also use standard drain cleaner, which is a fairly reliable option here, though these cleaners are on the abrasive side, so do not go overboard and choose a non-corrosive product. Wear latex gloves and protective eyewear when dealing with heavy-duty drain cleaners. We hope this information helps!
1 person found this helpful.
Was this helpful?
Thank you for voting!
Robert
January 13, 2023
What does the frame of the door consists of?
For model number WTW7500GW2
Hello Robert, thank you for your question. The Frame or Top Panel PS12070843 is the metal part only. There are no parts that come with the metal part. The lid PS12347533 is sold separately also. We look forward to hearing from you.
Hello Richard, thank you for your question. Try rocking the appliance from side to side or back and forth. If it's rocking a lot, your flooring or appliance's feet may be uneven. You can adjust the washer feet or place the washer on a piece of plywood. If your washer is level, we suggest replacing the suspension. Part number PS12347544. We hope this helps.
Trips gfci when start is pressed but not if plugged into a standard outlet.
For model number WTW7500GW2
Hi William, thank you for your interesting question. If plugging your washer is tripping GFCI often, it is possible that you are plugging your washer into an overloaded circuit. To prevent this from happening, make sure that your washer has a dedicated circuit. You can do it by plugging your washer into an alternative power outlet and seeing if it still trips. Check your washer's wiring for any visible damages. We would also recommend checking the power cord of your washer. It can get damaged, which can cause a short circuit. Please contact us anytime if you require further assistance.
Was this helpful?
Thank you for voting!
< Prev
1
2
3
Next >
✖
Ask a Question
Ask our experts a question on this model and we'll respond as soon as we can.
1.) disconnect power to your washer. Turn off water supply and disconnect from the washer.
open the washer top and remove plastic cap from the wash plate
2.) using 7/16 socket, remove bolt from the wash plate. If you can't remove it with a socket , I recommend using impact wrench.
3.) remove wash plate ( you might need to spray penetrating oil or wd40 inside the bolt hole to loosen it. Check to make sure the wash plate gear grooves are not worn down, if they are, replace it.
4.) using your Maytag specific spaner nut wrench, remove the spaner nut from the shaft of the gear case. This should be right underneath where the wash plate was. If you can't turn it by hand , use a rubber mallet or hammer to encourage it.
5.) some people remove the wash basket at this point. I don't think it is necessary.
6.) close your washing machine. Tape the top closed to keep it from flying open. Tilt your washer back and prop it up where you have access to the underside of the washing machine.
7) remove motor rotor bolt and pull rotor off of the motor.
8.) disconnect the two wire connectors that supply power to motor. using a socket, remove bolts that are keeping motor attached to the gear case.
9.) Now that the gear case is all the is remaining on the underside, you can remove the 4 bolts that are holding the gear case to the washer. Now try to pull gear case out.
10.) if gearcase will not pull out, lower washer back to upright position. Spray penetrating oil or wd40 around the shaft of the gearcase and allow it to sit for 5-10 minutes. Using a hammer, lightly tap on the shaft of the gearcase and it should now fall out. ( you might have to apply penetrating oil again, or apply more force with the hammer.
11.) reinstall motor to new gearcase. Insert new gear case to the washer. Reinstall bolts and reconnect power supply wires.
12. ReInstall spaner nut inside the washer, reinstall wash plate.
This product comes in a bottle with a brush like Liquid Paper. It goes on incredibly easy. A second coat might be needed. I wanted to prevent rust from setting in so I covered the scratches and dings. The paint is a little brighter since my washer is 10 years old but it still looks great.
Removed two screws on back of lid to raise top removed tub one bolt and one spanernut pulled tub lowered top reinstalled screws laid washer down to get to bottom of washer unplugged wiring removed four bolts pulled gear box and motor removed motor from gear box installed motor on new gear box reassemble washer


 Diagram and Parts List for Whirlpool Washer")