This part is known as a pulsator cap or washplate cap, and is designed for your LG washer. It fits over the washplate mounting bolt and prevents clothes from getting caught on the washplate during a w...
This inlet valve assembly controls the flow of hot and cold water into your washer, ensuring the drum fills at the correct temperature during each cycle. Located at the back of the machine where the w...
Got an LG washer that needs a fix? We have the perfect solution for you! Here is our bespoke screw, made just for LG washing machines. It's crafted to meet safety and efficiency standards, ensuring a ...
This drain pump assembly is responsible for removing water from your washer during the drain cycle. It is typically at the bottom of the washing machine and connected to the drain hose. If it is damag...
This part is the replacement switch assembly for your top-load washer. It contains the switch mechanism and the connecting wire that hooks the door latch to the electrical system of the washer. The li...
Keep your washer running smoothly with this clutch motor assembly. It helps the drum switch between washing and spinning so clothes get clean and water is removed efficiently. If your washer won’t spi...
Ask our experts a question about this model and we'll get back to you as soon as possible!
1 question answered by our experts.
< Prev
1
Next >
Sort by:
Search filter:
Clear Filter
Your search term must have 3 or more characters.
Keep searches simple. Use keywords, e.g. "leaking", "pump", "broken" or "fit".
Sorry, we couldn't find any existing answers that matched.Try using some different or simpler keywords, or submit your new question by using the "Ask a Question" button above!
Herbert
February 10, 2024
need part number for washer shifter assembly
For model number WT7800CV
Hello Herbert, thank you for contacting us. The part you are looking for is the shift actuator, part number PS12589800. If you need help placing an order for it, please feel free to give us a call!
raised the front of washer by hand (literally) and placed two 2x4 blocks under front lip for support. reached up inside washer cabinet and unscrewed the broken leg piece upwards into the cabinet. this was the only way I could get the broken piece out without some specialized tool to reach it from the underside. replacement with the new leg was a breeze.
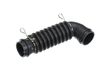
Very close to the installation video online at Parts Select. Removed the back panel, unclipped the hose from the inner fitting and replaced with the rear hose. Why it didn;t leak on the inside is interesting as there was no clip on the at the inner fitting. The one difference from the existing install video online was that I didn't have to tip the washer over ~75 degs before replacing. I instead found that I could put to cinder blocks under the back edge to replace the drain hose. This made the job quicker without having to worry about having a box for it to rest on (with any risk of falling to the floor).