This water filter purifies water going to the water dispenser and sometimes the icemaker as well. This part should be replaced if it is causing reduced water flow or just replaced periodically per the...
$69.99
In Stock
Order within the next 7 hrs and your part ships today!
This 18 ml bottle of white appliance touch-up paint is used to cover scratches or marks on your appliance. The white touch-up paint can be used on refrigerators, microwaves, ranges, clothes dryers, an...
$15.95
In Stock
Order within the next 7 hrs and your part ships today!
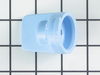
This water filter bypass cap is a genuine OEM component designed for select Whirlpool, Maytag, KitchenAid, and affiliated refrigerator models. Installed in place of the water filter, it allows uninter...
$55.88
In Stock
Order within the next 7 hrs and your part ships today!
This is a genuine replacement light bulb for a refrigerator. The inside of your refrigerator should illuminate when you open the door. If your fridge does not illuminate, you may need to replace this ...
$79.64
In Stock
Order within the next 7 hrs and your part ships today!
This is a multi-use and multi-appliance screw. It can be used on a microwave, refrigerator, range/oven, air conditioner, dehumidifier, washer, or dryer. The measurements of this screw are 8 x 1/2 inch...
$28.95
In Stock
Order within the next 7 hrs and your part ships today!
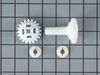
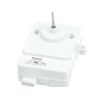
This light switch may also be known as a refrigerator door switch or a light switch kit, and is compatible with your refrigerator. The function of the refrigerator door switch is to turn on the light ...
$38.96
In Stock
Order within the next 7 hrs and your part ships today!
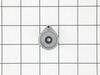
This is a replacement pivot block for your refrigerator. It is made of white plastic and is approximately 4 inches long and 1 inch wide. The pivot block catches and holds the door mullion cover when y...
$14.72
In Stock
Order within the next 7 hrs and your part ships today!
Made from durable, transparent plastic, this door shelf bin attaches to the inside of the refrigerator door to store small items like condiments and jars. It’s compatible with select Whirlpool, Maytag...
$83.69
In Stock
Order within the next 7 hrs and your part ships today!
This water filter is a genuine OEM replacement component designed for use in select refrigerators and freestanding ice makers. Engineered to remove contaminants and particles from the water supply, it...
$115.32
In Stock
Order within the next 7 hrs and your part ships today!
This kickplate grille is attached to the bottom of the refrigerator.
$101.49
In Stock
Order within the next 7 hrs and your part ships today!
Questions And Answers for WRX735SDBH02
Ask our experts a question about this model and we'll get back to you as soon as possible!
1 question answered by our experts.
< Prev
1
Next >
Sort by:
Search filter:
Clear Filter
Your search term must have 3 or more characters.
Keep searches simple. Use keywords, e.g. "leaking", "pump", "broken" or "fit".
Sorry, we couldn't find any existing answers that matched.Try using some different or simpler keywords, or submit your new question by using the "Ask a Question" button above!
Fred
January 6, 2024
hOW to set the inside temp od the refrigerator. I need t raise it some. It's freezing the food
For model number WRX735SDBH02
Hello Fred, thank you for your inquiry. If the temperature is too cold in the refrigerator or freezer, first check the air vents to be sure they are not blocked before adjusting the controls. To view and adjust the set points, press and hold TEMP for 3 seconds. When adjust mode is activated, adjusting information will appear on the display screen. When adjust mode is activated, the display screen shows the refrigerator set point and “FRIDGE” appears. Press LOCK to raise the set point, or press OPTIONS to lower the set point. When you have finished viewing (and adjusting if desired) the refrigerator set point, press TEMP to change the display to show the freezer set point. When the zone has been changed, “FREEZER” appears on the display screen. Press LOCK to raise the set point, or press OPTIONS to lower the set point. When you have finished viewing (and adjusting if desired) both the refrigerator and freezer set points, press MEASURED FILL “Confirm” to save the settings. The set point range for the refrigerator is 33°F to 45°F (0°C to 7°C). The set point range for the freezer is -5°F to 5°F (-21°C to -15°C). We hope that helps!
Was this helpful?
Thank you for voting!
< Prev
1
Next >
✖
Ask a Question
Ask our experts a question on this model and we'll respond as soon as we can.
Pressed in the end of the filter cover, lowered it down part way. Twisted the old filter 1/4 turn and removed it. Set in the sink to drain. Inserted new filter and twisted it to lock. closed cover. Done. Total time @ 1 Minute.
I removed the drop-down outer housing by gently prying the sides of the two pivot pins at the rear. This gave me move 'room' to grip and slightly rotate then pull the old filter forward and away from the tight suction connection. I was concerned that I would be too forceful for the plastic assemblies and would break something; deliberate motions and a steady thought process on the problem helped disengage the darned old filter!


 – Part Number: WPW10534155")


")
")