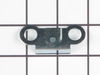
This hinge bracket, also known as a door stop, is attached to the bottom of the door and is used to limit how far the door swings out to protect the refrigerator itself, and any surrounding cabinets f...
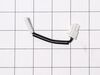
This evaporator fan motor is located in the back of the freezer, and circulates air over the refrigerator coils. These coils will convert the heat into cool air, which is then circulated.
This refrigerator meat drawer shelf frame provides structural support for the meat drawer, allowing it to slide smoothly in and out of the compartment. Constructed from durable white plastic, the fram...
Facing challenges with your refrigerator organization? Here's the answer to your problem ? our genuine Whirlpool Door Bin Cantilever. This is more than just a part; it's a practical solution designed ...
Is your refrigerator not maintaining the perfect temperature for your food? The Whirlpool Thermistor could be exactly what you need. This temperature sensor plays a key role in your refrigerator, cons...
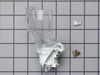
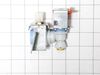
This genuine OEM ice maker kit is designed to fit refrigerators that did not originally come with an ice maker. This kit contains everything needed to install the new ice maker on your refrigerator in...
Don't let a faulty door bin disrupt your fridge's potential'let us help! We've got the perfect solution'the Whirlpool Cantilever Door Bin. This genuine part is perfect for keeping your bottles and jar...
This stainless steel refrigerator or freezer door handle is a genuine OEM part designed to replace broken or damaged handles. Made from durable stainless steel, it ensures long-lasting use and a modern look.
Have a Whirlpool refrigerator that's not functioning properly due to a faulty door hinge? We understand your problem and we have just the right solution for you ? the authentic OEM Insert Hinge Shim, ...
$17.06
In Stock
Questions And Answers for WRT549SZDM01
Ask our experts a question about this model and we'll get back to you as soon as possible!
2 questions answered by our experts.
< Prev
1
Next >
Sort by:
Search filter:
Clear Filter
Your search term must have 3 or more characters.
Keep searches simple. Use keywords, e.g. "leaking", "pump", "broken" or "fit".
Sorry, we couldn't find any existing answers that matched.Try using some different or simpler keywords, or submit your new question by using the "Ask a Question" button above!
Tom
September 8, 2021
Ice maker not working when set up
For model number WRT549SZDM01
Hello Tom, Thank you for contacting us. We have researched the model you have provided and have found the part you are looking for is PartSelect Number PS11757273. If you need help placing an order, customer service is open 7 days a week. Please feel free to give us a call. We look forward to hearing from you!
I need shelves for the right side of the door the ones that hold milk jugs also need the sliding part for the cold cuts drawer
For model number WRT549SZDM01
Hi Douglas, thank you for contacting us. The door shelf bin you are looking for is part number PS11752516. The sliding part comes attached with deli drawer shelf frame is part number PS11731608. We hope that helps!
The reason I repaired it myself was because the repairman that diagnosed the problem.didn't come back in two weeks. The evaporator fan sits behind a vented wall in the freezer and directs cold air into freezer and refrigerator.I removed the ice make assembly first and then the freezer wall held in place by two sheet metal nuts. Then removed wires from fan motor. Removed the fan blade from fan motor,which was press fitted on,then removed fan motor from bracket assembly(make sure and retain the two vibration rubber washers on back and front of motor. Reinstall new motor with vibration washers and press fan blade on new motor. Install in bracket assemble and reassemnble.
I used a flat-head screwdriver to pop out the old light rocker switch. Then, I unplugged the wires, plugged them into the new light rocker switch, and then popped the new switch into the hole. That's it! Lights began working again.
First I removed the old lightbulb from the socket and replaced it with a new one to confirm that the bulb was not the problem. I then pryed the socket out with a flat-head screwdriver. I could tell that the socket was anchored in its hole with clips so it was relatively easy to pry it out. Once the socket was out, I disconnected the lead wires and ordered a replacement socket kit from Partselect. When the new one arrived, I reconnected the lead wires to it, snapped it back into its hole, screwed in a new lightbulb, and presto!! The light was back on with no further problem. Thank you, Partselect!! A $15.00 part saved me what probably would have been at least a $100. service call and heaven knows what the technician would have told me I needed!!!