


WM4000HWA (01) LG Washer - Overview
Sections of the WM4000HWA
[Viewing 1 of 1]
Keep searches simple, eg. "belt" or "pump".

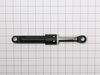
Shock Absorber Assembly
PartSelect #: PS11707466
Manufacturer #: ACV72909503
This friction damper assembly is designed to stabilize the washer tub during operation, particularly during high-speed spin cycles. By absorbing movement and reducing vibrations, it helps ensure quiet...
$66.58
In Stock


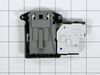
Washer Switch Assembly
PartSelect #: PS7792232
Manufacturer #: EBF61315802
This door lock switch is a key component in compatible washing machines, designed to signal the control board when the door is securely closed. Once engaged, it enables the locking mechanism and allow...
$205.79
In Stock

SENSOR ASSEMBLY
PartSelect #: PS16878771
Manufacturer #: EBD48922821
Having trouble with your LG appliance? It might be time to consider replacing the sensor assembly. This genuine OEM sensor assembly is designed and built to the highest standards by LG, allowing your ...
$121.00
In Stock

Washer Float Assembly
PartSelect #: PS3579595
Manufacturer #: 4769ER4001B
Struggling with a less efficient washing machine? Our LG Washer Float Assembly could be just the solution you need. This authentic OEM part, specifically created for LG models, pushes moist air out of...
$36.43
In Stock

Locking Pin
PartSelect #: PS3523451
Manufacturer #: 4774FR3118B
The locking pin is used to hold the shock absorber on the washer. There is a pin used at the bottom and top of the shock absorber. Sold individually.
$21.76
Special Order

Washer Leg Assembly
PartSelect #: PS7788210
Manufacturer #: AFC72909305
This levelling leg is a genuine replacement part. It is used to help keep your washing machine stable and balanced. It helps support your appliance. It screws into the base of your washer, and you can...
$45.58
In Stock

Spring-Hinge
PartSelect #: PS7796185
Manufacturer #: MHY62964802
Having problems with your LG washing machine? Our authentic LG Washer Suspension Hinge Spring could be just what you need. This high-quality part has been specifically crafted to give the outer tub of...
$44.35
In Stock


Questions And Answers for WM4000HWA
We're sorry, but our Q&A experts are temporarily unavailable.
Please check back later if you still haven't found the answer you need.
Common Symptoms of the WM4000HWA
[Viewing 7 of 7]Leaking
Fixed by
these parts
these parts


Show All
Locking Issues
Fixed by
these parts
these parts
Show All
Spinning Issues
Fixed by
these parts
these parts

Show All
Lid or door won’t close
Fixed by
these parts
these parts
Show All
Shaking and Moving
Fixed by
these parts
these parts
Show All
Water Filling Issues
Fixed by
these parts
these parts


Show All
Will Not Start
Fixed by
these parts
these parts
Show All

Keep searches simple. Use keywords, e.g. "leaking", "pump", "broken" or "fit".
Washer did not recognize the door was shut
I removed the Wire and spring from the tub seal and then removed the seal on the side of the washer that contains the Door switch. I removed the two screws that held the door switch in place while holding the switch with my other hand. Once the screws where out I pulled the switch assembly out thru the gap and removed the wires from old assembly. I then plugged the wires into the new assembly aligned the holes up and put the screws back in the new door switch assembly. I then put the door seal and tub seal holder back on. This took about 15 minutes. I do recomend that you unplug the washer before starting this process.
Parts Used:
-
CURTIS from OLIVE BRANCH, MS
-
Difficulty Level:Really Easy
-
Total Repair Time:15 - 30 mins
-
Tools:Nutdriver, Screw drivers
7 of 8 people
found this instruction helpful.
Was this instruction helpful to you?
Thank you for voting!
Spring broke that holds the drum up.
To put the new spring on requires two people. One to pull the drum up as far as possible and hold it in place and the other to attach the spring to the drum and the into the slot on the side of the washer frame. It takes a lot of leverage and strength to get the spring into the slot. We used a screw driver as leverage to get the spring extended to slip into the slot. You might also need the plastic holder part# 4930FR3040A. If the washer door boot has come off due to spring breaking, you will need to reset it. That requires also removing front panel. There is a large wire ring that holds the boot in place. You either need a special pair of pliers to expand the spring to reset the boot or a lot of strength to do it with a couple screw drivers.
Parts Used:
-
Phillip from SOUTH PARK, PA
-
Difficulty Level:A Bit Difficult
-
Total Repair Time:30 - 60 mins
-
Tools:Screw drivers
5 of 9 people
found this instruction helpful.
Was this instruction helpful to you?
Thank you for voting!
Water inlet valve relacement
Installed correctly but PartsSelect sent WRONG part, but part number on bag was correct. Installation of WRONG part fried the main board. A $100 fix is now costing me about $1300.00 for technician service and new unit. I asked PartsSelect to help with cost since outcome is due to their error. Totally unsatisfied. Will not suggest company to other DIYers.
Parts Used:

-
Marcia from TROY, OH
-
Difficulty Level:Very Difficult
-
Total Repair Time:More than 2 hours
-
Tools:Screw drivers, Wrench (Adjustable)
4 of 6 people
found this instruction helpful.
Was this instruction helpful to you?
Thank you for voting!