


WM3998HBA LG Washer - Overview
Sections of the WM3998HBA
[Viewing 1 of 1]
Keep searches simple, eg. "belt" or "pump".

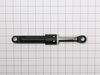
Shock Absorber Assembly
PartSelect #: PS11707466
Manufacturer #: ACV72909503
This friction damper assembly is designed to stabilize the washer tub during operation, particularly during high-speed spin cycles. By absorbing movement and reducing vibrations, it helps ensure quiet...
$66.58
In Stock

Tub-to-Pump Drain Hose
PartSelect #: PS3523345
Manufacturer #: 4738ER1002A
This hose has bellows to allow for flexibility during the wash and spin cycles.
$80.21
In Stock


Washer Gasket
PartSelect #: PS3535219
Manufacturer #: MDS62058301
This part is the replacement rear tub gasket for your washer. It is made of black plastic and is approximately 3-1/4 inches in diameter. The rear tub gasket forms a watertight seal between the rear tu...
$56.87
In Stock


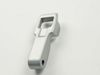
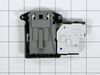
Washer Switch Assembly
PartSelect #: PS7792232
Manufacturer #: EBF61315802
This door lock switch is a key component in compatible washing machines, designed to signal the control board when the door is securely closed. Once engaged, it enables the locking mechanism and allow...
$205.79
In Stock

Washer Hose Connector
PartSelect #: PS3527289
Manufacturer #: 5214FR4006G
This part is the replacement connector hose or clean-out drain hose for your washer. It is black in color and is sold individually. The connector hose drains water out of the washer if the drain cycle...
$17.44
In Stock

CAP,DRAIN HOSE
PartSelect #: PS3635866
Manufacturer #: 5006EN3015A
This drain hose plug, also known as a hose cap, is a genuine OEM part for your washing machine. This plug caps the drain hose from the pump housing, and helps prevent leaks from your washer. Before be...
$13.26
In Stock

Washer Float Assembly
PartSelect #: PS3579595
Manufacturer #: 4769ER4001B
Struggling with a less efficient washing machine? Our LG Washer Float Assembly could be just the solution you need. This authentic OEM part, specifically created for LG models, pushes moist air out of...
$36.43
In Stock


Washer Ball Bearing
PartSelect #: PS11705913
Manufacturer #: 4280EN4001G
Looking to restore your LG washing machine to its peak performance? Our genuine OEM Ball Bearing could be just what you need! This part is designed with precision to support the spin basket shaft in y...
$118.06
In Stock
Questions And Answers for WM3998HBA
We're sorry, but our Q&A experts are temporarily unavailable.
Please check back later if you still haven't found the answer you need.
Common Symptoms of the WM3998HBA
[Viewing 8 of 8]Leaking
Fixed by
these parts
these parts


Show All
Lid or door won’t close
Fixed by
these parts
these parts
Show All
Locking Issues
Fixed by
these parts
these parts
Show All
Shaking and Moving
Fixed by
these parts
these parts
Show All
Will not drain
Fixed by
these parts
these parts
Show All
Water Filling Issues
Fixed by
these parts
these parts


Show All
Will Not Start
Fixed by
these parts
these parts
Show All
Spinning Issues
Fixed by
these parts
these parts
Show All


Keep searches simple. Use keywords, e.g. "leaking", "pump", "broken" or "fit".
leaking tub-to-pump drain hose
Pull washer away from wall. Unplug cord and remove drain hose from receptacle. Remove 4 screws holding panel to rear of washer. Squeeze and slide back hose clamps on each end of drain hose and loosen center clamp with screwdriver. Remove old hose. Reinstall new hose in reverse order using existing clamps. Re-install back panel.
Parts Used:
-
Leslie from STOWE, VT
-
Difficulty Level:Easy
-
Total Repair Time:30 - 60 mins
-
Tools:Screw drivers
51 of 71 people
found this instruction helpful.
Was this instruction helpful to you?
Thank you for voting!
Washer did not recognize the door was shut
I removed the Wire and spring from the tub seal and then removed the seal on the side of the washer that contains the Door switch. I removed the two screws that held the door switch in place while holding the switch with my other hand. Once the screws where out I pulled the switch assembly out thru the gap and removed the wires from old assembly. I then plugged the wires into the new assembly aligned the holes up and put the screws back in the new door switch assembly. I then put the door seal and tub seal holder back on. This took about 15 minutes. I do recomend that you unplug the washer before starting this process.
Parts Used:
-
CURTIS from OLIVE BRANCH, MS
-
Difficulty Level:Really Easy
-
Total Repair Time:15 - 30 mins
-
Tools:Nutdriver, Screw drivers
7 of 8 people
found this instruction helpful.
Was this instruction helpful to you?
Thank you for voting!
Bearings were bad and noisy
Followed this video
https://m.youtube.com/watch?v=MNp1hzlcF1g
The video was very good. Watch, stop, follow steps when doing the disassembly
https://m.youtube.com/watch?v=MNp1hzlcF1g
The video was very good. Watch, stop, follow steps when doing the disassembly
Parts Used:

-
John from BONAIRE, GA
-
Difficulty Level:A Bit Difficult
-
Total Repair Time:More than 2 hours
-
Tools:Pliers, Socket set, Wrench set
4 of 5 people
found this instruction helpful.
Was this instruction helpful to you?
Thank you for voting!