This washer hose with bellows, also known as a dispenser hose, is a genuine OEM replacement part for your washer. Replacing this part can be helpful if your washer is leaking. The dispenser hose conne...
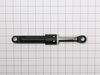
This friction damper assembly is designed to stabilize the washer tub during operation, particularly during high-speed spin cycles. By absorbing movement and reducing vibrations, it helps ensure quiet...
This part is the replacement rear tub gasket for your washer. It is made of black plastic and is approximately 3-1/4 inches in diameter. The rear tub gasket forms a watertight seal between the rear tu...
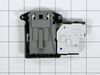
This door lock switch is a key component in compatible washing machines, designed to signal the control board when the door is securely closed. Once engaged, it enables the locking mechanism and allow...
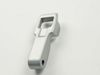
Struggling with a less efficient washing machine? Our LG Washer Float Assembly could be just the solution you need. This authentic OEM part, specifically created for LG models, pushes moist air out of...
The locking pin is used to hold the shock absorber on the washer. There is a pin used at the bottom and top of the shock absorber. Sold individually.
$21.76
Special Order
Questions And Answers for WM3700HVA
We're sorry, but our Q&A experts are temporarily unavailable.
Please check back later if you still haven't found the answer you need.
3 questions answered by our experts.
< Prev
1
Next >
Sort by:
Search filter:
Clear Filter
Your search term must have 3 or more characters.
Keep searches simple. Use keywords, e.g. "leaking", "pump", "broken" or "fit".
Sorry, we couldn't find any existing answers that matched.Try using some different or simpler keywords, or submit your new question by using the "Ask a Question" button above!
Andrew
August 4, 2023
I am getting LE error. I removed the stator and cannot find the motor sensor. The repair videos I have watch all show the sensor beside the stator power plug, but it not on my stator.
For model number WM3700HVA
Hello Andrew, thank you for your inquiry. Based on our research, an LE error code is displayed when the tub fails to spin. The error code indicates that the motor cannot operate properly because the washing machine is overloaded, or a foreign object is stuck in the tub. We would recommend resetting the washer and running a load with a normal amount of clothes. If this does not help, you may need to check the rotor assembly, part number PS3532774, to fix the issue. It rotates the washtub. It works together with another component called stator, and together they create a strong electromagnetic field that rotates the tub. There are several magnets located on the rotor. These magnets can become defective sooner or later. When this happens, your washer might stop spinning. We hope this solves your problem!
Dial spins, takes about 10 spins around to move display to setting required.
For model number WM3700HVA
Hello Stan, thank you for reaching out. Based on the description that you have provided, we would recommend replacing the display control board, part number PS12581498. Good luck with your repair!
The machine is giving a IE code. But the code does not corresponds with what is actually happening. It fulls up with water on the wash cycle beyond normal. Then stops and doesn't go to the rinse cycle. I have to hit wash again then it drains and spins as per normal. In a nut shell doesn't go to the rinse cycle until you press start again.
For model number WM3700HVA
Hello Dexter, thank you for reaching out. Based on our research, the error code you mentioned indicates that the water supply is inadequate. We would recommend replacing the display control board, part number PS12581498, to fix the issue. We hope this solves your problem!
Pull washer away from wall. Unplug cord and remove drain hose from receptacle. Remove 4 screws holding panel to rear of washer. Squeeze and slide back hose clamps on each end of drain hose and loosen center clamp with screwdriver. Remove old hose. Reinstall new hose in reverse order using existing clamps. Re-install back panel.
Wife called me and said the washing machine just flooded the Landry room. I looked at it and didn't see anything wrong. Took the top off and the back off and started looking for a leak, did not see anything. Took the front part of the washer apart thinking the drain hole was plugged up where the rubber boot is. It was ok after taking the big rubber boot off or whatever that is called i was not getting anywhere. I put it back together left the top and the back off. I turned the water on and started the washer on a quick cycle looking for a leak. I found the bellows at the inlet had a small leak fixed that and started the washer again. So what i found out was the clean out drain plug was not in tight letting water out as it was washing after i tightened it all was ok. So i did find a leak that was small that we never saw. The hardest part was putting that wire clamp on the rubber boot it took two people to do that.
I removed the Wire and spring from the tub seal and then removed the seal on the side of the washer that contains the Door switch. I removed the two screws that held the door switch in place while holding the switch with my other hand. Once the screws where out I pulled the switch assembly out thru the gap and removed the wires from old assembly. I then plugged the wires into the new assembly aligned the holes up and put the screws back in the new door switch assembly. I then put the door seal and tub seal holder back on. This took about 15 minutes. I do recomend that you unplug the washer before starting this process.