WM3499HVA (ASSEPUS) LG Washer - Overview
Sections of the WM3499HVA
[Viewing 4 of 4]Keep searches simple, eg. "belt" or "pump".
Water Inlet Valve - Hot
PartSelect #: PS3527427
Manufacturer #: 5220FR2006H
This hot water inlet valve is designed to regulate water flow into the washing machine during operation. Featuring a standard hose fitting inlet and a single water outlet, it opens as needed to allow ...
$78.09
In Stock
Order within the next 9 hrs and your part ships today!
LOCKER,HOOK
PartSelect #: PS8752721
Manufacturer #: MFG63099101
$49.47
In Stock
Order within the next 9 hrs and your part ships today!
Washer Switch Assembly
PartSelect #: PS7792232
Manufacturer #: EBF61315802
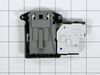
This door lock switch is a key component in compatible washing machines, designed to signal the control board when the door is securely closed. Once engaged, it enables the locking mechanism and allow...
$205.79
In Stock
Order within the next 9 hrs and your part ships today!
HINGE
PartSelect #: PS7321743
Manufacturer #: 4774EN3002A
The locking pin is used to hold the shock absorber on the washer. There is a pin used at the bottom and top of the shock absorber. Sold individually.
$21.22
In Stock
Order within the next 9 hrs and your part ships today!
Washer Leg Assembly
PartSelect #: PS7788210
Manufacturer #: AFC72909305
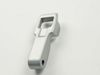
This levelling leg is a genuine replacement part. It is used to help keep your washing machine stable and balanced. It helps support your appliance. It screws into the base of your washer, and you can...
$45.58
In Stock
Order within the next 9 hrs and your part ships today!
Hose
PartSelect #: PS3523351
Manufacturer #: 4738ER2002A
When your LG washing machine isn't performing like it used to, this Vent Hose with Bellow is just what you need to bring it back to life. Crafted as a genuine OEM part, it offers the guaranteed qualit...
$56.87
In Stock
Order within the next 9 hrs and your part ships today!
Non-Skid Pads
PartSelect #: PS3532692
Manufacturer #: AGM73171801
$26.22
In Stock
Order within the next 9 hrs and your part ships today!
LIFTER
PartSelect #: PS12392326
Manufacturer #: MFE57764501
$18.96
In Stock
Order within the next 9 hrs and your part ships today!
GASKET
PartSelect #: PS11711786
Manufacturer #: MDS63939301
$192.52
In Stock
Order within the next 9 hrs and your part ships today!
Pressure Switch Assembly
PartSelect #: PS3529318
Manufacturer #: 6601ER1006F
$80.13
In Stock
Order within the next 9 hrs and your part ships today!
CLAMP ASSEMBLY
PartSelect #: PS7785189
Manufacturer #: 4861EN3003A
$13.26
In Stock
Order within the next 9 hrs and your part ships today!
Questions And Answers for WM3499HVA
We're sorry, but our Q&A experts are temporarily unavailable.
Please check back later if you still haven't found the answer you need.
Common Symptoms of the WM3499HVA
[Viewing 7 of 7]Leaking
Fixed by
these parts
these parts
Show All
Lid or door won’t close
Fixed by
these parts
these parts
Show All
Locking Issues
Fixed by
these parts
these parts
Show All
Water Filling Issues
Fixed by
these parts
these parts
Show All
No hot or cold water
Fixed by
these parts
these parts
Show All
Will Not Start
Fixed by
these parts
these parts
Show All
Will not drain
Fixed by
these parts
these parts
Show All
Keep searches simple. Use keywords, e.g. "leaking", "pump", "broken" or "fit".
Water was filling continues even the machine was unplugged
I did repaired while looking at video at your site .thanks to your team ..
Parts Used:
-
Sanjay from HOLTSVILLE, NY
-
Difficulty Level:Really Easy
-
Total Repair Time:Less than 15 mins
-
Tools:Pliers, Screw drivers, Wrench (Adjustable)
20 of 24 people
found this instruction helpful.
Was this instruction helpful to you?
Thank you for voting!
Water leaking on the floor under the washer.
Unplug the washer! Turn off the HOT water valve. Remove the hot water hose at the connection on the back of the washer. Remove the two Phillips head screws holding the top of the washer. Slide the lid toward the rear until you feel it disengage, then lift it off, setting it aside.
Unplug the electrical connector on top of the hot water valve (just pulls off).using pliers compress the hose clamp, slide it away from the hot water valve and pull the hose off the valve fitting(it will have some water remaining so lift it up and secure it to the brace above the hoses).
Remove the two phillips head screws that hold the valve in place. Pull the valve toward the front of the washer to remove it and compare it to the new valve.
To install the new valve, reverse all steps insuring tight water hose clamp and electrical connection. Install hot water hose, plug it in and turn on water. Test run and check for leaks. Unplug it and reinstall top.
Parts Used:
-
Danny from OAK HILLS, CA
-
Difficulty Level:Really Easy
-
Total Repair Time:30 - 60 mins
-
Tools:Pliers, Screw drivers
9 of 9 people
found this instruction helpful.
Was this instruction helpful to you?
Thank you for voting!
Washer did not recognize the door was shut
I removed the Wire and spring from the tub seal and then removed the seal on the side of the washer that contains the Door switch. I removed the two screws that held the door switch in place while holding the switch with my other hand. Once the screws where out I pulled the switch assembly out thru the gap and removed the wires from old assembly. I then plugged the wires into the new assembly aligned the holes up and put the screws back in the new door switch assembly. I then put the door seal and tub seal holder back on. This took about 15 minutes. I do recomend that you unplug the washer before starting this process.
Parts Used:
-
CURTIS from OLIVE BRANCH, MS
-
Difficulty Level:Really Easy
-
Total Repair Time:15 - 30 mins
-
Tools:Nutdriver, Screw drivers
7 of 8 people
found this instruction helpful.
Was this instruction helpful to you?
Thank you for voting!