The drain pump and motor assembly may also be known as the washer drain pump and is a part for your washer. The drain pump helps expel water from the washing machine. The drain pump is activated after...
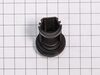
This hot water inlet valve is designed to regulate water flow into the washing machine during operation. Featuring a standard hose fitting inlet and a single water outlet, it opens as needed to allow ...
This washer hose with bellows, also known as a dispenser hose, is a genuine OEM replacement part for your washer. Replacing this part can be helpful if your washer is leaking. The dispenser hose conne...
This tub bearing is for washers.
Tub bearing supports the spin basket shaft at the tub.
Unplug the washer and shut off the water supply before installing this part. Wear work gloves to protect your hands.
This replacement pump filter, also known as a filter assembly, is a genuine OEM part for your washer or washer/dryer combo. Before beginning this repair, turn off the power and water supply to your wa...
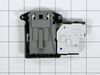
This door lock switch is a key component in compatible washing machines, designed to signal the control board when the door is securely closed. Once engaged, it enables the locking mechanism and allow...
This part is the replacement connector hose or clean-out drain hose for your washer. It is black in color and is sold individually. The connector hose drains water out of the washer if the drain cycle...
Removed the top of the washer by removing the 4 back screws and 2 small brackets. Then I removed the front panel, this was actually the hardest part, 2 screws and 8 tabs that you pop out carefully from the top of the panel. I only disconnected the power button and was able to rest the panel on top of the washer. The rest of the washer came apart quickly just moving down the front of the washer and removing the door, latch, tub gasket, drain cover. Removing the pump was just a mater of disconnecting the drain hoses, and one clip under the drain assembly. 3 screws attach the drain to assembly to the pump and only 2 wires that are clearly marked. Reassembly is just going back through in reverse order of disassenbly. The best thing about this is that it all comes apart with a standard phillips screwdriver.
Thank you for the very helpful YouTube video. After watching the video, I was able to diagnose the problem, buy the part from your website, and complete the repair. This is my personal machine - I am not a professional repairman.
There are two pumps in this system. I turned the washer on its side and took off bottom plate. There are several screws holding this on. I then took the entire pump assembly off. There are 3 screws holding each pump on the brown plastic body. Each pump has a positive and negative lead. I switched out the pump and reassembled. The hardest part is getting the 3 "shock absorbers in place with the rubber sleeves. I think the book suggest getting to the pump from the front side but I went through the bottom. Worked good. I did wonder however if the other pump was working. Do you need two pump working to get flow? By replacing one pump I went from no flow to good flow. Cost me $75.00