This is the main seal between the front bulkhead and the outer tub. If the washer is leaking, the door boot may have a tear in it. Overloading the washer is the most common cause for a torn door boot
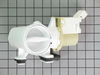
This pump helps expel water from the washing machine and is activated after the spin speed is maintained for a specific period of time. It has two ports for water to pass through: a large one, and a s...
This 18 ml bottle of white appliance touch-up paint is used to cover scratches or marks on your appliance. The white touch-up paint can be used on refrigerators, microwaves, ranges, clothes dryers, an...
Sold individually. These shock absorbers keep the washer from vigorous shaking during its cycles. This shock absorber is for washers.
Shock absorber absorbs the vibrations and movements of the oute...
This is a replacement tub-to-pump hose for your washer. This hose runs from the bottom of the tub to the water pump, and is used to transport water. The hose can develop a hole, and when this happens ...
Water inlet valve controls the water flow into the washer.
Fits some washers in the following series: Kenmore 110; Whirlpool CHW, WFW and YWFW; Maytag CHW, MHN, MHP, MHWE, MHWZ and YMHWE; Amana NFW...
If your washer door won’t close or lock, or your machine won’t start, this door latch might be the issue. It’s the part that keeps the door shut tight during the cycle and makes sure everything runs s...
This is the replacement bellow clamp for your washer. It is approximately 18 inches in diameter and is sold individually. The bellow clamp goes around the bellow in your washer and holds it in place o...
This part is the replacement drive belt for your washer. It is made of black rubber and is approximately ½ an inch wide and 48 inches long. It has 6 grooves and is sold individually. The drive belt is...
$63.78
In Stock
Questions And Answers for WFW9250WW01
Ask our experts a question about this model and we'll get back to you as soon as possible!
3 questions answered by our experts.
< Prev
1
Next >
Sort by:
Search filter:
Clear Filter
Your search term must have 3 or more characters.
Keep searches simple. Use keywords, e.g. "leaking", "pump", "broken" or "fit".
Sorry, we couldn't find any existing answers that matched.Try using some different or simpler keywords, or submit your new question by using the "Ask a Question" button above!
Chris
June 17, 2021
Machine makes a noise during the spin cycle. This is a new noise.
For model number WFW9250WW01
Hello Chris, Thank you for the question. Depending on the type of noise, it could be a worn Bearing. When the Bearing is defective or worn, it can make a grinding or rubbing noise. The Rear Bearing was only sold as part of the Outer Tub Assembly. I looked up the part and it is listed as No Longer Available/Discontinued sorry. There are no part substitutions listed. Our suggestion here would be to call the manufacturer and see if they can provide you with a substitution for these part numbers and contact us back with he updated substitution number. We hope this helps.
When on rinse mode the detergent dispenser is overflowing with water.
For model number WFW9250WW01
Hello Hans, thank you for writing. Detergent can gradually build up in the detergent tray and its attachments over time. If these are not cleaned regularly, the water and additives will not dispense fully and water will remain in the compartments. We hope this helps.
1 personfound this helpful.
Was this helpful?
Thank you for voting!
Greig
April 12, 2024
Unit doesn't start after a few minutes get error codes F1 then F6 in sequence.
For model number WFW9250WW01
Hi Greig, thank you for your inquiry. This error code means the washer's motor control unit (MCU) is having trouble communicating with the washer's central control unit (CCU). In most cases, the issue is caused by a damaged MCU circuit, usually caused by an overload. We would recommend replacing the motor control board, part number PS11754006, to fix the issue. Good luck with your repair!
Removed the front panel unplugged The washer drained water out, lift the washer up to un screw the drain pump. Then unhooked the hoses from pump put the other pump in.
This model is a front-loading washer. The spring loaded retainer for the front of the boot must be removed, then the boot can moved to the side exposing the module. Remove the two screws holding the model, pull the model out, remove the three electrical plugs, then reverse this procedure to install new module.
Pump started making noises like ball bearings grinding. took the lower front cover off pulled the strainer out of the pump housing and found $2.55 in nickles dimes and quarters. Some 223 bullets and about 20 bobby pins. Together they had destroyed the impeller, so ordering a new one and installing it did the trick. Easy installation about 15mins.


 Diagram and Parts List for Whirlpool Washer")