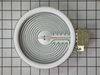
This is a heating element compatible with various makes of ranges and ovens and is sold as an individual part. Measuring 20.5-inches wide and 20.25-inches (with terminals) long, this heating element i...
This an authentic OEM 40-Watt replacement light bulb, used in a number of household appliances. It is specially designed to withstand extreme temperatures, which is why these replacement bulbs are mos...
This 18 ml bottle of white appliance touch-up paint is used to cover scratches or marks on your appliance. The white touch-up paint can be used on refrigerators, microwaves, ranges, clothes dryers, an...
This burner control knob is designed to adjust the heat settings on a range, allowing users to turn burners on and off and fine-tune flame or temperature levels. Measuring 2 inches in diameter and fin...
This is a multi-use and multi-appliance screw. It can be used on a microwave, refrigerator, range/oven, air conditioner, dehumidifier, washer, or dryer. The measurements of this screw are 8 x 1/2 inch...
This oven temperature sensor is designed to monitor and regulate the internal heat levels of your range, ensuring consistent and accurate cooking performance. It communicates directly with the control...
The light socket on your electric range connects the power source to the light bulb. If your oven light is malfunctioning, you may need to replace the light socket. The light socket is located in the ...
The Door Vent Trim (White) is an OEM replacement part that fits a variety of ranges from Whirlpool, KitchenAid, Maytag, Jenn-Air, Amana, Inglis, and Magic Chef brands. The vent trim attaches to the to...
This surface burner switch is an essential component for electric ranges, controlling the power and heat level of the left front burner. It regulates the temperature by cycling the burner on and off t...
Ask our experts a question about this model and we'll get back to you as soon as possible!
5 questions answered by our experts.
< Prev
1
Next >
Sort by:
Search filter:
Clear Filter
Your search term must have 3 or more characters.
Keep searches simple. Use keywords, e.g. "leaking", "pump", "broken" or "fit".
Sorry, we couldn't find any existing answers that matched.Try using some different or simpler keywords, or submit your new question by using the "Ask a Question" button above!
Steve
May 24, 2023
Which of the four infinite switches that you have listed (4,4A,4B, or 4C) is for my fight front element?
Second request for this information this week. Please reply.
For model number WFE745H0FS0
Hello Steve, Thank you for writing. The Right Front Element Switch for this model is listed as PartSelect Number PS11731368. We hope this helps!
Glass cooktop will only cook on high temp even when turned to low or med
For model number WFE745H0FS0
Hi Roger,
Thank you for your question. If you are setting one of the burners to a low or medium heat setting and the burner goes right to high heat setting, the issue is likely the burner switch that controls it. To verify if the switch is operating normally, you will need to test it for continuity with a multimeter on the Rx1 setting. Before removing and checking any part on your range, unplug the range from the electrical outlet. First check the wires connected to the switch for any signs of burning, or overheated wires and terminals. If no issues are found, test the switch for continuity with the multimeter. Place probes on the L1 and H1 terminals and then touch the L2 and H2 terminals. If your test results indicate that there is no continuity between one or both sets of terminals, you need a replacement infinite switch. If the switch is fine, check the burner element. Visually inspect it for any signs of bubbling, burning, wear, holes, or damage. If there are no signs of damage use a multimeter and touch each of the terminals one at a time with one probe while holding the other probe to the outside surface of the element. If either terminal shows continuity, it is defective. To test the entire element for continuity, place each of the probes on the terminals, one on each. The exact reading you should receive varies between models. Refer to your owner’s manual to determine what yours should be, but if any element has a reading outside of 19 to 115 ohms, it is defective. If you do not receive the correct readings from the tests above or find damage on your element, you will need a replacement surface burner element. We hope this helps!
Help! Our Whirlpool range has issues. The broil element stays on continuously when in bake mode, but turns off when the oven is off. We replaced the oven sensor in August, and then it worked well for a few months. It went out again in December, so we replaced it again, but it just started doing the same thing. Turn 'bake' on, and the broil element goes full blast without turning off until you turn the oven off. It just said 'fault detected' on the control panel, but no code came up. Thanks!
For model number WFE745H0FS0
Hello Laura, Thank you for the question. This could be an issue with the wiring or the Oven Control Board, PartSelect Number PS12704743. If the Element, sensor and wiring are good, you may need a new board. We hope this helps.
The oven does not keep temperature as set and the food is not baked?
For model number WFE745H0FS0
Hello Harland, thank you for the great question. Based on our research, we would recommend checking the temperature sensor, part number PS11726314, to fix the issue. We hope this helps!
First, we turned on broil and the upper element turned orange and obviously worked. We figured the bottom element went out. The diagram on this site showed a bottom heating element that looked nothing like ours, but after reading other reviews, and reading that part that goes through the back of the oven was in the middle, and not off to the side, we ordered this element. It was perfect. All you have to do is unplug the oven, take out the bottom pan covering the element by removing 2 screws in the back, remove the lower small cover on the back of the oven and then unplug the old element, unscrew the old element on the inside of the stove, then install the new element and put everything back like it was. Nothing to it. It worked like a charm and my oven now heats up fast again. Easiest appliance repair job ever!
Took 2 screws under front edge of smooth top. Unscrewed ground wire from back of smooth top unit. Unplugged 2 wire bundles, from back. Took bad element out , put in new one. Put back together. About 10 min's tops. Easy peasy.


 Diagram and Parts List for Whirlpool Range")