Introducing the Samsung Washer Shock Damper Front, a vital component for optimal washer performance. This part maintains the stability of your washer, helping minimize vibration and noise during opera...
Introducing the Hex Head Bolt, a vital component designed to keep your Samsung, Kenmore, or Maytag washer functioning at its best. Manufactured with strict quality controls, this part ensures you rece...
Introducing the Samsung brand Rear Shock Damper, a crucial component of Samsung Washers. Engineered to deliver optimal performance, this rear shock damper is designed uniquely to help stabilize your w...
Introducing the Drawer Tub Hose for your Samsung Washer, a vital piece to ensure efficient functioning of your appliance. This genuine Samsung part is designed with the highest attention to detail and...
Got a Samsung washing machine that's not functioning as it used to? The solution might be simpler than you think! Our authentic Samsung Spider Arm Drum Shaft is just what you need. This little miracle...
Add exceptional longevity and superb performance to your Samsung washer and dryer with the high-quality Water Temperature Thermistor. Specially designed by Samsung, this exceptional product ensures ac...
Introducing the Samsung Washer Drain Pump, a vital component to keep your appliance working efficiently. Designed and crafted by Samsung, a name trusted by millions, this pump works seamlessly with yo...
Having trouble with your Samsung washing machine not spinning correctly? You might need our authentic OEM Drive Motor Stator, exclusively made for your Samsung washer. Picture it as the heart of your ...
Upgrade your Samsung Dryer or Samsung Washer with this genuine Control Knob. Specifically designed by Samsung, it provides an optimal level of control and compatibility. This authentic product ensures...
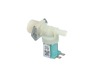
Introducing the highly efficient Water Inlet Valve, exclusively designed for your Samsung, Maytag, and Kenmore washers. This essential component ensures a controlled and steady water flow into your wa...
Enhance the performance of your Samsung or Kenmore washer with the Outer Seal Clamp. This essential part is expertly crafted by Samsung, ensuring excellent quality and a fit precise like original equi...
Improve the performance of your Samsung or Kenmore Washer with this genuine Guide Spring. This crucial component ensures smooth operation by assisting in the suspension system of the washer's drum. As...
$4.33
In Stock
Questions And Answers for WF45K6500AV
Ask our experts a question about this model and we'll get back to you as soon as possible!
1 question answered by our experts.
< Prev
1
Next >
Sort by:
Search filter:
Clear Filter
Your search term must have 3 or more characters.
Keep searches simple. Use keywords, e.g. "leaking", "pump", "broken" or "fit".
Sorry, we couldn't find any existing answers that matched.Try using some different or simpler keywords, or submit your new question by using the "Ask a Question" button above!
Don
December 17, 2021
washer keeps getting stuck in wash cycle and has to be re-started.
also how to get in diagnosis mode to identify problem?
For model number WF45K6500AV
Hello Don, Thank you for your inquiry. We have researched the model you have provided and we would recommend checking the following parts to fix your issue: the door lock switches, door button switch, the water inlet valves, the pressure sensor, and the control board. To enter diagnostic mode, power on the machine, and press and hold Soil Level and Delay End at the same time. You should hear a chime and the display will show all zeros. Next press the Soil Level button once and the letter D should show on the screen to show you are in diagnostic mode. Then turn the knob in either direction to cycle through any error codes that come up. Good luck with your repair.
Unplug electrical cord. Remove top of washer. Remove soap dispenser tray. Remove control panel, disconnect electrical harness from back of panel. Remove front door assembly, make sure you first remove the wire clamp from the front of the diaphragm. Remove hoses from diaphragm and then remove the rear wire clamp on the diaphragm. Install the new diaphragm by starting at the bottom and make sure the drain holes line up. Assemble everything back in reverse order of how it was disassembled.
Take pics every step, easier re-assembly. Dismantled washer keeping bolt/screw section removed compartmentalized in a tackle box in the order of removal. Replaced drum support, bearings, seal, old blots. Too much to write but I was able to do it all in about 4 hours once all the parts finally came in.