Introducing the Hex Head Bolt, a vital component designed to keep your Samsung, Kenmore, or Maytag washer functioning at its best. Manufactured with strict quality controls, this part ensures you rece...
Upgrade your domestic laundry routine with our Washer Tub Gasket/Seal. Designed by leading brands, Samsung and Maytag, this product is designed for maximum efficiency and durability. Guaranteed to fit...
Have you noticed your Samsung washer is not operating as efficiently as it used to? Or Perhaps you've spotted a leak? It's likely because there is a tear or wear in your door boot seal-gasket. Our r...
Is your Samsung washing machine door glass broken or cracked? We've got just what you need to fix that problem. Introducing our Samsung Washer Door Glass ? a reliable, high-quality replacement part cr...
Everything you need to keep your Samsung or Maytag washer working properly can be found right here. The Drain Pump is essential in ensuring your washer operates efficiently, smoothly channeling water ...
Enhance the performance of your Samsung or Kenmore washer with the Outer Seal Clamp. This essential part is expertly crafted by Samsung, ensuring excellent quality and a fit precise like original equi...
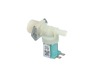
Introducing the highly efficient Water Inlet Valve, exclusively designed for your Samsung, Maytag, and Kenmore washers. This essential component ensures a controlled and steady water flow into your wa...
Is your Samsung washing machine door giving you trouble? Our Samsung Washer Door Lock Switch could be the fix you need. Designed by Samsung, this genuine OEM part ensures that your washer door stays t...
Introducing the Samsung,Kenmore Washer's essential component - the Hose - Water. This high-quality component is known for its enduring performance and its primary function is to ensure efficient flow ...
Upgrade the performance of your Samsung or Maytag washer with the Rear Tub Oil Seal designed for smooth operation and durability. This premium part delivers superior sealing to prevent leaks in your w...
Explore the reliable functionality of this Samsung pump grommet, designed specifically to diminish vibration between the washer's pump and frame. Prior to installing this vital part, be sure to power ...
Ask our experts a question about this model and we'll get back to you as soon as possible!
1 question answered by our experts.
< Prev
1
Next >
Sort by:
Search filter:
Clear Filter
Your search term must have 3 or more characters.
Keep searches simple. Use keywords, e.g. "leaking", "pump", "broken" or "fit".
Sorry, we couldn't find any existing answers that matched.Try using some different or simpler keywords, or submit your new question by using the "Ask a Question" button above!
Maurice
August 18, 2022
what will keep the pump from draining pump only get 22 volts
For model number WF317AAG/XAA
Hi Maurice,
Thank you for your question. If the pump is not draining, check the pump for signs of damage or clogs. Also, check the drain hose to see if it is positioned in the stand pipe correctly and make sure it is not kinked or clogged. If these parts show any signs of damage, they will need to be replaced. If you have any questions, please let us know. We are open 7 days a week. We look forward to hearing from you!
An initial issue was getting the door to unlock. I tired several things but finally was able to pull the door as if to open it and put something between the door handle and the front of the washer while I ran a washer cycle. There is a way to take the washer top off and reach down inside the unit and pull down on a release, but I did not try that.
The washer has a rubber boot between the washer frame and the wash tub. There is a metal wire ring that secures the outer edge of the boot to the washer frame. Peel back the outer edge of the boot at the bottom to reveal a metal ring that has its ends connected by a small spring. Use a flat tip screw drive to pry this ring off. Peel back the boot from the washer frame.
Next use a Phillips screw drive to remove the two screws that protrude through the wash frame on the right side of the door.
Reach between the washer tub and the frame and the tub and pull the switch through the opening and the washer tub. You will have to wiggle the switch around to remove it. There are three sets of wires attached to the switch by plugs.
The switch is covered with a plastic protective cover. Remove this. You will have to use a screw driver to release various catches to do this.
Remove the three set of wires. There are catches that secure the wire plugs in place. pry them back with a small screw drive.
Attach the new switch to the sets of wires.
Attach the protective cover to the switch. The wires feed through a small slot toward the bottom of the switch.
Slide the switch through the opening where you removed it. and re-attach it using the two screws.
Put the rubber boot in the channel in the washer frame. Replace the metal ring. This was the most challenging part of the repair for me. I had to play around with this to get it into position. You have to work it around the gasket and stretch out the spring.
By the way, The service was great and exceeded by expectations.
The part did not fit this model. The flap part fit the hole but the seal ring is too big. I cut 1\4inch out and used super glue the make it small enough to fit and seal the hose. Make sure you only use a drop of glue and keep the seal even and flat so it will seal
Removed the rear top two Phillips screws, pull off top cover. Unscrew two phillips screws that hold the outside front lock trim, unclip (one left of housing) plastic housing. Remove one phillips screw 11 o'clock from housing, about 6" away, with door button above it, which releases the door lock housing from inside the machine. From right side (facing machine) look down into left front of machine, you will see a black cover, which does a goid job hiding the white part, but it protects the part from water, I guess. Unclip 3-4 plugs, push spinning loader away to pull out the complete part easily. Swap back covers (a bit annoying to place wiring harness back in such a tight place, and cover on. You can try another method if you have a simpler way, like place the harness onto part first, before plugging in and placing cover. But, I kept dropping the part into the machine, which equals a little pita). Then screw the 11pm screw to hold part and the two other screws (small housing and cover), place remaining 2 screws, and lid. Pretty much undo the above procedure. Done.