Introducing the Hex Head Bolt, a vital component designed to keep your Samsung, Kenmore, or Maytag washer functioning at its best. Manufactured with strict quality controls, this part ensures you rece...
$11.95
In Stock
Order within the next 7 hrs and your part ships today!
Revive the wide array of your appliances including your Samsung Refrigerator, Samsung Dryer, Samsung Washer, and even your Samsung Dishwasher with the Tapping Screw, a crucial component engineered by ...
$6.95
In Stock
Order within the next 7 hrs and your part ships today!
Optimize your Samsung, Maytag, or Kenmore washer's performance with the Drain Pump Assembly - 120V 60Hz. This high-quality unit directly replaces the original drain pump, ensuring efficient and smooth...
Is your Samsung washing machine door glass broken or cracked? We've got just what you need to fix that problem. Introducing our Samsung Washer Door Glass ? a reliable, high-quality replacement part cr...
Introducing an integral element for your washing machine maintenance, Samsung's oil seal. This essential component is expertly designed to be pressed into the rear drum of your washer, thereby providi...
$44.95
In Stock
Order within the next 7 hrs and your part ships today!
Having trouble with your washing machine draining efficiently? Let us help you solve that problem with the Samsung Washer Drain Pump. This key part is produced by Samsung who you already trust for dep...
Enhance the performance of your Samsung or Kenmore washer with the Outer Seal Clamp. This essential part is expertly crafted by Samsung, ensuring excellent quality and a fit precise like original equi...
$17.44
In Stock
Order within the next 7 hrs and your part ships today!
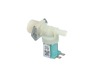
Introducing the highly efficient Water Inlet Valve, exclusively designed for your Samsung, Maytag, and Kenmore washers. This essential component ensures a controlled and steady water flow into your wa...
$84.95
In Stock
Order within the next 7 hrs and your part ships today!
Improve the performance of your Samsung or Kenmore Washer with this genuine Guide Spring. This crucial component ensures smooth operation by assisting in the suspension system of the washer's drum. As...
$6.95
In Stock
Order within the next 7 hrs and your part ships today!
Say goodbye to shaky washing cycles with the Samsung Washer Counterweight. This integral part keeps your washing machine balanced during the spin cycle, protecting your floors and clothing from potent...
$108.85
In Stock
Order within the next 7 hrs and your part ships today!
Experience superior washing machine performance with this indispensable Samsung/Kenmore Shock Absorber (Rear). Designed for optimal compatibility with your Samsung or Kenmore washer, this compact yet ...
$53.95
In Stock
Order within the next 7 hrs and your part ships today!
Questions And Answers for WF210ANW/XAA
Ask our experts a question about this model and we'll get back to you as soon as possible!
3 questions answered by our experts.
< Prev
1
Next >
Sort by:
Search filter:
Clear Filter
Your search term must have 3 or more characters.
Keep searches simple. Use keywords, e.g. "leaking", "pump", "broken" or "fit".
Sorry, we couldn't find any existing answers that matched.Try using some different or simpler keywords, or submit your new question by using the "Ask a Question" button above!
Philip
July 12, 2021
Will not spin
For model number WF210ANW/XAA
Hello Philip, Thank you for the question. This could be a defective Drain Pump. If the pump does not kit on to start draining, the tub will not spin. We hope this helps!
Samsung sqeaking when the drum moves, took the back panel off and could not locate the belt, does it have a belt? When I turn the back wheel assembly it squeaks but where is the belt? Thank You.
For model number WF210ANW/XAA
Hello Kurt, thank you for contacting us. Based on our research, your model does not come with a drive belt. If it is making the squeaking noise while the drum moves, the problem could be most probably with the tub bearings. For your model, the tub bearing does not come separately, and it comes as a part of the outer tub assembly, part number PS4221188. We would recommend checking it to solve the problem. We hope this helps!
Can i replace the filters where water hoses go into back of washer?
For model number WF210ANW/XAA
Hi Theresa, thank you for contacting us. It seems that you are referring to the filter screens inside the water inlet valves. They come attached to the water inlet valves, part number PS4209090, and PS4209100. They are not sold separately. We hope that helps!
Watched the video, procedure was simple and as depicted on the video. Started by using a wet shop Vac to the discharge hose and sucked as much dirty wash water out as possible. Removed the pump,and found the motor did not turn freely. Removed the motor (3 screws) and replaced the motor with new part. Reassembled the washer, everything worked as it should. After about 3-4 loads of laundry, the "Not Draining" code / problem returned. Again, sucked out the water with the Shop Vac. Checked the Filter /Cleanout and found it completely packed with MUD. Cleaned that out, and again disassembled the washer. The pump was removed and the remaining muddy gunk was cleaned from the impeller. The 3 drain lines that attached to the pump were inspected for blockage/obstruction and flushed of any muddy residue. Reassembly was quick and easy, and the washer has worked well since. I have no idea how the dirt got into the system with enough dirt to gunk up the system. Recommend keeping more frequent inspections of the cleanout trap.
The part did not fit this model. The flap part fit the hole but the seal ring is too big. I cut 1\4inch out and used super glue the make it small enough to fit and seal the hose. Make sure you only use a drop of glue and keep the seal even and flat so it will seal
First unplug or turn off thee circuit breaker. Then remove the two screws to the top cover. Slide the cover back about three inches then remove the cover. Next take out the screw to the old sensor. Then unplug the electrical connection by squeezing and the pulling to disengage. Now set the old unit aside. You then grad your eight inch wire tie and hold the with flat side to the right and just to the right of the screw hole for the bracket is a square hole. Feed to wire tie into the square hole with your left hand then loop down left side of the end of new sensor and back up threw the square hole and tighten with the pliers. Your new sensor will be positioned just like it was mounted to the metal bracket. And pretty ridged. Now connect the vacuum hose and electrical connector.