This an authentic OEM 40-Watt replacement light bulb, used in a number of household appliances. It is specially designed to withstand extreme temperatures, which is why these replacement bulbs are mos...
This 18 ml bottle of white appliance touch-up paint is used to cover scratches or marks on your appliance. The white touch-up paint can be used on refrigerators, microwaves, ranges, clothes dryers, an...
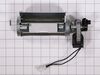
If your oven’s control panel is getting too hot or showing fan errors, this cooling fan might be the fix. It helps keep the electronics cool by circulating air behind the panel, which can prevent over...
This is a multi-use and multi-appliance screw. It can be used on a microwave, refrigerator, range/oven, air conditioner, dehumidifier, washer, or dryer. The measurements of this screw are 8 x 1/2 inch...
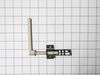
This oven temperature sensor is designed to monitor and regulate the internal heat levels of your range, ensuring consistent and accurate cooking performance. It communicates directly with the control...
The light socket on your electric range connects the power source to the light bulb. If your oven light is malfunctioning, you may need to replace the light socket. The light socket is located in the ...
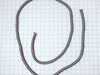
The Door Vent Trim (White) is an OEM replacement part that fits a variety of ranges from Whirlpool, KitchenAid, Maytag, Jenn-Air, Amana, Inglis, and Magic Chef brands. The vent trim attaches to the to...
This surface burner base is a crucial component for specific models of stoves, ovens, and ranges. It serves the important function of holding the orifice and directing gas to the burner head for effic...
$132.76
In Stock
Questions And Answers for WEG745H0FS0
Ask our experts a question about this model and we'll get back to you as soon as possible!
25 questions answered by our experts.
< Prev
1
2
3
Next >
Sort by:
Search filter:
Clear Filter
Your search term must have 3 or more characters.
Keep searches simple. Use keywords, e.g. "leaking", "pump", "broken" or "fit".
Sorry, we couldn't find any existing answers that matched.Try using some different or simpler keywords, or submit your new question by using the "Ask a Question" button above!
Tate
January 2, 2020
Price for on/off knobs (#7 on illustration)
For model number WEG745H0FS0
Hello Tate, Thank you for contacting us. I have researched the model you have provided and have found the part you are looking for is PartSelect Number PS12114378. You can enter the part number into the website for price and availability and there will be a add to cart button to proceed with the order and choose your shipping method. You can pay with Credit card or PayPal on the site. Hope this helps!
The start button on the control panel doesn't work. All the other buttons work fine. We bought it new about 3 years ago, but we've only been using it since february.
For model number WEG745H0FS0
Hi Bridget ,
Thank you for your question. If the start button is not working on the control panel, check the connections between the membrane switch and the electronic control board. If the connections are fine, you will need to replace the membrane switch. We hope this helps! Good luck with the repair!
My oven display not working, do I just need to replace the board or is there a inline fuse that could be bad
For model number WEG745H0FS0
Hello Jeff, Thank you for the question. This model does not require a fuse. If it is just the Display not operating, the Control Board, PartSelect Number PS11756686 may be faulty. We hope this helps!
Hello, need to know what part to replace. We had a water spill on our keyboard since then error code F3E0 comes up, we had confirmed that the oven sensor works just fine. Key pad buttons seem to work, there’s a display and buttons make sounds…Broiler works, stove top works, oven baking however doesnt.
From what I understand we likely need to replace the control board, just not certain or know what part.
Thank you
For model number WEG745H0FS0
Hi Alisha,
Thank you for your question. If you are unable to bake with your oven, the igniter may not be working correctly and it will need to be replaced. The part number listed under your model number for the oven bake igniter is PS11752876. If you would like to place an order for it, you may order it either online or by calling our customer service line and anyone will be happy to assist you. We hope this helps! If you have any questions, please let us know.
What is the part number for the large knob
And the part number for the small knob
They are the knobs to turn on the burners on top of stove
For model number WEG745H0FS0
Hello Bruce, thank you for contacting us. The small control knob you are referring to is part number PS12349292, and the large control knob is part number PS16543519. We hope this helps!
I numbered every part. ex: 1 L., for first part removed left side. I used a magic marker to circle the holes and wrote the number of screws used on the part, set the srews in a separete place, so that I new where these screws went to. The cleanup was pretty time consuming, but I was able to keep my stove, when every repairman I called to fix my stove told me I was better off buying a new stove. ($600.00 stove 2 years old)Please Note: The insulation blanket needed for the entire stove is two pieces, the sides and top are one part # and the bottom and back, are another part #. I did not know this. I just purchased the top and sides. I got lucky, the back and bottom were still in good shape. So I guess I should have read the description of the part more carefully to see what it covers, before I ordered it. It took two people two hours to do the work, it was really nice to have an extra set of eyes, to remember what direction pieces of metal from the stove went. I would do it all over in a heart beat instead of buying a new stove.
Socket Lite come with clips attached to the outside of the housing. After you unhook the 3 lead wires that are attached to the unit. All you have to do is push in on the clips and release the unit. Then you snap in the new unit. Attach the 3 wire leads, put a oven bulb in the socket end, and the install the light cover
Removed oven from wall unit and took the back off. Removed the old socket assembly by depressing the ears and forcing unit into the oven. The electrical wires were easily removed since they are spade connections and slip off. They also are different sizes so that there is no chance of erroneously putting them back in an incorrect order. The new unit simply slips in from the front and snaps into place. The most difficult part of the entire process is removing the old unit. A little "friendly persuasion" is required to get the old unit out.


 Diagram and Parts List for Whirlpool Range")