This 18 ml bottle of white appliance touch-up paint is used to cover scratches or marks on your appliance. The white touch-up paint can be used on refrigerators, microwaves, ranges, clothes dryers, an...
$15.95
In Stock
Order within the next 4 hrs and your part ships today!
This is a multi-use and multi-appliance screw. It can be used on a microwave, refrigerator, range/oven, air conditioner, dehumidifier, washer, or dryer. The measurements of this screw are 8 x 1/2 inch...
$28.95
In Stock
Order within the next 4 hrs and your part ships today!
This oven temperature sensor is designed to monitor and regulate the internal heat levels of your range, ensuring consistent and accurate cooking performance. It communicates directly with the control...
$150.68
In Stock
Order within the next 4 hrs and your part ships today!
The light socket on your electric range connects the power source to the light bulb. If your oven light is malfunctioning, you may need to replace the light socket. The light socket is located in the ...
$87.95
In Stock
Order within the next 4 hrs and your part ships today!
This oven rack offers a sturdy, chrome-finished surface for baking, roasting, and broiling in your range. It fits a wide selection of compatible ovens and is built to handle high heat and frequent use...
$65.39
In Stock
Order within the next 4 hrs and your part ships today!
Give your oven door a clean, finished look with this white side trim piece. It fits on the right edge of the door, helping seal in heat and protect the glass. If your current trim is cracked or loose,...
$87.09
In Stock
Order within the next 4 hrs and your part ships today!
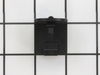
It provides a way of connecting individual electrical wires and offers protection of the device from electrical surges (voltages and/or currents).
$43.19
In Stock
Order within the next 4 hrs and your part ships today!
Questions And Answers for WEE510S0FW2
Ask our experts a question about this model and we'll get back to you as soon as possible!
5 questions answered by our experts.
< Prev
1
Next >
Sort by:
Search filter:
Clear Filter
Your search term must have 3 or more characters.
Keep searches simple. Use keywords, e.g. "leaking", "pump", "broken" or "fit".
Sorry, we couldn't find any existing answers that matched.Try using some different or simpler keywords, or submit your new question by using the "Ask a Question" button above!
Darla
November 29, 2021
I have broken the cooktop. Can I replace it myself
For model number WEE510S0FW2
Hello Darla, Thank you for the question. Most customers have been able to do the repair on their own. We have researched the model you have provided and have found the part you are looking for is Part #: PS11775222 for the Black Top and Part #: PS11775250 for White. We hope this helps!
The white paint around my 5 year old Electric Range control panel is peeling. What steps can be taken to correct this situation?
For model number WEE510S0FW2
Hi John, thank you for contacting us. Use a mild detergent and water to remove any grease or dirt. Dry the area thoroughly. Use fine-grit sandpaper to sand the peeling paint area gently. This will help remove any loose paint and create a smooth surface for the new paint to adhere to. Then, apply white touch up paint part number PS385132. Let the paint cure for the recommended time before using the range to ensure the best adhesion and durability. We hope this information helps!
Hi Virginia, thank you for contacting us. The oven control board for your model is part number PS11765771. It is listed on our site. We hope that helps!
Hello Emmanuel, thank you for contacting us. Based on our understanding of the issue, we would suggest checking the power cord for any damages first. If it is working fine, then you may need to check the terminal block, part number PS11750972, to solve the problem. It connects the house power to the range wire harness. We hope this helps.
Oven does not maintain set temp but steadily decreases after setting. Door gasket intact. No heat loss detected. Maintenance man for complex says it is the control board (?). Your thoughts, please.
For model number WEE510S0FW2
Hello Barbara, thank you for your inquiry. To resolve the issue of an oven not maintaining its set temperature and steadily decreasing after setting, you may need to check the temperature sensor, part number PS11726314. A malfunctioning temperature sensor can most probably cause this issue. We hope this helps!
I numbered every part. ex: 1 L., for first part removed left side. I used a magic marker to circle the holes and wrote the number of screws used on the part, set the srews in a separete place, so that I new where these screws went to. The cleanup was pretty time consuming, but I was able to keep my stove, when every repairman I called to fix my stove told me I was better off buying a new stove. ($600.00 stove 2 years old)Please Note: The insulation blanket needed for the entire stove is two pieces, the sides and top are one part # and the bottom and back, are another part #. I did not know this. I just purchased the top and sides. I got lucky, the back and bottom were still in good shape. So I guess I should have read the description of the part more carefully to see what it covers, before I ordered it. It took two people two hours to do the work, it was really nice to have an extra set of eyes, to remember what direction pieces of metal from the stove went. I would do it all over in a heart beat instead of buying a new stove.
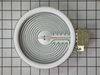
Took 2 screws under front edge of smooth top. Unscrewed ground wire from back of smooth top unit. Unplugged 2 wire bundles, from back. Took bad element out , put in new one. Put back together. About 10 min's tops. Easy peasy.