


SHPM78Z55N Bosch Dishwasher - Overview
Models starting with SHPM78Z55N
Click on the best match to narrow your results.
Keep searches simple, eg. "belt" or "pump".

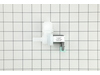
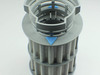
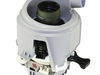
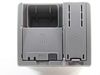
Access Valve
PartSelect #: PS16746057
Manufacturer #: 10023852
This water access valve, also known as a water inlet valve, is a genuine replacement component designed for use in compatible dishwashers. It regulates the flow of water from the household supply into...
$46.92
In Stock

BOSCH
PartSelect #: PS18375489
Manufacturer #: 10040888
This wheel for the lower rack of your dishwasher, it includes the brushing you will need for installation; the axel is not included. You need to line the replacement wheel up with the axel, slide it i...
No Longer Available

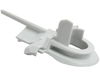
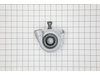
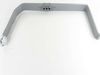
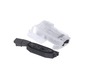
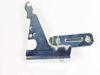
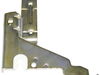
Mounting Bracket
PartSelect #: PS8728568
Manufacturer #: 00619985
Sold individually.
$14.17
In Stock

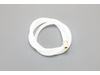
SEALING
PartSelect #: PS18375762
Manufacturer #: 12054183
This dishwasher door gasket creates a watertight seal between the door and the tub, preventing leaks during wash cycles. Made from flexible black rubber, it fits securely along the edge of the door to...
$23.53
In Stock

Dishwasher Circulation Pump with Heater
PartSelect #: PS11724988
Manufacturer #: 12008381
If your dishwasher isn’t cleaning well, won’t start, or is leaking, this heat pump assembly could be the fix. It’s designed to fit select Bosch, Thermador, and Gaggenau models and helps circulate and ...
$216.29
In Stock

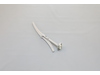
Adjustable Tine Row Clip
PartSelect #: PS8727471
Manufacturer #: 00611981
This part is a replacement tine row clip for your dishwasher. The tine row clip is adjustable, and it fits onto your dishrack to holds the tines into place. If your dishrack tine rows will not stay in...
$9.77
In Stock

PUMP-DRAIN
PartSelect #: PS11704799
Manufacturer #: 00631200
This drain pump is designed for use in various dishwasher models and is responsible for efficiently removing water at the end of each cycle. It directs the water through the drain hose, which connects...
$69.01
In Stock


FILTER-MICRO
PartSelect #: PS8730270
Manufacturer #: 00645038
This replacement micro filter is designed to trap small food particles and debris during the wash and rinse cycles, helping to maintain optimal cleaning performance in your dishwasher. Positioned with...
$60.96
In Stock

Dishwasher Spray Arm
PartSelect #: PS8737036
Manufacturer #: 00745856
This upper spray arm is a key component in many dishwashers, designed to distribute water evenly across dishes placed in the top rack. Located beneath the upper rack, it features multiple nozzles that...
$44.07
In Stock

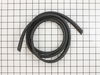
Dishwasher Hosedrain
PartSelect #: PS8737004
Manufacturer #: 00744881
This drain hose helps your dishwasher get rid of dirty water after each cycle. It connects to your home’s plumbing and keeps things flowing smoothly. If your dishwasher isn’t draining, smells bad, or ...
$39.01
In Stock

Lower Dishrack
PartSelect #: PS18375870
Manufacturer #: 20007189
If your dishwasher’s bottom rack is broken or rusted, this replacement rack can help get things back in order. It’s designed to fit a variety of Bosch, Thermador, and Kenmore models and holds your dis...
$211.17
In Stock
Common Symptoms of models starting with SHPM78Z55N
[Viewing 10 of 10]Leaking
Fixed by
these parts
these parts
Show All
Not draining
Fixed by
these parts
these parts

Show All
Not cleaning dishes properly
Fixed by
these parts
these parts
Show All
Not drying dishes properly
Fixed by
these parts
these parts
Show All
Door latch failure
Fixed by
these parts
these parts


Show All
Door won’t close
Fixed by
these parts
these parts
Show All
Will not fill with water
Fixed by
these parts
these parts

Show All
Will not dispense detergent
Fixed by
these parts
these parts

Show All
Will Not Start
Fixed by
these parts
these parts
Show All
Noisy
Fixed by
these parts
these parts

Show All

Keep searches simple. Use keywords, e.g. "leaking", "pump", "broken" or "fit".
A prong in the bottom rack had broken nearly through where it attached to the base & was rusting severely. Several other prongs had also started to rust.
The bottom rack of our Bosch dishwasher was discontinued & no longer available anywhere, so we ordered an OEM replacement rack from PartSelect.com & hoped that it would fit.
The new rack fits perfectly & is actually an improvement over the old one. The new rack doesn't have a vase tower, but that is actually a big design improvement because it can store more dishes & is more flexible than the old one. The new rack comes without a handle cover, but it was very easy to move the handle cover from our old rack to the new one.
The new rack fits perfectly & is actually an improvement over the old one. The new rack doesn't have a vase tower, but that is actually a big design improvement because it can store more dishes & is more flexible than the old one. The new rack comes without a handle cover, but it was very easy to move the handle cover from our old rack to the new one.
Parts Used:
-
Patricia from DALLAS, TX
-
Difficulty Level:Very Easy
-
Total Repair Time:Less than 15 mins
50 of 60 people
found this instruction helpful.
Was this instruction helpful to you?
Thank you for voting!
E:15 error code with Watertap
The E:15 error code means water is detected in the pan under the unit. There are several ways this can happen.
In this case, it was caused by a bad inlet valve. It did not close properly and led to an overflow of water inside that eventually spilled into the pan underneath the unit.
I see now why the pump keeps running after this error. In this case, it would have led to a big flood in the kitchen if it did not.
I was actually able to run the unit while broke by manually operating the valve under our sink that provides water to the unit.
Be sure to turn off breaker before servicing. Don't get shocked!
Be sure to turn off water before starting! Or, you'll have a flood.
Anyway, I just pulled the unit out (was secured by 2 screws on the sides). I lifted up the insulation material on the left side to get at the valve. Pushed a little green tab to release the electrical plug. Then, use pliers to move clamp off the white water hose on the inside. Then, pull of white hose. This was hard in my case. Took a lot of force. Then, reach behind the unit and use pliers to unscrew water hose. Now, the whole gray panel there can pop out with some force. Then, slip the old valve out and slip new one in. Reconnect hoses and clamp. Note that I put some caulk on the connector where white hose goes. Not sure if needed or not.
Good luck!
Parts Used:
-
Raymond from VIENNA, VA
-
Difficulty Level:Easy
-
Total Repair Time:30 - 60 mins
-
Tools:Pliers
45 of 67 people
found this instruction helpful.
Was this instruction helpful to you?
Thank you for voting!
The middle rack was rusting and some of the pegs were coming off.
Removed the spray arm, front handle, and little clips from the old rack and installed onto the new rack. Was very simple.
Parts Used:

-
Susan from MIDDLEBURY, VT
-
Difficulty Level:Really Easy
-
Total Repair Time:15 - 30 mins
19 of 24 people
found this instruction helpful.
Was this instruction helpful to you?
Thank you for voting!