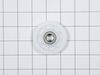
This is an authentic dryer lint filter cover sourced directly from the manufacturer. It protects the more delicate lint filter in your dryer, so that it doesn’t get damaged and lint can’t mix in with ...
The moisture sensor, also known as a humidity sensor, works in conjunction with your dryer by helping determine the amount of moisture in the drum to reduce overdrying. If the timer doesn’t advance co...
The drive belt is made to wrap around the drum, working with the tension pulley to rotate the drum. If your dryer drum will not turn, then you may need to replace your belt. This drive belt is 1/4-inc...
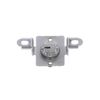
This is a replacement lint screen guide for your dryer. The lint screen guide attaches to the front bulkhead and supports the lint screen. If your lint screen will not stay in place, or if you are not...
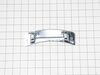
Looking to extend the lifespan of your LG electric dryer? Our authentic LG Idle Pulley could be the missing piece you need! This little thing plays a big role in keeping your dryer working smoothly an...
This plastic adjustable dryer leg is used to support the weight and adjust the height of your dryer to keep it level. To install the leg, tip the dryer back and screw it into the bottom of your dryer ...
I actually went to mr fix it on u tube. Great instruction on how to take dryer apart. First I unplugged the dryer. I found I could reach the heating system by removing the lint tube in the back of the dryer. I put my I phone with the light on inside the back of the dryer and tested the connections to see if all were working. The thermal fuse was not working. I removed the two wires , red on top and white on the bottom. Then used a small Phillips screwdriver to remove the two mounting screws and removed the fuse. I then used a vacuum to clear any lint from the back of the dryer and inside the dryer. This took me about an hour and a half. I did it this way because I did not want to disassemble the entire dryer to get to the components. I received the fuse in 3 days and tested it. It was fine. I then put it in the dryer screwed it in place, connected the wires. Replaced the lint tube. This took about 10 minutes. Dryer is running great.
I unplugged the dryer and disconnected the vent. I pulled the dryer away from the wall so I had room to work on it. Pulled the top cover off (slides back). Took the door off Took the front adjustable feet on the bottom off Unscrewed all of the face screws on the front of the dryer Took the two screws off of the back of the control panel holding the control panel to the metal frame. Gently pulled on the control panel to reveal 4 screws under the control panel to be able to take the front cover off. Pulled the front cover off (the dryer door front cover). Pulled the dryer vent cover off (two screws). I could now see the heating element with sensor/fuse (right side). Did a continuity test (beep) on all visable sensors/fuses on the heating element. No beep on the thermal fuse (used website diagram to locate parts to test and replacement part numbers). Got the part after about a week, tested the parted (it beeped), replaced with new part and put dryer back together, plugged in and the dryer heated. Problem solved.
Unplugged dryer, pled forward to get access to back of dryer. Removed screws, enabling top, front control clip. door panel to be taken off. Lift out drum, replace heater assembly. drum belt, thermistor. Cleaned entire interior and reassembled, working good as new. All parts fit and were a exact match.