


PFCF1NFXCWW General Electric Refrigerator - Overview
Sections of the PFCF1NFXCWW
[Viewing 7 of 7]


Keep searches simple, eg. "belt" or "pump".

Temperature Sensor
PartSelect #: PS304103
Manufacturer #: WR55X10025
Also known as a thermistor. This part is used to sense the temperature in the cabinet.
$34.68
Special Order

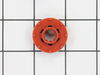
Evaporator Fan Grommet - Red
PartSelect #: PS963756
Manufacturer #: WR02X12008
This evaporator fan grommet is red in color, and is about 1 inch in diameter.
$16.74
Special Order

Light Bulb - 40W
PartSelect #: PS217532
Manufacturer #: 40A15
This 40-Watt light bulb is sold individually.
It is specially designed to withstand extreme temperatures, so this bulb is compatible with a variety of appliance types including refrigerators, ranges,...
$19.10
Special Order

Refrigerator Water Filter
PartSelect #: PS951515
Manufacturer #: GSWF
This OEM filter is sold individually. Change your filter every 6 months for the best results. This filter is found in top-freezer and bottom-freezer refrigerators located in the back upper right corne...
$86.54
Special Order

LIGHT SWITCH
PartSelect #: PS16554876
Manufacturer #: WR23X37285
The interior light of your refrigerator is controlled by a switch that is activated when the door is opened and closed. If your refrigerator light will not turn on, there could be an issue with the sw...
No Longer Available


Divider Guide Kit
PartSelect #: PS3406247
Manufacturer #: WR49X10211
This part is an authentic GE drawer divider kit. It contains both the divider itself, as well as two mounting screws. It fits into your refrigerator to separate the drawer. It is made mainly of plasti...
$109.12
Special Order

SUPPORT Vegetable PAN ASM
PartSelect #: PS3512820
Manufacturer #: WR02X13504
SUPPORT Vegetable PAN ASM
$14.32
Special Order

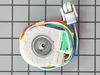
Evaporator Fan Motor
PartSelect #: PS1019114
Manufacturer #: WR60X10185
This evaporator fan motor is located in the back of the freezer, and circulates air over the refrigerator coils. These coils will convert the heat into cool air, which is then circulated.
Note: Therm...
$161.64
Special Order

Evaporator Fan Grommet - Grey
PartSelect #: PS773826
Manufacturer #: WR02X11331
This is a replacement evaporator fan grommet for your refrigerator. The fan grommet absorbs the vibration from the evaporator fan motor for quiet operation while it runs. If your evaporator fan is unu...
$13.95
Special Order

Shelf Support
PartSelect #: PS1020256
Manufacturer #: WR02X12187
This plastic shelf support, or shelf stud connects the shelf to your refrigerator. To replace the shelf support first remove the shelves and drawers from your refrigerator, then remove the damaged or ...
$17.95
Special Order

Lid Bumper
PartSelect #: PS284979
Manufacturer #: WR02X10540
The lid bumper or evaporator fan motor bumper in your refrigerator prevents the fan motor from scraping against the side bracket. If your refrigerator/freezer is noisy, the bumper could be worn down o...
$13.95
Special Order
Questions And Answers for PFCF1NFXCWW
We're sorry, but our Q&A experts are temporarily unavailable.
Please check back later if you still haven't found the answer you need.
Common Symptoms of the PFCF1NFXCWW
[Viewing 20 of 20]Noisy
Fixed by
these parts
these parts

Show All
Fridge too warm
Fixed by
these parts
these parts


Show All
Freezer section too warm
Fixed by
these parts
these parts
Show All
Light not working
Fixed by
these parts
these parts


Show All
Fridge too cold
Fixed by
these parts
these parts
Show All
Freezer not defrosting
Fixed by
these parts
these parts

Show All
Fridge and Freezer are too warm
Fixed by
these parts
these parts

Show All
Too warm
Fixed by
these parts
these parts
Show All
Frost buildup
Fixed by
these parts
these parts
Show All
Ice maker not making ice
Fixed by
these parts
these parts


Show All
Fridge runs too long
Fixed by
these parts
these parts
Show All
Will Not Start
Fixed by
these parts
these parts
Show All
Freezer too cold
Fixed by
these parts
these parts
Show All
Leaking
Fixed by
these parts
these parts

Show All
Clicking sound
Fixed by
these parts
these parts

Show All
Not dispensing water
Fixed by
these parts
these parts
Show All
Door won’t open or close
Fixed by
these parts
these parts


Show All
Doesn’t stop running
Fixed by
these parts
these parts
Show All
Too cold
Fixed by
these parts
these parts
Show All
Won’t start
Fixed by
these parts
these parts
Show All


Keep searches simple. Use keywords, e.g. "leaking", "pump", "broken" or "fit".
my refigerator was warm but the freezer was cold and working correcttly
I went to a GE repair center to explain my problem, the service center reccomended that I have a techinician come out o look at it. $75.00 for the visit and what ever labor and materials wuld cost.
I went on line to see if there were others having this same problem and found that there were many with the same problem.
After reading some of the ways that people found out what was wrong ...it became a matter of three components, the timer, heater or thermostat.
I tried the most common component and the less expensive one first , the thermostat switch I installed it very easily snipping two wires and attaching the news using wire nuts I used the diagram on this website to pinpoint the component and there has not been a problem since.
Parts Used:
-
michele from North Smithfield, RI
-
Difficulty Level:Really Easy
-
Total Repair Time:15 - 30 mins
-
Tools:Pliers
300 of 394 people
found this instruction helpful.
Was this instruction helpful to you?
Thank you for voting!
refrigerator was getting too cold
I removed the old temperature sensor by cutting the wires. I attached the wires of the new sensor with wire nuts and mounted it in the same bracket.
Parts Used:
-
Larry from Menomonie, WI
-
Difficulty Level:A Bit Difficult
-
Total Repair Time:15 - 30 mins
149 of 217 people
found this instruction helpful.
Was this instruction helpful to you?
Thank you for voting!
Evaporator motor sounded like wind in the trees howling
I had to remove all of the shelves.....part of the ice maker.....the rear cover over the freezer coils.....There were two wires that came from the back of the freezer that were also incorporated with the fan motor plug from the factory....This caused me to cut all of the wires from the new motor and soider them to the existing plug and shrink wrap the connections. If GE would have supplied two new ends I could have cut only those wires added the ends and inserted them into the new motor plug thus eliminating an extra hour and a soildering iron,,,,In my case not a big deal however not a project for those who have trouble with repairs using these type of tools.
Parts Used:
-
DOUG from MARYSVILLE, OH
-
Difficulty Level:A Bit Difficult
-
Total Repair Time:30 - 60 mins
-
Tools:Nutdriver, Screw drivers
112 of 139 people
found this instruction helpful.
Was this instruction helpful to you?
Thank you for voting!