The interior light of your refrigerator is controlled by a switch that is activated when the door is opened and closed. If your refrigerator light will not turn on, there could be an issue with the sw...
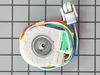
This evaporator fan motor is located in the back of the freezer, and circulates air over the refrigerator coils. These coils will convert the heat into cool air, which is then circulated.
Note: Therm...
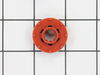
This is a replacement evaporator fan grommet for your refrigerator. The fan grommet absorbs the vibration from the evaporator fan motor for quiet operation while it runs. If your evaporator fan is unu...
This plastic shelf support, or shelf stud connects the shelf to your refrigerator. To replace the shelf support first remove the shelves and drawers from your refrigerator, then remove the damaged or ...
The lid bumper or evaporator fan motor bumper in your refrigerator prevents the fan motor from scraping against the side bracket. If your refrigerator/freezer is noisy, the bumper could be worn down o...
This evaporator fan blade is for your refrigerator, and it circulates air so that the temperature of the fridge is regulated. This model has 3 blades, and is a little more than 4 inches in diameter. I...
When your refrigerator starts accumulating frost or struggles to maintain temperature, the defrost thermostat might need replacing. This small but essential part helps control the defrost cycle, preve...
I had to remove all of the shelves.....part of the ice maker.....the rear cover over the freezer coils.....There were two wires that came from the back of the freezer that were also incorporated with the fan motor plug from the factory....This caused me to cut all of the wires from the new motor and soider them to the existing plug and shrink wrap the connections. If GE would have supplied two new ends I could have cut only those wires added the ends and inserted them into the new motor plug thus eliminating an extra hour and a soildering iron,,,,In my case not a big deal however not a project for those who have trouble with repairs using these type of tools.
I applied some tips learned by reading other reviews. So before I started I grabbed my trusty vise grip pliers and a small screw driver. I locked onto the switch actuator, the part that the refrigerator door pushes in, with the vise grips and pulled on it just hard enough to get the screw driver inserted in the right side to push in the catch clip so the switch could be pulled out further each time the catch clip was depressed to the next detent. Then I used the screw driver on the left site to encourage the switch past the detents on the left and very quickly the switch was out of the mount. The wires from the refrigerator pulled out with the old switch. I unplugged the old switch from the wires and plugged in the new switch and shoved the new switch back into the mount, wiggled it a couple of times to make sure it was secure and the job was done. Once I applied the vise gripes at first, the whole job took less than a minute.
First ,I placed all the frozen food from the freezer into the lower fridge compartment. Removed the main shelf. Removed the ice cube tray shelf. Removed the center plastic covers using a nut driver. Removed the complete inside back wall of the freezer to get access to the fan. Simply removed about 5 screws, and cut 3 tie straps that held the wiring in place. Unplugged the fan connector and removed fan with its brackets and placed them on the kitchen table. Then used the nut driver to remove 2 screws which hald the fan to its bracket. Simply pulled off the fan blades and pressed them onto the new motor. Mounted new motor onto the bracket. Reinstalled the fan assembly back into freezer. Reconnected the wiring and the fan began to run... BE CAREFUL NOT TO TOUCH THE FAN WITH YOUR FINGERS! Finally replaced all the covers, panels, and shelf etc. and everything is once again nice and cold.