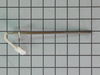
The temperature sensor, also known as an oven probe, detects the temperature within the oven cavity. This temperature sensor is 9 inches in length and is a genuine OEM part. If your oven is too hot, n...
$78.07
In Stock
Order within the next 11 hrs and your part ships today!
Having trouble with your stove or oven's light indicator? Don't fret - we have a solution for you. Our Frigidaire Range Light Lens Indicator, ideal for select Frigidaire, Electrolux, White Westinghous...
$21.50
In Stock
Order within the next 11 hrs and your part ships today!
Order within the next 11 hrs and your part ships today!
Questions And Answers for PCFG3078AFA
Ask our experts a question about this model and we'll get back to you as soon as possible!
1 question answered by our experts.
< Prev
1
Next >
Sort by:
Search filter:
Clear Filter
Your search term must have 3 or more characters.
Keep searches simple. Use keywords, e.g. "leaking", "pump", "broken" or "fit".
Sorry, we couldn't find any existing answers that matched.Try using some different or simpler keywords, or submit your new question by using the "Ask a Question" button above!
Karen
December 15, 2022
Meat temp probe not working right. Sometimes shows 3 --- or temp bounces around, sometimes turns oven off. Do I need a new jack or just the probe.
For model number PCFG3078AFA
Hello Karen, thank you for contacting us. The most probable cause of the issue is a faulty meat probe sensor. We would recommend replacing it with the meat probe, part number PS11757868. Customer service is always available to help you place an order if you are having trouble doing so. Good luck with your repair.
I called a repair place. They charged $54 to diagnose, (said it needed a new latch motor) then wanted $220 to complete the repair. I checked online prices and did it myself for about 15 minutes work and the latch motor itself ($44?).
Was necessary to uplug the range, pull it away from the wall and remove the back panel sheet metal, then 3 screws that mount the motor. Replace motor, reattach sheet metal. Plug in. Done. Ready to bake cookies.
Repair was quite easy, as long as you have the instructions for removing the door. The screws that hold the bottom of the door to the fixed hinge are placed into the side of the hinge assembly after removal; this holds the door at a 45 degree angle for easy removal. After that, just place the door on a flat surface and dismantle the door from the inside. The inner glass is contained in a metal frame with another piece of glass; this frame comes apart easily using the clips in each side. The door assembles easily after the glass is replaced; just take your time and give yourself enough room to lay out the parts as you go. Good luck!