


NY58J9850WS (AA-0000) Samsung Range - Overview
Sections of the NY58J9850WS
[Viewing 5 of 5]


Keep searches simple, eg. "belt" or "pump".

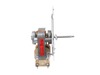
Range Convection Fan Motor Assembly
PartSelect #: PS11720787
Manufacturer #: DG96-00110E
Update your Samsung kitchen appliances with this top-quality Range Convection Fan Motor Assembly. This essential component ensures convection cooking is smooth and effective in your Samsung Range, Wal...
$143.95
On Order

Leveling Leg
PartSelect #: PS4240934
Manufacturer #: DG61-00525A
Do you need to stabilize a wobbly Samsung kitchen appliance? Our Black Leveling Leg from Samsung is not only a robust, original part but also the perfect answer to your misalignment problem! Simple ...
$36.95
In Stock
Order within the next 11 hrs and your part ships today!

Wire Rack
PartSelect #: PS12721757
Manufacturer #: DG75-01001D
Presenting the Wire Rack by Samsung, an essential component designed specifically for your Samsung Range, Samsung Microwave Oven Combo, Samsung Wall Oven, and Samsung Cooktop. Renowned for its sturdy ...
$133.23
In Stock
Order within the next 11 hrs and your part ships today!

Convection Fan Motor - Lower
PartSelect #: PS11735747
Manufacturer #: DG31-00005C
Presenting the Convection Fan Motor - Lower, exclusively designed for your Samsung Range, Samsung Wall Oven, and Samsung Microwave Oven Combo by the renowned brand, Samsung. This high-end part ensures...
$144.92
In Stock
Order within the next 11 hrs and your part ships today!

Convection Fan Motor Assembly
PartSelect #: PS11720788
Manufacturer #: DG96-00110F
Improve your Samsung Range, Wall Oven, or Microwave Oven Combo's functionality with this Samsung Original Convection Fan Motor Assembly. Keeping your appliance operating smoothly, this component assis...
$151.42
On Order

Oven Temperature Sensor
PartSelect #: PS4240744
Manufacturer #: DG32-00004C
Introducing the Samsung Oven Temperature Sensor! An essential component specifically designed to steadfastly monitor and regulate the temperature in your Samsung Range, Microwave Oven Combo, and Wall ...
$137.95
In Stock
Order within the next 11 hrs and your part ships today!

Lower Fan Blade
PartSelect #: PS4241125
Manufacturer #: DG67-00011B
This Samsung convection fan blade is designed for use with ranges. It plays a vital role, rotating on the motor shaft to distribute hot air throughout the oven, thus guaranteeing uniform heating. Prio...
$22.95
In Stock
Order within the next 11 hrs and your part ships today!

Micro Door Switch
PartSelect #: PS4131192
Manufacturer #: 3405-001034
Enhance the efficiency of your Samsung appliances with the Micro Door Switch. This crucial component is compatible with a variety of Samsung products including the Range, Microwave, Microwave Oven Com...
$27.95
In Stock
Order within the next 11 hrs and your part ships today!

Upper Fan Blade
PartSelect #: PS4241119
Manufacturer #: DG67-00001B
Enhance your kitchen functionality with the Samsung Upper Fan Blade, designed for top-notch compatibility with your Samsung Range, Microwave Oven Combo, and Wall Oven. This crucial component guarantee...
$23.95
In Stock
Order within the next 11 hrs and your part ships today!

Control Board Assembly
PartSelect #: PS11735601
Manufacturer #: DE92-02439M
Keep your Samsung range or wall oven running at its peak with the Samsung Main Control Board. Known for reliable control, this component is an essential facet of your appliance's functionality. It ens...
$214.32
On Order

Floor Coating
PartSelect #: PS9606602
Manufacturer #: DG61-00823A
Introducing the Samsung Cavity Floor Coating, an exceptional maintenance and repair essential for your Samsung range, wall oven, and microwave oven combo. This product demonstrates Samsung's consisten...
$165.82
In Stock
Order within the next 11 hrs and your part ships today!

Burner Head
PartSelect #: PS5576948
Manufacturer #: DG62-00076B
If your Samsung range isn't heating like it used to, it might be time for a new Burner Head (Aux). This valuable, strong metal part is specially built for your Samsung range to withstand high temperat...
$54.95
In Stock
Order within the next 11 hrs and your part ships today!
Questions And Answers for NY58J9850WS
We're sorry, but our Q&A experts are temporarily unavailable.
Please check back later if you still haven't found the answer you need.
Common Symptoms of the NY58J9850WS
[Viewing 4 of 4]No heat
Fixed by
these parts
these parts

Show All
Doesn’t shut off
Fixed by
these parts
these parts
Show All
Won’t turn on
Fixed by
these parts
these parts
Show All
Oven not heating evenly
Fixed by
these parts
these parts
Show All


Keep searches simple. Use keywords, e.g. "leaking", "pump", "broken" or "fit".
Touchpad for oven wasn't working, but top gas burners were.
I initially thought I needed a new touch control panel but after a bit of research on the web and numerous videos and articles on replacing the control panel, I found an obscure video and forum where they mentioned that this thermostat fuse has been known to overheat and shut down the oven (touch controls) for safety reason. By the way, my unit is 3 years old and the warranty expired one month ago! I took the top off, found the fuse and tested it with a Multi-meter (again, thanks to some very helpful youtube videos out there). Dead. I figured it was worth a try and ordered the $20 part as opposed to the much more expensive control.
> remove all of the gas burners on the stove (a total of about a dozen screws)
> then remove the top back vent and the screws that hold the top metal piece in place
> you will see the thermostat fuse towards the back in the middle.
> loosen one screw and replace
> put back together in reverse order.
*** You do NOT have to remove the front piece as some videos and articles mention.
The total time should be about 20 minutes. With a little patience and pre-homework, it's easy and you'll save a couple hundred in labor costs.
Good Luck.
Parts Used:

-
Bob from WILTON, CT
-
Difficulty Level:Easy
-
Total Repair Time:30 - 60 mins
-
Tools:Screw drivers
14 of 14 people
found this instruction helpful.
Was this instruction helpful to you?
Thank you for voting!
Convection oven fans were noisy.
This oven has two fans that counter rotate. One spins clockwise, the other counterclockwise. Because of this, the motors and the fan blades are different. The schematic shows the counter clockwise rotating fan with a right hand threaded shaft/nut on the bottom and the clockwise motor and fan with the left hand nut on the top. My range had the motors in the exact opposite orientation, but the fan blades on the motors as shown on the schematic. The incorrect assembly at the factory (I bought new in the box, so I know this is the first repair) meant that nether fan blade was turning the correct direction. So do yourself a favor, be sure you’re buying the right motor (clockwise or counterclockwise) and be sure you put the right fan blade on the right motor. The Samsung motor ending in F is the counterclockwise motor that has the right hand threaded shaft the clockwise motor with the left hand threaded shaft ends in E.
Parts Used:
-
Sue from De Soto, IL
-
Difficulty Level:A Bit Difficult
-
Total Repair Time:30 - 60 mins
-
Tools:Screw drivers, Socket set
17 of 27 people
found this instruction helpful.
Was this instruction helpful to you?
Thank you for voting!
Bearing went out on the fan
Slide out the stove. Unplug the electricity. Remove the back panel with a screwdriver. Then go inside the oven and remove the two Philips head screws holding the fan cover. Then remove the nut holding the fan. Note, it is a left handed nut, so turn it right to loosen it. Pull off the fan. Return to the back and remove the nut and two screws that hold the fan. The fan slides right out. The only problem I had was that the electrical contacts on the new motor were wider than the original. I had to break the plastic so I could separate the wire leads, so that they would fit the new motor. Works like a charm.
John
John
Parts Used:
-
John from NASHVILLE, TN
-
Difficulty Level:Easy
-
Total Repair Time:30 - 60 mins
-
Tools:Screw drivers, Socket set
7 of 14 people
found this instruction helpful.
Was this instruction helpful to you?
Thank you for voting!