


MW830BA Amana Microwave - Overview
Sections of the MW830BA
[Viewing 3 of 3]


Keep searches simple, eg. "belt" or "pump".

Microwave Light Bulb
PartSelect #: PS11745088
Manufacturer #: WP8183592
Sold individually.
$49.16
Special Order

Microwave Fuse 15 Amp 250v
PartSelect #: PS11757434
Manufacturer #: WPY01050009
$16.60
Special Order

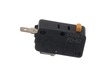
Micro Door Switch
PartSelect #: PS4131192
Manufacturer #: 3405-001034
Enhance the efficiency of your Samsung appliances with the Micro Door Switch. This crucial component is compatible with a variety of Samsung products including the Range, Microwave, Microwave Oven Com...
$27.95
In Stock

Micro Switch
PartSelect #: PS4131191
Manufacturer #: 3405-001033
Introducing the SWITCH-MICRO;125/250VAC, a versatile microwave appliance part compatible with several Samsung and Kenmore models. This durable part is designed for use with Samsung Microwaves and Sams...
$26.95
In Stock


Rectifier
PartSelect #: PS11738693
Manufacturer #: WP13091701
This part is also known as a rectifier.
$35.46
Special Order

Questions And Answers for MW830BA
We're sorry, but our Q&A experts are temporarily unavailable.
Please check back later if you still haven't found the answer you need.
Common Symptoms of the MW830BA
[Viewing 3 of 3]No heat
Fixed by
these parts
these parts


Show All
Doesn’t shut off
Fixed by
these parts
these parts
Show All
Won’t turn on
Fixed by
these parts
these parts

Show All
Keep searches simple. Use keywords, e.g. "leaking", "pump", "broken" or "fit".
Blown Fuse - Ps1750182
Unscrewed the cover of the microwave replaced the blown fuse with the new fuse, plugged in the microwave and tested all functions and everything worked fine. Thx for quick delivery.
Parts Used:
-
John from Inverness, FL
-
Difficulty Level:Really Easy
-
Total Repair Time:Less than 15 mins
-
Tools:Screw drivers
12 of 14 people
found this instruction helpful.
Was this instruction helpful to you?
Thank you for voting!
Light bulb burned out.
Found instruction on internet,
1. Remove anit-tampering screws with punch and hammer
2. Remove the rest of the screws
3. Removed cover
4. Remove burned out bulb and installed new one
5. INstalled cover
6. Installed screws including the anti tampering onces
7. Op tested unit.
Wife is happy.
1. Remove anit-tampering screws with punch and hammer
2. Remove the rest of the screws
3. Removed cover
4. Remove burned out bulb and installed new one
5. INstalled cover
6. Installed screws including the anti tampering onces
7. Op tested unit.
Wife is happy.
Parts Used:
-
Stephen from Cottonwood, AZ
-
Difficulty Level:Easy
-
Total Repair Time:Less than 15 mins
-
Tools:Screw drivers
16 of 33 people
found this instruction helpful.
Was this instruction helpful to you?
Thank you for voting!
microwave ran with the door open
First I read through the customer comments, reviews, questions, etc. at Parts Select, which is always a good bet. Then I put "samsung microwave door switch replacement" into youtube and watched some videos. They don't even have to be for Samsung. From what I can tell, many of the appliance companies use the same design and the same junk parts, so watching a GE video is almost the same for example. Watch some videos to familiarize yourself with the steps. There are maybe six to disassemble and install the new part. I replaced all three switches. They are not expensive and to replace 3 is only 5% more work than to replace just one; you have to take the microwave apart in either case. UNPLUG THE MICROWAVE FROM THE WALL. Start taking it apart. I use my phone to take a picture of any thing I remove, unscrew or disconnect, especially wires, BEFORE I disconnect them. Thee pictures serve as a reference when I go to reconnect and reassemble. If I am uncertain then I check the picture. Good luck!
Parts Used:
-
david from WASHINGTON, DC
-
Difficulty Level:Easy
-
Total Repair Time:30 - 60 mins
-
Tools:Screw drivers
9 of 14 people
found this instruction helpful.
Was this instruction helpful to you?
Thank you for voting!