This 18 ml bottle of white appliance touch-up paint is used to cover scratches or marks on your appliance. The white touch-up paint can be used on refrigerators, microwaves, ranges, clothes dryers, an...
This hose clamp extends from half an inch to an inch in diameter. It is made entirely of metal and is intended for use with Maytag brand washing machines.
Having a problem with a funky-smelling washing machine, or one that just doesnt seem to clean your clothes as well as it used to? Say hello to the Affresh Washing Machine Cleaner by Whirlpool. This po...
Are you dealing with a faulty washplate in your washing machine? Meet the Whirlpool Washer Washplate Screw, your personal helper for securing loose or broken washplates. This genuine OEM part is highl...
This drain pump is engineered for top-load washing machines and plays a vital role in the appliance’s drainage system. During the drain cycle, it efficiently removes water from the washer tub and chan...
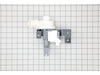
This clutch slider kit is part of the transmission system in select washing machines, helping control the movement and speed of the agitator during wash and spin cycles. The kit includes a clutch band...
This clutch assembly is designed for use in top-load washing machines, where it plays a crucial role in engaging the transmission during both the agitation and spinning cycles. If your washer is exper...
Ask our experts a question about this model and we'll get back to you as soon as possible!
2 questions answered by our experts.
< Prev
1
Next >
Sort by:
Search filter:
Clear Filter
Your search term must have 3 or more characters.
Keep searches simple. Use keywords, e.g. "leaking", "pump", "broken" or "fit".
Sorry, we couldn't find any existing answers that matched.Try using some different or simpler keywords, or submit your new question by using the "Ask a Question" button above!
Randy
March 30, 2025
Unit has no power display.I unplugged it and plugged the dryer in the same outlet to make sure that I had power to the unit. It was unplugged for 10 minutes before I tried to power it back up. Dead in the water !
For model number MVWB955FC0
Hi Randy,
Thank you for your question. If the washer does not start, we recommend checking the lid latch assembly for continuity with a multimeter on the Rx1 setting to see if it is operating normally. Before removing and checking this part unplug the washer from the electrical outlet. First check the lid switch to see if you can operate it mechanically and to see if the levers and actuators are damaged or sticking. If you can operate it mechanically, test it with the multimeter. You should receive a reading of zero. If you receive any other reading, you will need to replace the lid latch assembly. We hope this helps!
My washer growls when spinning . what bearing/bushing causes this?
For model number MVWB955FC0
Hi Brandon,
Thank you for your question. If the washer growls or makes a grinding noise when in use, the bearing on the gearcase is worn or damaged and the gearcase, part number PS12745232, will need to be replaced. We hope this helps!
This product comes in a bottle with a brush like Liquid Paper. It goes on incredibly easy. A second coat might be needed. I wanted to prevent rust from setting in so I covered the scratches and dings. The paint is a little brighter since my washer is 10 years old but it still looks great.
DIY'er working on a Maytag Centennial type washing machine should be aware that replacing a a transmission or agitator due to worn out splines is only half a job done well. I originally replaced my transmission due to worn splines, only to discover later that the worn agitator splines caused the new transmission splines to wear out at an accelerated rate. Transmission and Agitator should be replaced together, along with a new Agitator mounting bolt. There are plenty of video's online of how to do this repair so I won't get into that here. Just wanted to drop the above sage advice. Transmissions for these washers aren't cheap.
Nothing to it. Just remember to put the insert in the knob, NOT on the selector stem. Line up the flat part of the insert with the flat part of the stem and push the knob in place.
Don NOT ram it on the selector stem. When it's seated, don't push any more. That's all there is to it. It works. If the pointer on the knob indicates the selector is lined up correctly, but it isn't, the problem is the selector, not the knob.


 Diagram and Parts List for Maytag Washer")