


MVH230E Microwave - Overview
Models starting with MVH230E
Click on the best match to narrow your results.
Keep searches simple, eg. "belt" or "pump".

Light Bulb - 40W
PartSelect #: PS2376034
Manufacturer #: 8206232A
This 40w light bulb is a replacement bulb constructed of glass and metal. It is an easy-to-install electrical part which produces 40w of light. If the bulb won't light up then it may be broken and sho...
$11.26
In Stock

Light Bulb - 40W 130V
PartSelect #: PS247209
Manufacturer #: WB36X10003
This 40-watt microwave light bulb is a genuine replacement component designed to provide interior illumination for compatible GE microwave models. Engineered to withstand the high temperatures within ...
$27.89
Special Order

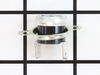
Ceramic Fuse - 20 amp
PartSelect #: PS11747931
Manufacturer #: WPM0805101
This ceramic microwave fuse is just over an inch long. It is white in the center, while each end is made of metal. This is a twenty amp fuse.
$12.91
In Stock

Door Interlock Switch Kit
PartSelect #: PS373050
Manufacturer #: 4392027
This kit contains 2 switches - 15 Amp - 125/250 Volt with 3/16" terminals.
$132.18
In Stock

Microwave Light Bulb - 40W
PartSelect #: PS2172588
Manufacturer #: R0713676
Sold individually.
No Longer Available


Magnetron
PartSelect #: PS239126
Manufacturer #: WB27X10017
This magnetron uses electrical and magnetic currents in order to create an intense heat output.
$236.27
Special Order


Mounting Plate Assembly
PartSelect #: PS252596
Manufacturer #: WB56X2147
This mounting plate is used to mount the microwave to the wall.
No Longer Available


Common Symptoms of models starting with MVH230E
[Viewing 3 of 3]Won’t turn on
Fixed by
these parts
these parts


Show All
No heat
Fixed by
these parts
these parts

Show All
Doesn’t shut off
Fixed by
these parts
these parts
Show All

Keep searches simple. Use keywords, e.g. "leaking", "pump", "broken" or "fit".
light bult needed to be replaced
The nightmare was that this microwave is installed under the cabinet....in order to get to the light bulb I had to pull out my stove then squeeze into the space between the stove and counter....my old microwave light bult was much easier to change.....Shame on Whirlpool for making this so difficult.....must be a better way to cover the light bulb so that we do not need a screwdriver to remove the door to get to the light bulb
Parts Used:
-
Deborah from Millersville, MD
-
Difficulty Level:Difficult
-
Total Repair Time:Less than 15 mins
-
Tools:Screw drivers
220 of 325 people
found this instruction helpful.
Was this instruction helpful to you?
Thank you for voting!
bulb had broken off in base that was still screwed into socket
At first I tried to use pliers to unscrew the base,very uncomfortable working position,upside down and backwards(the microwave is installed over the range top)very limited space for your body and arms to manuver and you really cant see the base,all of this took place after the breaker was turned off ofcourse,finally figured out that you can drop the entire bottom housing of the microwave by unscrewing 6 screws and the light sockets are easily accessable once you lower it,take out 1 retaining screw ,remove the entire socket and unscrewed the broken base and replaced the bulbs,I said bulbs,there is no sense in having to replace another bulb in who knows how long since only one had burned out but they were both the same age
Parts Used:
-
william from san antonio, TX
-
Difficulty Level:A Bit Difficult
-
Total Repair Time:15 - 30 mins
-
Tools:Pliers, Screw drivers
93 of 109 people
found this instruction helpful.
Was this instruction helpful to you?
Thank you for voting!
Unit worked fine except it would not heat
Had to take unit off wall and disassemble the main casing.then disconnected the wires from the magnetron.took the mounting nuts off but wasn't able to remove the magnetron until I loosened the transformer out of the way .Then it came out easy.Installed the magnetron ,tightened the nuts,installed the transformer back in, connected the the wires back on and installed the casing on ,screwed the screws and got help to install the unit to the wall again.....Tested the unit before putting back on the wall to make sure it heated....The parts were exac same type and wasn't too hard to do...
Parts Used:
-
Roy from Colorado Springs, CO
-
Difficulty Level:A Bit Difficult
-
Total Repair Time:30 - 60 mins
-
Tools:Screw drivers, Socket set
88 of 96 people
found this instruction helpful.
Was this instruction helpful to you?
Thank you for voting!