MS-214YE LG Microwave - Overview

Sections of the MS-214YE

[Viewing 1 of 1]
Keep searches simple, eg. "belt" or "pump".
Microwave Locker – Part Number: 4026W2A019A
Microwave Locker
PartSelect #: PS3522838
Manufacturer #: 4026W2A019A
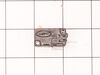
The locker, or door latch assembly fits to the inside of the microwave door, and keeps the door closed. If the door on your microwave oven doesn’t appear to close properly, you may have a problem with...
$17.47
  In Stock
Order within the next 7 hrs and your part ships today!
Micro Switch – Part Number: 3B73362F
Micro Switch
★★★★★
★★★★★
(4)
PartSelect #: PS3522738
Manufacturer #: 3B73362F
$24.73
  Special Order
Magnetron – Part Number: 6324W1A001L
Magnetron
PartSelect #: PS3529034
Manufacturer #: 6324W1A001L
This part is used to generate microwave energy/heat.
$229.17
  In Stock
Order within the next 7 hrs and your part ships today!
Diode (Cable, Assembly) – Part Number: 6851W1A002E
Diode (Cable, Assembly)
PartSelect #: PS3529603
Manufacturer #: 6851W1A002E
$30.09
  In Stock
Order within the next 7 hrs and your part ships today!
Holder Assembly,Locker – Part Number: 3501W1A019D
Holder Assembly,Locker
PartSelect #: PS3519053
Manufacturer #: 3501W1A019D
Are you struggling with a faulty microwave door? Introducing the Locker Door Latch Housing Assembly, a crucial part specifically crafted for LG microwaves. This essential component guarantees that you...
$55.94
  Special Order
TRAY,GLASS – Part Number: 3390W1G009D
TRAY,GLASS
PartSelect #: PS3556218
Manufacturer #: 3390W1G009D
This glass tray provides a stable, heat-resistant surface for cooking or heating while allowing even energy distribution. It is replaced when chipped, cracked, or missing to restore safe operation.
$83.89
  Special Order
Motor Synchronous – Part Number: 6549W1S011B
Motor Synchronous
PartSelect #: PS3529208
Manufacturer #: 6549W1S011B
$48.07
  In Stock
Order within the next 7 hrs and your part ships today!
Capacitor – Part Number: 0CZZW1H004B
Capacitor
PartSelect #: PS3517241
Manufacturer #: 0CZZW1H004B
Are you noticing issues with your LG microwave oven? Don't sweat it; we've got you covered with our LG High Voltage Capacitor ? a truly essential component. This genuine LG part is designed for some s...
$62.01
  In Stock
Order within the next 7 hrs and your part ships today!
Lamp,Incandescent – Part Number: 6912W3B002L
Lamp,Incandescent
PartSelect #: PS3530418
Manufacturer #: 6912W3B002L
$27.95
  In Stock
Order within the next 7 hrs and your part ships today!
Thermostat – Part Number: 6930W1A003A
Thermostat
PartSelect #: PS3530456
Manufacturer #: 6930W1A003A
$24.73
  Special Order
Turntable Assembly – Part Number: 5889W2A014C
Turntable Assembly
PartSelect #: PS3528552
Manufacturer #: 5889W2A014C
  No Longer Available
Screw,Customized – Part Number: 4B70188C
Screw,Customized
PartSelect #: PS3525453
Manufacturer #: 4B70188C
$17.47
  Special Order

Questions And Answers for MS-214YE

Be the first to ask our experts a question about this model!

Common Symptoms of the MS-214YE

[Viewing 6 of 6]
No heat
Fixed by
these parts
Fixing Fixing Fixing
Show All
Door not closing properly
Fixed by
these parts
Fixing
Show All
Won’t turn on
Fixed by
these parts
Fixing Fixing
Show All
Tray won’t turn
Fixed by
these parts
Fixing Fixing Fixing
Show All
Doesn’t shut off
Fixed by
these parts
Fixing
Show All
Noisy
Fixed by
these parts
Fixing
Show All
Keep searches simple. Use keywords, e.g. "leaking", "pump", "broken" or "fit".
Motor Burned Out On Turntable
My 8 year old daughter cleaned the inside of the microwave with enough water to rival a tsunami. Resulted in a clean microwave with a fried out motor that no longer revolved. Part came quickly. Took cover and bottom off to get to the part. One screw held it on and a plug. Removed those, put on new part and she was good to go. No trip to home depot today.
Parts Used:
Motor Synchronous
  • Steven from Oak Forest, IL
  • Difficulty Level:
    Really Easy
  • Total Repair Time:
    15 - 30 mins
  • Tools:
    Screw drivers
37 of 49 people found this instruction helpful.
Was this instruction helpful to you?
Thank you for voting!
Broken door micro switch. (unit does not start heating)
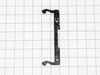
Unplug the unit before servicing. Need phillips screwdriver. Open door. Use step ladder to access and remove 2 small screws from top of the room air diffuser at top of unit. Slide diffuser slightly to the left to align the diffuser's plastic tab on the left side to rotate toward you. (The wires for the front control panel are at the far left side of this difuser, but difuser is slotted for easy removal). Once the difuser is removed you will see 1 screw at the top that secures the pannel cover on the left side of the unit. Remove screw and slide this panel slightly up and out. This exposes the plastic frame that holds the upper and lower door switches. To locate the door switches and observe how they work, close and open the door and watch the door (bayonets) open and close the micro switches. Do the (red) buttons on top of the switches move up and down when the door bayonets push and release? If the buttons do not "pop" up when opened the switch is defective. The switch frame is secured with 2 screws. Remove screws and rotate the unit out for easy access to the micro switch(s). The internal (spring?) on my unit that is suposed to allow the red (visible) button on top of the switch to "pop" up when the door is opened was broken. Carefully pry the switch outward while being careful to lift the plastic holder-piece that holds the switch in place. Be careful, there is a small pin on the frame, so rotate the switch OUT toward you while lifting (carefully) the plastic holder-piece (you will see it on top of the switch). You can use an ohm meter to test the continuity of the switches. But if the buttons don't "pop" they are defective. Replace switch and reassemble.
Parts Used:
Micro Switch
  • JAMES from BILLINGS, MT
  • Difficulty Level:
    Very Easy
  • Total Repair Time:
    30 - 60 mins
  • Tools:
    Screw drivers
37 of 67 people found this instruction helpful.
Was this instruction helpful to you?
Thank you for voting!
One of the switches in a component that door activates when shut.
I replaced the whole component with all three switches in it even though only one switch was bad . Taking out one switch out of the holder unit would probably have damaged the unit that was holding the switches. Easy install and it works great again .
Parts Used:
Holder Assembly,Locker
  • Jimmy from OZARK, MO
  • Difficulty Level:
    Easy
  • Total Repair Time:
    30 - 60 mins
  • Tools:
    Pliers, Screw drivers
9 of 11 people found this instruction helpful.
Was this instruction helpful to you?
Thank you for voting!