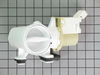
This pump helps expel water from the washing machine and is activated after the spin speed is maintained for a specific period of time. It has two ports for water to pass through: a large one, and a s...
$181.12
In Stock
Order within the next 36 mins and your part ships today!
Also known as a door boot seal.This part is used to keep the clothes inside the tub during the wash cycle. The folds in the bellow allow the tub to move separately from the door during the spin cycle.
$179.31
In Stock
Order within the next 36 mins and your part ships today!
This is a replacement tub-to-pump hose for your washer. This hose runs from the bottom of the tub to the water pump, and is used to transport water. The hose can develop a hole, and when this happens ...
$43.35
In Stock
Order within the next 36 mins and your part ships today!
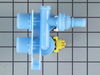
This water inlet valve attaches the water lines to the back of your appliance. The attaching solenoids on the valve open and close according to the desired temperature or amount of water needed.
$91.75
In Stock
Order within the next 36 mins and your part ships today!
If your washer door won’t close or lock, or your machine won’t start, this door latch might be the issue. It’s the part that keeps the door shut tight during the cycle and makes sure everything runs s...
$199.40
In Stock
Order within the next 36 mins and your part ships today!
This is the replacement bellow clamp for your washer. It is approximately 18 inches in diameter and is sold individually. The bellow clamp goes around the bellow in your washer and holds it in place o...
$36.15
In Stock
Order within the next 36 mins and your part ships today!
The door boot spring clamp or outer bellow clamp on your washer is designed to keep the door boot in place. It is circular in shape, and you will find it wrapped around the bellow. To remove the old c...
$26.25
In Stock
Order within the next 36 mins and your part ships today!
This hose clamp extends from half an inch to an inch in diameter. It is made entirely of metal and is intended for use with Maytag brand washing machines.
$11.80
In Stock
Order within the next 36 mins and your part ships today!
Having a problem with a funky-smelling washing machine, or one that just doesnt seem to clean your clothes as well as it used to? Say hello to the Affresh Washing Machine Cleaner by Whirlpool. This po...
$25.31
In Stock
Order within the next 36 mins and your part ships today!
Questions And Answers for MHWZ600TE01
Be the first to ask our experts a question about this model!
✖
Ask a Question
Ask our experts a question on this model and we'll respond as soon as we can.
Removed the front panel unplugged The washer drained water out, lift the washer up to un screw the drain pump. Then unhooked the hoses from pump put the other pump in.
I discovered water leaking from the bottom of the door on our Kenmore front load washer. I did a little self diagnosis from the internet and found that this seems to be a common problem for front load Kenmore washers and that the ususal suspect is the large rubbery bellows. I examined the bellows on my washer and although I didn't find anything wrong with it, I couldn't find any other likely causes. I shopped around and found PartSelect to be the cheapest for the replacement part. Removal is easy by removing the lower front panel with three small screws on the bottom front, then remove the very top panel and then the top front control panel and finally the door panel. the bellows are actually held in place with a spring loop on the outer and a screw tightener on the inner, both are fairly easy to remove and the bellows comes right off. For installation my best advice is to lube the bellows with a small amount of dishwashing soap in the groove that fits on the washer tub. This will help it slide into place and enables a small amount of sliding fine tuning once it is on. From there it is just a reverse of the removal.
This model is a front-loading washer. The spring loaded retainer for the front of the boot must be removed, then the boot can moved to the side exposing the module. Remove the two screws holding the model, pull the model out, remove the three electrical plugs, then reverse this procedure to install new module.