This 18 ml bottle of white appliance touch-up paint is used to cover scratches or marks on your appliance. The white touch-up paint can be used on refrigerators, microwaves, ranges, clothes dryers, an...
This single oven rack is used to provide a durable surface for your cookware inside the oven for baking/broiling. The oven rack measures approximately 24.76” x 15.78”, is made of metal and is chrome i...
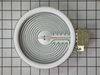
The light socket on your electric range connects the power source to the light bulb. If your oven light is malfunctioning, you may need to replace the light socket. The light socket is located in the ...
Having trouble with the heat control on your Whirlpool cooking range? This 6-Inch Infinite Switch Surface Element Control is made just for you. Crafted from top-drawer materials, this real OEM part is...
Ask our experts a question about this model and we'll get back to you as soon as possible!
1 question answered by our experts.
< Prev
1
Next >
Sort by:
Search filter:
Clear Filter
Your search term must have 3 or more characters.
Keep searches simple. Use keywords, e.g. "leaking", "pump", "broken" or "fit".
Sorry, we couldn't find any existing answers that matched.Try using some different or simpler keywords, or submit your new question by using the "Ask a Question" button above!
Ladonna
January 11, 2022
I received a “fault detected disable power to clear”, error. When disabling the power did not work, i ordered three elements. They all worked with the exception of the top oven on my double oven stove. I replaced the terminal block and now when i try to turn on the top oven, i receive a “feature not available “ error. What part should i get so that my top oven can work properly?Other than this issue, the oven works fine. Thanks in advance.
For model number MET8776BS00
Hi LaDonna,
Thank you for your question. If cutting the power to the oven does not work, then the electronic control board needs to be replaced. The part number listed under your model number for the electronic control board is PS11753789. If you would like to place an order for it, you may order it either online or by calling our customer service line and anyone will be happy to assist you. We hope this helps! If you have any questions, please let us know.
I numbered every part. ex: 1 L., for first part removed left side. I used a magic marker to circle the holes and wrote the number of screws used on the part, set the srews in a separete place, so that I new where these screws went to. The cleanup was pretty time consuming, but I was able to keep my stove, when every repairman I called to fix my stove told me I was better off buying a new stove. ($600.00 stove 2 years old)Please Note: The insulation blanket needed for the entire stove is two pieces, the sides and top are one part # and the bottom and back, are another part #. I did not know this. I just purchased the top and sides. I got lucky, the back and bottom were still in good shape. So I guess I should have read the description of the part more carefully to see what it covers, before I ordered it. It took two people two hours to do the work, it was really nice to have an extra set of eyes, to remember what direction pieces of metal from the stove went. I would do it all over in a heart beat instead of buying a new stove.
Took 2 screws under front edge of smooth top. Unscrewed ground wire from back of smooth top unit. Unplugged 2 wire bundles, from back. Took bad element out , put in new one. Put back together. About 10 min's tops. Easy peasy.


 Diagram and Parts List for Maytag Range")


 – Part Number: W11665456")