


MET3800XW2 Maytag Washer Dryer Combo - Overview
Sections of the MET3800XW2
[Viewing 15 of 15]


 Diagram and Parts List for Maytag Washer Dryer Combo")


Keep searches simple, eg. "belt" or "pump".

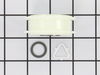
Agitator Directional Cogs
PartSelect #: PS388034
Manufacturer #: 80040
These agitator directional cogs are commonly referred to as dog ears. They come four to a package and are usually used with direct drive washing machines.
$7.31
In Stock

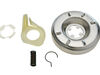
Direct Drive Motor Coupling
PartSelect #: PS1485646
Manufacturer #: 285753A
This direct drive motor coupling (Direct Drive Washer Motor Coupling, Motor Coupling, Washer Motor Coupling, Coupling Kit) provides a cushioned connection between the transmission and the motor shaft....
$26.58
In Stock

Door Catch Kit
PartSelect #: PS334230
Manufacturer #: 279570
This kit contains two door strikes, and three door catches to service dryer doors that have one or two catches.
$8.82
In Stock

Idler Pulley
PartSelect #: PS334244
Manufacturer #: 279640
This Idler Pulley includes the tri-ring and gasket and everything included here is manufacturer-certified. This part maintains correct tension on the drive belt in order to spin the drum properly. If ...
$32.93
In Stock

Dryer Drum Support Roller
PartSelect #: PS11752609
Manufacturer #: WPW10314173
This drum support roller is sold individually. Most dryers require two. The tri-rings are included. This is a drum support roller for a dryer. It is a genuine replacement part. This part is sold separ...
$23.96
In Stock

Suspension Spring
PartSelect #: PS11743345
Manufacturer #: WP63907
The suspension spring supports the outer tub and keeps the tub steady during loads that could cause an unbalance. If this part breaks, is worn down or has stretched out and lost its spring, it could c...
$13.26
In Stock

Washer Clutch Assembly
PartSelect #: PS334641
Manufacturer #: 285785
A worn clutch can cause a slower spin speed which will leave your clothes wet after a cycle. This clutch assembly comes with brake cam driver, blue spring for large capacity washers and black spring f...
$52.79
In Stock


Multi Rib Belt
PartSelect #: PS382430
Manufacturer #: 661570
The Drive Belt is a 93 1/2" belt which wraps around the dryer drum to allow tension and movement. If broken the dryer will not turn properly, or there may be loud noises. The part is rated as "medium"...
$30.59
In Stock


Roller Support Tri-Ring
PartSelect #: PS11755850
Manufacturer #: WPW10512946
If you notice that your dryer is noisy or will not tumble, you may need to replace the tri ring. This part is triangular, and is less than an inch in size. Tri rings can be found both on the idler pul...
$17.01
In Stock

Washer Tub Spring
PartSelect #: PS11751118
Manufacturer #: WPW10250667
This part is used to balance the tub during spin cycle. Sold individually.
$8.92
In Stock
Questions And Answers for MET3800XW2
We're sorry, but our Q&A experts are temporarily unavailable.
Please check back later if you still haven't found the answer you need.
- < Prev
- 1
- Next >
Sort by:
Search filter:
Clear Filter
Your search term must have 3 or more characters.
Keep searches simple. Use keywords, e.g. "leaking", "pump", "broken" or "fit".
Sorry, we couldn't find any existing answers that matched.Try using some different or simpler keywords, or submit your new question by using the "Ask a Question" button above!
Lyndal
February 1, 2026
Timed Dry setting not heating. Both the sensor dry (high heat & low heat) working.
For model number MET3800XW2

Hi Lyndal, thank you for the question. Based on our understanding, the issue could be with the dryer timer, part number PS12741754. It acts as the brain for the drying process, supervising electrical components and dictating the duration and sequence of drying, cooling, and tumbling cycles. You may need to replace it to fix the issue. We hope this sorts out your problem!
Was this helpful?
Thank you for voting!
Related Parts:
TIMER


$281.64
Special Order
Lyndal
February 3, 2026
no heat on Time Dry setting. other two settings works
For model number MET3800XW2
Hello Lyndal, thank you for getting in touch. Based on your description that the heat works on other settings (likely Automatic/Sensor Dry) but not on the Time Dry setting, the issue could be due to a faulty timer assembly, part number PS12741754. You may need to replace it to fix the issue. We hope this helps.
Was this helpful?
Thank you for voting!
Related Parts:
TIMER
$281.64
Special Order
- < Prev
- 1
- Next >
Common Symptoms of the MET3800XW2
[Viewing 27 of 27]Will not agitate
Fixed by
these parts
these parts


Show All
Noisy
Fixed by
these parts
these parts


Show All
Door won’t close
Fixed by
these parts
these parts


Show All
Leaking
Fixed by
these parts
these parts


Show All
Spins slowly
Fixed by
these parts
these parts
Show All
Not Heating
Fixed by
these parts
these parts


Show All
Spinning Issues
Fixed by
these parts
these parts
Show All
Won’t Start
Fixed by
these parts
these parts

Show All
Too hot
Fixed by
these parts
these parts

Show All
Will not drain
Fixed by
these parts
these parts

Show All
Shaking and Moving
Fixed by
these parts
these parts


Show All
Burning smell
Fixed by
these parts
these parts

Show All
Running With Door Open
Fixed by
these parts
these parts
Show All
Drum Not Spinning
Fixed by
these parts
these parts
Show All
Will Not Start
Fixed by
these parts
these parts

Show All
Door Pops Open
Fixed by
these parts
these parts
Show All
Marks left on clothes
Fixed by
these parts
these parts

Show All
Light not working
Fixed by
these parts
these parts
Show All
Does not dispense fabric softener or detergent
Fixed by
these parts
these parts


Show All
Timer Not Working
Fixed by
these parts
these parts
Show All
Lid or door won’t close
Fixed by
these parts
these parts

Show All
No hot or cold water
Fixed by
these parts
these parts


Show All
Touchpad does not respond
Fixed by
these parts
these parts
Show All
Noisy and Marks Left on Clothes
Fixed by
these parts
these parts
Show All
Not cleaning dishes properly
Fixed by
these parts
these parts
Show All
Heat stays on after drum has stopped
Fixed by
these parts
these parts
Show All
Draining Issues
Fixed by
these parts
these parts
Show All


Keep searches simple. Use keywords, e.g. "leaking", "pump", "broken" or "fit".
No movement from Basket & agitator
The job looked intimidating but turned out to be very easy.
First take off the water pump by removing the two clips that hold it in place. Place a shallow pan under the pump to catch the water that is in the pump and hoses. Open the hose clamps with a pair of pliers or channel locks (better) and slide the hoses off of the water pump.
The motor comes off next. Unplug the electrical connector from the motor and two wires from the capacitor. Remove the two screws holding the clamps in place and then pop off the two clamps. You will need to hold up the motor with one hand while you remove the clamps or it will fall to the floor once the clamps are removed.
One piece of the coupling assemble will be attached to the motor and the other will be attached to the gearcase drive shaft. If you want to clean up the mess created by the shredded rubber center piece of the coupling assembly you will have to take off the motor mounting plate. It is held on by two bolts and removing it makes installing the coupling easier but probably not necessary.
Push the back half of the coupling on to the gearcase drive shaft until the shaft is flush with the face of the coupling. Install the new rubber center piece on to the coupling then re-install the motor mounting plate. Install the other half of the coupling on to the motor shaft and lift the motor up to the coupling. You have to rotate the motor shaft by spinning the fan blades until the coupling lines up so you can slide it into the other half of the coupling. Then just reattach the motor, connectors and water pump in the reverse order of disassembly.
Parts Used:
-
Jeff from Wayne, NJ
-
Difficulty Level:Easy
-
Total Repair Time:30 - 60 mins
-
Tools:Pliers, Screw drivers, Socket set
1121 of 1223 people
found this instruction helpful.
Was this instruction helpful to you?
Thank you for voting!
door switch was bad
i was able to go on line with your company , find my dryer, order the part and had it the next day. fast , great , service
Parts Used:
-
pat from lisbon,, OH
-
Difficulty Level:Really Easy
-
Total Repair Time:15 - 30 mins
-
Tools:Screw drivers, Wrench set
1032 of 1091 people
found this instruction helpful.
Was this instruction helpful to you?
Thank you for voting!
washer wouldn't agitate
First pry off the cap of the agitator. Then using a socket remove the bolt that holds the plastic cup in place. Remove this cup by prying it loose from the two tabs that hold it in place. Once this cup is removed you can get to the broken cogs.
Slip the new cogs into the underside of the cup, and slide the cup back down in the agitator housing using the slots on the side for a guide. (You may want to remove the entire agitator and assemble everything upside down, then flip it all back over to mount, so the cogs don't fall out).
Tighten the bolt, snap the cap back in place on top of the agitator and your'e done. Easy repair.
Parts Used:
-
mike from Kent, WA
-
Difficulty Level:Easy
-
Total Repair Time:15 - 30 mins
-
Tools:Screw drivers, Socket set
952 of 1053 people
found this instruction helpful.
Was this instruction helpful to you?
Thank you for voting!