This dryer repair kit consists of five commonly replaced dryer parts: one multi-rib belt (part #661570V and measures 93 1/2 inches long), four drum support rollers, one idler assembly, nine tri-rings,...
$60.74
In Stock
Order within the next 11 hrs and your part ships today!
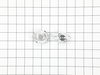
This drum support roller is sold individually. Most dryers require two. The tri-rings are included. This is a drum support roller for a dryer. It is a genuine replacement part. This part is sold separ...
$23.96
In Stock
Order within the next 11 hrs and your part ships today!
This thermostat may differ in appearance, but functions the same as the original part. This part controls the temperature of the inside of the dryer drum and prevents the dryer from overheating.
$45.26
In Stock
Order within the next 11 hrs and your part ships today!
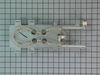
This idler pulley assembly includes the pulley and bracket, ensuring proper tension on the dryer drive belt for smooth drum rotation. Compatible with several Whirlpool, KitchenAid, Maytag, Jenn-Air, A...
$34.56
In Stock
Order within the next 11 hrs and your part ships today!
This is the moisture sensor for your dryer. It helps detect the amount of moisture in your clothes during the dryer cycle. If you notice your clothes are still wet after an automatic dryer cycle is do...
$13.59
In Stock
Order within the next 11 hrs and your part ships today!
The dryer heating element generates the heat required for drying clothes. Constructed with a nickel-chrome coil, it resists electricity to produce heat. If the dryer no longer heats, inspect the therm...
$133.50
In Stock
Order within the next 11 hrs and your part ships today!
If you notice that your dryer is noisy or will not tumble, you may need to replace the tri ring. This part is triangular, and is less than an inch in size. Tri rings can be found both on the idler pul...
$17.01
In Stock
Order within the next 11 hrs and your part ships today!
Also known as Thermal Cut-Off kit. The thermostat acts as a safety mechanism that keeps the dryer from overheating and the fuse is like a backup system - it's set to trip at a higher temperature than...
$67.53
In Stock
Order within the next 11 hrs and your part ships today!
This 18 ml bottle of white appliance touch-up paint is used to cover scratches or marks on your appliance. The white touch-up paint can be used on refrigerators, microwaves, ranges, clothes dryers, an...
$15.95
In Stock
Order within the next 11 hrs and your part ships today!
This front-load door hinge is a genuine replacement component designed to support the door on compatible washers and dryers, ensuring smooth and secure pivoting during opening and closing. Constructed...
$126.66
In Stock
Order within the next 11 hrs and your part ships today!
Questions And Answers for MED6000AW0
Ask our experts a question about this model and we'll get back to you as soon as possible!
4 questions answered by our experts.
< Prev
1
Next >
Sort by:
Search filter:
Clear Filter
Your search term must have 3 or more characters.
Keep searches simple. Use keywords, e.g. "leaking", "pump", "broken" or "fit".
Sorry, we couldn't find any existing answers that matched.Try using some different or simpler keywords, or submit your new question by using the "Ask a Question" button above!
John
July 6, 2024
How do you remove the Vent Screen Housing, something in our last drying load caught on interior housing piece and it is now bent inward at 90 degrees.
For model number MED6000AW0
Hello John, thanks for asking us! To access your Vent Screen Housing, you will need to start by unplugging the dryer. Remove the 2 or 3 screws on the top back that hold the main top in place and slide it toward the back and lift up and off. You will need to remove 3 or 4 more screws to unhook the control panel so it will roll off. Then remove the front panel by taking those screws out too. Once the front panel is off, unscrew the bulkhead to remove it, and then you should be able to access the housing to replace it. Unhook the old one, hook in the new one and secure it, and then reverse the steps above to put your dryer back together. We hope this helps and good luck with your repair!
Hi John, thank you for contacting us. The door switch for your model is part number PS12745626, the door strike is part number PS11750398, and the door catch is part number PS12578781. We hope that helps!
My dryer gets warm but not warm enough to dry clothes what issue could this be?
For model number MED6000AW0
Hi Raphaela, thank you for contacting us. We have concluded that this issue is probably because of a clogged lint screen. We would recommend cleaning the dryer vent and the lint screen to fix the issue. If the lint screen is damaged, then you may need to replace the lint filter, part number PS17918475. We hope this solves your problem!
My dryer works fine, but the temperature, dryness level and wrinkle prevent do not light up. The numbers for the timer is working. When I touch the temperture, dryness level and wrinkle prevent there are noises that the machine makes, but because there are no lights its impossible to tell what level it is. Is this any easy fix or do I have to live with it?
For model number MED6000AW0
Hi Carol, thank you for contacting us. According to our research, you need to check the main control board, part number PS11756115. If the Dryer is still making noises you should check Drum Support Roller, part number PS11752609, and Idler Pulley with Bracket, part number PS11726337. We hope this helps, good luck with the repair!
The issue was the idler pulley. First I began opening up the front panel based on a youtube video but soon realized the model was slightly different and required a lot more items to remove. I saw the pulley in the back with nothing in the way so I put the front panel crap back on and removed the rear panel. There it was, very simple to remove and replace. I'm not looking forward to drum rollers though. Hopefully they're aren't as difficult as they appear.
I purchased the dryer repair kit with the drum belt, wheels and idler pulley. I watched the instructional videos online and it seemed fairly straight forward. Breaking down the dryer and replacing the pulleys was easy enough. My problem began when I tried to feed the drum belt around the idler pulley. After finishing the job, the dryer would not turn and the sensor light stayed on. I thought something else was broken with the dryer and spent hours trouble shooting other problems that I was having. Finally I figured out that the drum belt was not installed correctly around the idler pulley. However, I could not get it properly installed from the front of the machine so I tried from the rear still with no avail. I finally had to fish the old belt out of the garbage can that I had thrown away earlier. I lined up the old belt with the new one in the kit and discovered that the new belt was much smaller, so I put the old one back on the drum. Here's the lesson I learned...make sure the belts are the same size before attempting to install. The old idler was responsible for the squeaking and that stopped but I am still using the same old drum belt. Hope it lasts.
I asked for advise, looked around and priced heating elements and thermostats. This was the best combo offered for the price given. It was shipped and received it very quick. Installed it and 5 minutes later, she was running like a champ!


 Diagram and Parts List for Maytag Dryer")