Use this scraper for your ceramic/glass cooktop. It has a retractable blade and is an all-purpose tool for cooktops, mirrors, windows and tile. Use it to also remove paint, paper, dirt, stickers and more.
This cooktop cleaner will cut through tough grease and baked-on residue. The cleaner will leave a protective coating of silicone on the cooktop surface as it cleans. This 10oz bottle is safe for all g...
This burner knob is for cooktops. Burner knob lets you control the heat of the surface burner on the cooktop.
Remove the knob by pulling it straight off its post. Sold individually.
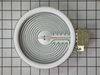
Cook with confidence using this radiant surface element. It heats your cookware evenly for great results and sits under the glass cooktop for a sleek look. If your burner isn’t heating or cooks uneven...
Imagine the ease of cooking with a perfectly functioning cooktop, courtesy of our genuine Whirlpool Infinite Burner Switch. This authentic OEM part will seamlessly fit your Whirlpool model, promising ...
$155.33
Special Order
Questions And Answers for MEC7430WW00
Be the first to ask our experts a question about this model!
✖
Ask a Question
Ask our experts a question on this model and we'll respond as soon as we can.
Took 2 screws under front edge of smooth top. Unscrewed ground wire from back of smooth top unit. Unplugged 2 wire bundles, from back. Took bad element out , put in new one. Put back together. About 10 min's tops. Easy peasy.
really easy! Removed 2 screws under the glass top at the front, access from the open oven door, then removed the ground wire, removed the stove top, took the element holder off,( 2 screws)and replaced with new element, 30 minutes. I ordered the part and came within 18 hrs of ordering it, fantastic experience.
Remove two screws on front of range top. they are exposed when you open the oven door. lift and pull back top. unplug two molex connectors, need to squeeze the plastic sides. remove top range to floor. remove six screws and take glass top off metal frame. element is held in with some simple clips and three push on connectors must be removed. replace with new element and assemble in reverse order.


 Diagram and Parts List for Maytag Cooktop")