


MBL1956HES Maytag Refrigerator - Overview
Models starting with MBL1956HES
Click on the best match to narrow your results.
Keep searches simple, eg. "belt" or "pump".

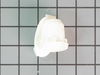
Refrigerator Center Crisper Drawer Slide Rail - White
PartSelect #: PS11757048
Manufacturer #: WPW10671238
This center crisper drawer rail supports the edges of refrigerator crisper drawers, ensuring smooth sliding and proper alignment. At 13.5 inches long, it fits between the drawers on the shelf frame. Q...
$72.26
In Stock

Crisper Drawer - Clear
PartSelect #: PS11726308
Manufacturer #: W10833528
Sold individually. This crisper drawer is for refrigerators.
Crisper drawer stores fruits and vegetables at a humidity level that helps keep them fresh longer.
$147.97
In Stock

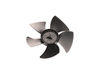
Replacement Ice Maker
PartSelect #: PS2121513
Manufacturer #: D7824706Q
This modular ice maker assembly replaces worn-out units to restore ice production in refrigerators. It includes the ice mold and control device but excludes the cover, ice level arm, wire harness, and...
$139.34
In Stock

Refrigerator Door Switch
PartSelect #: PS12728638
Manufacturer #: W11384469
Door switch turns the light off when you close the door.
$48.68
In Stock

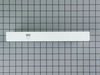
Crisper Drawer Cover Frame
PartSelect #: PS11757049
Manufacturer #: WPW10671240
This refrigerator crisper drawer frame is a durable white plastic component designed to support the crisper drawer and secure the glass shelf that serves as its lid. Engineered for long-lasting perfor...
$151.44
In Stock

Refrigerator Electronic Control Board
PartSelect #: PS11755733
Manufacturer #: WPW10503278
This electronic control board is a critical component in refrigerator systems, responsible for regulating temperature settings and managing cooling and defrost cycles. If your appliance is experiencin...
$227.47
In Stock

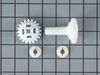
Icemaker Control Assembly
PartSelect #: PS2341896
Manufacturer #: W10190935
This part is used to help tell the icemaker what to do - it turns the timing cams and the ejector blades. Motor is not sold separately.
$150.25
In Stock

Deli Drawer Glide- Left Side
PartSelect #: PS11743442
Manufacturer #: WP67001054
This is a replacement pan glide for your refrigerator. The pan glide can be found attached to the refrigerator shelf, and allows the pan to slide in and out efficiently. If your refrigerator pan will ...
$14.12
In Stock

Compressor Start Device and Capacitor
PartSelect #: PS8746522
Manufacturer #: W10613606
This includes both the run capacitor and the start relay. The capacitor helps the compressor kick on and off while maintaining a constant temperature to keep things frozen in your freezer.
The start ...
$96.26
In Stock

Refrigerator Humidity Control Slide
PartSelect #: PS11743638
Manufacturer #: WP67005864
This part mounts on the crisper drawer cover and is used to limit the amount of air that gets into the crisper.
$14.07
In Stock

Refrigerator Run Capacitor
PartSelect #: PS11743364
Manufacturer #: WP65889-4
This part helps the compressor kick on and off while maintaining a constant temperature to keep things frozen in your freezer.
$84.57
In Stock

Refrigerator Deli Drawer Glide
PartSelect #: PS11743441
Manufacturer #: WP67001053
This is a deli drawer glide for the right side of your refrigerator. It allows the deli drawer to glide in and out smoothly. In order to access your glider, you will have to remove drawer and shelf, a...
$14.12
In Stock
Common Symptoms of models starting with MBL1956HES
[Viewing 23 of 23]Ice maker not making ice
Fixed by
these parts
these parts


Show All
Light not working
Fixed by
these parts
these parts


Show All
Fridge too warm
Fixed by
these parts
these parts


Show All
Leaking
Fixed by
these parts
these parts


Show All
Will Not Start
Fixed by
these parts
these parts

Show All
Noisy
Fixed by
these parts
these parts

Show All
Ice maker won’t dispense ice
Fixed by
these parts
these parts

Show All
Freezer section too warm
Fixed by
these parts
these parts

Show All
Door won’t open or close
Fixed by
these parts
these parts

Show All
Freezer not defrosting
Fixed by
these parts
these parts

Show All
Fridge and Freezer are too warm
Fixed by
these parts
these parts
Show All
Fridge too cold
Fixed by
these parts
these parts

Show All
Clicking sound
Fixed by
these parts
these parts
Show All
Ice maker dispenses too much ice
Fixed by
these parts
these parts

Show All
Freezer too cold
Fixed by
these parts
these parts
Show All
Frost buildup
Fixed by
these parts
these parts

Show All
Too warm
Fixed by
these parts
these parts
Show All
Ice maker dispenses too little ice
Fixed by
these parts
these parts
Show All
Fridge runs too long
Fixed by
these parts
these parts
Show All
Won’t start
Fixed by
these parts
these parts
Show All
Not dispensing water
Fixed by
these parts
these parts
Show All
Door latch failure
Fixed by
these parts
these parts

Show All
Door Sweating
Fixed by
these parts
these parts

Show All


Keep searches simple. Use keywords, e.g. "leaking", "pump", "broken" or "fit".
Icemaker producing few or no cubes and often leaving "kling-ons" on ice tray
Interior surface of ice tray felt rough & flaky (coating deteriorated) so cubes would not release.
Unplug appliance.
Remove timer cover by hand pressure @ edge.
Remove single attachment screw & bracket at lower front of icemaker.
Disconnect wiring harness from socket @ rear of compartment.
Tricky part was determining what type of connection held the other two attachment points along the long edge of the icemaker. I did not have repair manual or useful drawing but looked @ PartsDirect pic of side brackets & used a small mirror to confirm that mine were also some sort of "snap in" attachment.
Remove icemaker unit by pushing upward and outward on the unit. I takes a good bit of pressure and will pop loose, but be careful not to break attachment bracket from freezer wall.
Scavenge shut off bar and wiring harness from old icemaker once you have it out & attach to new one before installing it back in freezer.
Again, you might find a mirror useful to align those pesky snap-in brackets with the new unit.
Since you probably kept your freezer running while waiting for the part, the plastic snap-ins will be cold and brittle. I warmed them up first by applying a dampened cloth heated in the microwave to make them a little more pliable.
A good push of the new unit towards the snap-ins along with some upward force will get it stable.
Reattach the metal screw in bracket & connect the wiring harness to rear plug... and don't forget to plug the whole thing back in.
It will take awhile for the first batch of cubes dump as the timer may need to cycle completely around to get to the fill cycle... be patient.
Dump the first couple of batches of cubes just to make sure you're free of any residue.
Parts Used:
-
Bernie from Diamond Bar, CA
-
Difficulty Level:Easy
-
Total Repair Time:30 - 60 mins
-
Tools:Nutdriver
815 of 913 people
found this instruction helpful.
Was this instruction helpful to you?
Thank you for voting!
No ice
removed flap door in front of icemaker...removed 3 screws with bolt heads...removed one additional screw with bolt head and ice unit slid out. I removed motor unit (pops out no screws). Replaced and had ice within 3 hours.
Parts Used:
-
Daniel from Suwanee, GA
-
Difficulty Level:Easy
-
Total Repair Time:15 - 30 mins
-
Tools:Screw drivers, Socket set
567 of 688 people
found this instruction helpful.
Was this instruction helpful to you?
Thank you for voting!
Freezer is cold, Refridgerator is not as cold as it should be
Having seen this problem before in other equipment so I had an idea where to look. Problem: the automatic defrost function was not operating. Looking through openings in the back panel of the freezer compartment, you could see the evaporator coils and fins were a solid chuck of ice. There are three logical components to check. Heater element, thermostat (located just above the evaporator) and a relay on the control board (located in the fridge control panel). Checked the heater with an ohm meter -- OK. The thermostat closes the circuit at around 20 degrees and opens at around 32 degrees. Pulled out the thermostat, wiring, fan unit. Everything unplugs, unscrews, and unclips, don't cut wires. Put the whole assembly in a friends freezer for an hour or so to see if the thermostat closes -- OK. Problem had to be with the control board. Replaced control board, reprogrammed it per included instruction. Everything is working again.
Parts Used:
-
Russell from Hardinsburg, KY
-
Difficulty Level:A Bit Difficult
-
Total Repair Time:More than 2 hours
-
Tools:Screw drivers
382 of 470 people
found this instruction helpful.
Was this instruction helpful to you?
Thank you for voting!