These agitator directional cogs are commonly referred to as dog ears. They come four to a package and are usually used with direct drive washing machines.
$7.31
In Stock
Order within the next 11 hrs and your part ships today!
This direct drive motor coupling (Direct Drive Washer Motor Coupling, Motor Coupling, Washer Motor Coupling, Coupling Kit) provides a cushioned connection between the transmission and the motor shaft....
$26.58
In Stock
Order within the next 11 hrs and your part ships today!
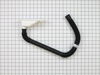
This pump is intended for use with washing machines that do not have belts. This drain pump has two ports for water to pass through: a large one, and a smaller one.
$61.80
In Stock
Order within the next 11 hrs and your part ships today!
The suspension spring supports the outer tub and keeps the tub steady during loads that could cause an unbalance. If this part breaks, is worn down or has stretched out and lost its spring, it could c...
$13.26
In Stock
Order within the next 11 hrs and your part ships today!
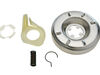
A worn clutch can cause a slower spin speed which will leave your clothes wet after a cycle. This clutch assembly comes with brake cam driver, blue spring for large capacity washers and black spring f...
$52.79
In Stock
Order within the next 11 hrs and your part ships today!
The valve body of this part could be blue or green in color. There are two ports for water to enter, and this valve is compatible with a half inch ID hose. It has two 3/4-11x1/2 NHT hose threads.
$44.72
In Stock
Order within the next 11 hrs and your part ships today!
This 18 ml bottle of white appliance touch-up paint is used to cover scratches or marks on your appliance. The white touch-up paint can be used on refrigerators, microwaves, ranges, clothes dryers, an...
$15.95
In Stock
Order within the next 11 hrs and your part ships today!
This package of pads contains three tub wear pads.
$21.35
In Stock
Order within the next 11 hrs and your part ships today!
Questions And Answers for LSN1000LW0
Ask our experts a question about this model and we'll get back to you as soon as possible!
2 questions answered by our experts.
< Prev
1
Next >
Sort by:
Search filter:
Clear Filter
Your search term must have 3 or more characters.
Keep searches simple. Use keywords, e.g. "leaking", "pump", "broken" or "fit".
Sorry, we couldn't find any existing answers that matched.Try using some different or simpler keywords, or submit your new question by using the "Ask a Question" button above!
Ramjit
April 7, 2024
Heavy items like towels comes out damp after washing and spin dry cycle
What is the most likely cause for this?
For model number LSN1000LW0
Hi Ramjit, thank you for reaching out. Based on the description that you have provided, we would recommend checking the drain hose for any clogging. If this is not the issue, we would recommend replacing the drain pump, part number PS11741239, to solve the problem. We hope that helps!
The washer fills but won’t spin or drain, it makes a humming noise as if something is frozen or stuck when it is switched to “spin” setting on dial. The pump is not clogged and spins freely. Thanks.
For model number LSN1000LW0
Hello David, Thank you for reaching out. That is great that you already cheeked for the blockage a sit is the most common cause. Since everything is clear, we suggest checking the Direct Drive Motor Coupling and the wiring to the Motor. If they are good, you may have a faulty Motor. We hope this helps!
The job looked intimidating but turned out to be very easy. First take off the water pump by removing the two clips that hold it in place. Place a shallow pan under the pump to catch the water that is in the pump and hoses. Open the hose clamps with a pair of pliers or channel locks (better) and slide the hoses off of the water pump. The motor comes off next. Unplug the electrical connector from the motor and two wires from the capacitor. Remove the two screws holding the clamps in place and then pop off the two clamps. You will need to hold up the motor with one hand while you remove the clamps or it will fall to the floor once the clamps are removed. One piece of the coupling assemble will be attached to the motor and the other will be attached to the gearcase drive shaft. If you want to clean up the mess created by the shredded rubber center piece of the coupling assembly you will have to take off the motor mounting plate. It is held on by two bolts and removing it makes installing the coupling easier but probably not necessary. Push the back half of the coupling on to the gearcase drive shaft until the shaft is flush with the face of the coupling. Install the new rubber center piece on to the coupling then re-install the motor mounting plate. Install the other half of the coupling on to the motor shaft and lift the motor up to the coupling. You have to rotate the motor shaft by spinning the fan blades until the coupling lines up so you can slide it into the other half of the coupling. Then just reattach the motor, connectors and water pump in the reverse order of disassembly.
First pry off the cap of the agitator. Then using a socket remove the bolt that holds the plastic cup in place. Remove this cup by prying it loose from the two tabs that hold it in place. Once this cup is removed you can get to the broken cogs. Slip the new cogs into the underside of the cup, and slide the cup back down in the agitator housing using the slots on the side for a guide. (You may want to remove the entire agitator and assemble everything upside down, then flip it all back over to mount, so the cogs don't fall out). Tighten the bolt, snap the cap back in place on top of the agitator and your'e done. Easy repair.
The hardest part of this job was pulling the machine away from the wall so the hoses could be disconnected and the machine flipped onto it's back. Putting the machine on it's back does two things. It drains the water left in the bottom of the tub so it won't pour out onto the motor when the old pump is removed, and gives the necessary access to the pump. Once the machine is on it's back you remove the hose clamps with a pair of pliers and disconnect the hoses. The pump is secured to the motor with a pair of spring steel retaining clips which are easily popped off by hand. Once the clips are removed, the pump is in your hand. Put the new pump in place, replace the retaining clips and hoses, and you're done. This has to have been the easiest repair I've ever done. I wish cleaning gutters was this easy.