This temperature sensor, also referred to as a thermistor, is a genuine replacement component compatible with various appliance models. It works in coordination with the control board to monitor inter...
$103.87
In Stock
Order within the next 6 hrs and your part ships today!
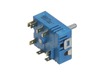
This rotary switch helps you control the heat on your range’s surface burners. It adjusts the temperature smoothly, so you can cook with precision. If your burner isn’t responding, only works on one s...
$125.45
In Stock
Order within the next 6 hrs and your part ships today!
This clear inner glass lets you see inside your LG oven while keeping the heat in. If your oven glass is cracked or chipped, replacing it helps restore energy efficiency and safe cooking. It’s made to...
$150.30
In Stock
Order within the next 6 hrs and your part ships today!
This genuine heating element fits select LG ovens and ranges, providing heat for broiling and baking. Located at the top of the oven, it ensures even cooking and reliable performance. It replaces olde...
$168.28
In Stock
Order within the next 6 hrs and your part ships today!
Struggling with a faulty knob on your LG range stove oven? Say hello to this genuine LG Knob Assembly'a quick fix to help bring back the impeccable control over your cooking temperatures. This OEM com...
$103.51
In Stock
Order within the next 6 hrs and your part ships today!
Questions And Answers for LSE4616BD
Be the first to ask our experts a question about this model!
✖
Ask a Question
Ask our experts a question on this model and we'll respond as soon as we can.
Unplugged oven electric and turned gas off. Removed all back covers from the unit. Removed the cover on the inside covering the burner and fan in the back of the convection oven. Removed the nut securing the fan to motor shaft with helper holding the motor. Removed the three electrical wires attached to motor, making note where they go. Removed screws mounting the motor to oven. Removed motor cooling fan and shaft spacer from old motor. Fit in same orientation on new motor. Replace all parts in reverse order, restore gas and electric, turn on and test.
Go onto youtube, such as https://www.youtube.com/watch?v=-ITkrwhDNMQ and watch similar videos for DYI. The process is very similar to other models.
Once the door is removed, place oven door on a towel or soft place so it does not scratch the door. Unscrew the screws and make sure you notice where each screw goes, so you know the process of where each screw goes when you re-assemble.
Once the inner cover is removed, remove the insulation, too so you don't damage it. Use Wet/Dry Shop Vac to clean the shattered glass. (WORD OF ADVICE: I did not remove the insulation and the suction of the Shop Vac removed part of the insulation, so now instead of a quick turn around repair turns into a few weeks repair, because the insulation is on back order 10-14 days from the supplier. DON"T MAKE THE SAME MISTAKE!)
Once the glass has been removed, the new inner glass is replaced, begin by re-assemble the oven door with the correct screws and attached the oven door to the range.
Initial failure of over range microwave Aug 3rd. Control Panel worked but no heat. Took to local LG authoriaed local repair place. They fixed it quickly and we re-installed it. Worked fine for 2 months then had similar failure again. Agaim took to same authorized repairer. They kept unit for 3 months but finally concluded theu could not fix it and suggested we contact LG for a partial refund. When they tested the unit during re-assembly in my presence, there was a blue flash and the fuse blew. Since we had built a custom tile mural back splash around this unit, I brought it home, ordered a number of time delay fuses new capacitor and two new high voltage diodes. However, using my Fluke DMM, I checked the existing capacitor and high voltage diode and they checked OK so I just replaced the time delay fuse. The high voltage transformer leads had 2 possible ways to connect to capacitor and diode. Tried one way, plugged unit in and turned it on, and immediatly blew the fuse. Replaced the fuse and reversed the high voltage transformer connections,amd turned unit pn, and it worked perfectly. Since we had experienced several power failures during the time of the original failure, the repairer concluded that power spikes might be at fault, so I also purchased a TrippLite ISOBAR4ULTRA 3300 Joule surge protector between wall outlet and microwave, and re-installed over range. It has worked perfectly since.