


LRGL5823D (FBDELGA) LG Range - Overview
Sections of the LRGL5823D
[Viewing 5 of 5]


Keep searches simple, eg. "belt" or "pump".

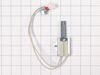
Temperature Sensor
PartSelect #: PS11732697
Manufacturer #: EBG61305805
This temperature sensor, also referred to as a thermistor, is a genuine replacement component compatible with various appliance models. It works in coordination with the control board to monitor inter...
$103.87
In Stock

Oven Igniter
PartSelect #: PS3535362
Manufacturer #: MEE61841401
This gas range oven igniter is compatible with various models of LG gas ranges. It is made up of the igniter element, wire harness, connector and mounting bracket. The igniter is responsible for gener...
$346.52
In Stock


Display Printed Circuit Board Assembly
PartSelect #: PS16223754
Manufacturer #: EBR89296402
Having issues with your LG range? Try our Display PCB Assembly'it's a real game-changer. Specifically formulated for specific models in LG's oven range, this genuine OEM product guarantees a seamless ...
$163.05
On Order


Power Transformer Assembly
PartSelect #: PS16732632
Manufacturer #: EBJ64465501
The spark module controls the spark for lighting the cooktop surface burners.
$78.72
In Stock


VALVE ASSEMBLY,GAS
PartSelect #: PS16223303
Manufacturer #: AJU74852813
Help your LG gas range get back to peak performance with the LG Valve Assembly. Designed just for gas ranges, this genuine LG part controls the gas flow to your right rear burner, ensuring the flame i...
$80.54
On Order


VALVE
PartSelect #: PS11762077
Manufacturer #: MJX62571702
Restore your oven’s performance with this gas valve. It controls gas flow to the burners for even heat and safe operation. If your oven won’t light or flames are uneven, this part may be the fix. Turn...
$313.09
In Stock
Questions And Answers for LRGL5823D
We're sorry, but our Q&A experts are temporarily unavailable.
Please check back later if you still haven't found the answer you need.
Common Symptoms of the LRGL5823D
[Viewing 6 of 6]Little to no heat when baking
Fixed by
these parts
these parts

Show All
Oven not heating evenly
Fixed by
these parts
these parts
Show All
Element will not heat
Fixed by
these parts
these parts
Show All
Gas igniter glows, but will not light
Fixed by
these parts
these parts
Show All
Will Not Start
Fixed by
these parts
these parts
Show All
Oven is too hot
Fixed by
these parts
these parts
Show All
Keep searches simple. Use keywords, e.g. "leaking", "pump", "broken" or "fit".
Oven wouldn't ignite
Took off the oven door then took out the racks and two screws in the oven bottom and removed it . Then removed the heat deflector. Then un plugged the old igniter and removed the burner to make it easier to remove the old igniter. Then installed the new igniter and reversed the process
Parts Used:
-
Martin from KEWASKUM, WI
-
Difficulty Level:Easy
-
Total Repair Time:15 - 30 mins
-
Tools:Nutdriver
11 of 19 people
found this instruction helpful.
Was this instruction helpful to you?
Thank you for voting!
Replace Inner Oven glass because it shattered
Go onto youtube, such as https://www.youtube.com/watch?v=-ITkrwhDNMQ and watch similar videos for DYI. The process is very similar to other models.
Once the door is removed, place oven door on a towel or soft place so it does not scratch the door. Unscrew the screws and make sure you notice where each screw goes, so you know the process of where each screw goes when you re-assemble.
Once the inner cover is removed, remove the insulation, too so you don't damage it. Use Wet/Dry Shop Vac to clean the shattered glass. (WORD OF ADVICE: I did not remove the insulation and the suction of the Shop Vac removed part of the insulation, so now instead of a quick turn around repair turns into a few weeks repair, because the insulation is on back order 10-14 days from the supplier. DON"T MAKE THE SAME MISTAKE!)
Once the glass has been removed, the new inner glass is replaced, begin by re-assemble the oven door with the correct screws and attached the oven door to the range.
Hope this helps
Parts Used:

-
Jeffrey from CERRITOS, CA
-
Difficulty Level:Really Easy
-
Total Repair Time:30 - 60 mins
-
Tools:Screw drivers
17 of 39 people
found this instruction helpful.
Was this instruction helpful to you?
Thank you for voting!
The LED display started losing sections over two years ago. Got to the point where it is illegible with just a few LED still working.
This is a gas stove with 110v electric. Unplug cord before beginning.
Remove back cover. There Phillip approx 15 Phillips screws. Back cover slides up off of tabs to remove .
You need to get the main board out of the way to get to the Display PCBA. There were three wiring harness connectors on the right side of the board you need to disconnect which allows the Board to slide out to the right. Use plastic pry bar to pop tabs slightly on top and right side of board that will allow you to slide the board out to the right. You need to take care to not break these tabs.
I did not disconnect the other wiring harnesses on left side of board. I lifted the board and laid it out of the way on the top of the back of stove. I held it in place with a piece of duct tape holding it to top by wiring harness to give me room.
Now you have access to the Display PCBA. This board is held in place by 5 screws. Remove screws and place new board in place with the 5 screws.
Now put the main board back in place by sliding in place from right to left and under the tabs on all sides. This is a little tricky but with a plastic pry bar and going slowly not to difficult. Be careful not to pinch wires behind the main board. There are relief openings that wiring should be routed through.
Plug the cord back in and make sure all is working on the Display and push buttons on front pad.
Finally place the back cover on and secure with screws.
Parts Used:
-
Robert from Irwin, PA
-
Difficulty Level:Easy
-
Total Repair Time:30 - 60 mins
-
Tools:Screw drivers
4 of 4 people
found this instruction helpful.
Was this instruction helpful to you?
Thank you for voting!