LRE3194SW (FWHLLGA) LG Range - Overview

Sections of the LRE3194SW

[Viewing 1 of 1]
Keep searches simple, eg. "belt" or "pump".
Temperature Sensor – Part Number: EBG61305805
Temperature Sensor
★★★★★
★★★★★
(5)
PartSelect #: PS11732697
Manufacturer #: EBG61305805
This temperature sensor, also referred to as a thermistor, is a genuine replacement component compatible with various appliance models. It works in coordination with the control board to monitor inter...
$103.87
  In Stock
Microwave Thermostat – Part Number: 6930W1A003X
Microwave Thermostat
★★★★★
★★★★★
(4)
PartSelect #: PS3530468
Manufacturer #: 6930W1A003X
$32.64
  In Stock
WINDOW,GLASS – Part Number: 4890W1N009H
WINDOW,GLASS
★★★★★
★★★★★
(2)
PartSelect #: PS16661222
Manufacturer #: 4890W1N009H
This clear inner glass lets you see inside your LG oven while keeping the heat in. If your oven glass is cracked or chipped, replacing it helps restore energy efficiency and safe cooking. It’s made to...
$150.30
  In Stock
Bake Element – Part Number: MEE62306405
Bake Element
★★★★★
★★★★★
(1)
PartSelect #: PS12716127
Manufacturer #: MEE62306405
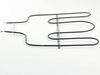
As an avid home cook, you know the importance of a properly working oven and how crucial the Bake Element is to your range cooker's heating process. That's where this LG Bake Element comes in. Located...
$173.06
  In Stock
FOOT – Part Number: 4778W1N001B
FOOT
PartSelect #: PS3635599
Manufacturer #: 4778W1N001B
$24.73
  In Stock
Range Radiation Heater – Part Number: MEE62385201
Range Radiation Heater
★★★★★
★★★★★
(3)
PartSelect #: PS7795472
Manufacturer #: MEE62385201
Is your LG range oven stove not heating quite like it used to? The Radiant Surface Element could be just what you need. This genuine LG part is specifically designed to provide heat directly to your r...
$493.17
  In Stock
HEATER,SHEATH – Part Number: MEE62306504
HEATER,SHEATH
★★★★★
★★★★★
(1)
PartSelect #: PS12582157
Manufacturer #: MEE62306504
This genuine heating element fits select LG ovens and ranges, providing heat for broiling and baking. Located at the top of the oven, it ensures even cooking and reliable performance. It replaces olde...
$168.28
  In Stock
Display Power Control Board – Part Number: EBR64624906
Display Power Control Board
★★★★★
★★★★★
(1)
PartSelect #: PS7792509
Manufacturer #: EBR64624906
Are you having trouble with your LG Range? If your settings for temperature and time are acting up, you may need this LG Display Power Control Board. This essential, original OEM part is specifically ...
$127.43
  In Stock
HEATER,SHEATH – Part Number: MEE32902206
HEATER,SHEATH
PartSelect #: PS12582156
Manufacturer #: MEE32902206
$78.61
  In Stock
Oven Rack – Part Number: MHL63411403
Oven Rack
★★★★★
★★★★★
(1)
PartSelect #: PS11761984
Manufacturer #: MHL63411403
$176.90
  In Stock
Common Nut – Part Number: 1NHB0500032
Common Nut
PartSelect #: PS3517437
Manufacturer #: 1NHB0500032
$17.47
  Special Order
Radiant Heater – Part Number: MEE62385001
Radiant Heater
PartSelect #: PS7795470
Manufacturer #: MEE62385001
Do you have an LG range that's not heating as it should? Our replacement part can solve your problem. This LG OEM part uses radiant heating technology to directly heat your range's cooking area. It's ...
$270.31
  In Stock

Questions And Answers for LRE3194SW

Be the first to ask our experts a question about this model!

Common Symptoms of the LRE3194SW

[Viewing 7 of 7]
Little to no heat when baking
Fixed by
these parts
Fixing Fixing Fixing
Show All
Element will not heat
Fixed by
these parts
Fixing Fixing Fixing
Show All
Oven not heating evenly
Fixed by
these parts
Fixing Fixing Fixing
Show All
Oven is too hot
Fixed by
these parts
Fixing Fixing
Show All
Door won’t open after self cleaning cycle
Fixed by
these parts
Fixing
Show All
Won’t turn on
Fixed by
these parts
Fixing
Show All
Will Not Start
Fixed by
these parts
Fixing
Show All
Keep searches simple. Use keywords, e.g. "leaking", "pump", "broken" or "fit".
Hammer 1, Glass range top and heating element 0
Dropped a hammer on the range while removing a ceiling light. Viewed a How-To video on Google. Ordered the needed parts. Followed the steps from the How-To video. Reinstall was a bit tricky by myself - could have used an extra set of hands. I have a few words of caution:
1) Put something between the range top and range - like a sheet or drop cloth - to prevent a dropped screw from falling into a crevice in the stove. I dropped a screw and was unable to retrieve it, even with a magnet.
2) Makes sure you remove all bumpers, screws, clips, etc. from the item being replaced and put them on the new item if the new item does not come with replacement bumpers, screws, etc.
Parts Used:
Range Radiation Heater
  • Richard from CHESAPEAKE, VA
  • Difficulty Level:
    Easy
  • Total Repair Time:
    30 - 60 mins
  • Tools:
    Screw drivers
22 of 50 people found this instruction helpful.
Was this instruction helpful to you?
Thank you for voting!
Oven did not heat
I removed three back paneling, which requires at least a dozen screws to be removed. Unplug the range obviously before removing any panel. Take a pic of the old modular which controls the heating elements so when you remove the plugs connected to the defective modular, you could put it on the new one exactly as you saw it. The modular has two screws that secures it to back of range. Remove, and disconnect the wires, than do the opposite to new one and reconnect the wires to new modular. Make sure it looks like the picture you took. Reconnect the power to outlet provided for the range, test if the oven turns on and is heating. If yes than turn off oven, unplug the range, reinstall the back panels, plug back the range cord, move back in its place, and start cooking again. Not hard, very easy.
Parts Used:
PCB ASSEMBLY
  • David from New Milford, CT
  • Difficulty Level:
    Very Easy
  • Total Repair Time:
    15 - 30 mins
3 of 3 people found this instruction helpful.
Was this instruction helpful to you?
Thank you for voting!
Half the LEDs on my stove went out, the part fixed it.
Unplugged the stove, took the top cover off, removed the old part and replaced it.
Parts Used:
Display Power Control Board
  • Edward from FORT WORTH, TX
  • Difficulty Level:
    Really Easy
  • Total Repair Time:
    30 - 60 mins
  • Tools:
    Pliers, Screw drivers, Socket set
2 of 5 people found this instruction helpful.
Was this instruction helpful to you?
Thank you for voting!