This air filter helps keep your fridge smelling fresh and your food lasting longer. It uses carbon to trap odors and clean the air inside your refrigerator. If you notice bad smells or your fridge tel...
Refrigerator door bin AAP73252202 is an original equipment manufacturer (OEM) part that fits some Kenmore Elite bottom-freezer refrigerators in the following series: 7957204, 7957205, 7957209, 7957218...
This handle screw, also known as a mounting bolt, is a mounting screw to help secure the door handle to your refrigerator door. If your handle is loose, you may just need to tighten the screw. If your...
This refrigerator door shelf bin is a clear, gallon-sized storage accessory designed for installation on the right-side door of select refrigerator models. Crafted from durable, food-safe resin, it fe...
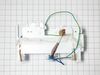
This wiring harness is 20 pin and 3 pin. Replacement ice maker for LG refrigerators. The ice maker assembly contains the mold to form ice and the ejection controls to fill the ice storage bin. Unplug...
This is a manufacturer-approved refrigerator door closure for your refrigerator. It is made of white plastic and measures approximately 3 inches by 2 inches. If your old closure is damaged, your refri...
Shut off water supply. Disconnect main supply line. Remove rear lower panel on back of refrigerator. Remove all tubing clamps on back. Disconnect leaking tubing from water supply valve. Remove water filter and unscrew/remove water filter housing. Replace tubing - connect to water filter housing then to water supply valve. Reconnect filter housing and filter. Reinstall lower panel, then main water supply line, then all tubing clamps. Turn water back on and check for leaks after discarding several glasses of water to fill filter. Job complete!
Before you begin, I'd recommend unplugging the refrigerator. You have to slip the putty knife in around the edge of the dispenser panel and carefully release the tabs all the way around and the entire panel pulls straight out. There are three wiring harnesses to unplug. You'll have to remove several screws and release the tabs around the electronic panel and remove it from the main panel. It's a good idea to take note or even pictures of how the ice and water actuators are positioned on the panel, so you get them situated properly on the new panel. If the ice actuator is not fit correctly on a knob that sticks up it may dispense ice all the time (happened to me). After you transfer the actuators to the new panel and the ice and water dispensing levers, you can re-attach the electronic panel on the left side. make sure all of the wiring harnesses are plugged in and the wires situated out of the way, then re-install the panel by pushing it straight back in. Plug the refrigerator in and test it out.
The heavy work is moving the fridge, then take off the lower plans. Use a bowel or cup for screws and the water line connector spacers so you don't loos them. undo connections holding water line, including the bottom brakes for the solenoid. Reuse the spring around the lower waterline to prevent external wear on the line.
NOTE: remove the waterline connector spacers and save! NOTE: you must compress (not pull) the connect to then pull the waterline out of the connectors. NOTE: You must also remove the water filter and housing inside the fridge but this is easy. MOTE: Test the line for leaks by turning on the water and then using the door water. The filter will need to refill so it may take a minute before water comes up. This line only have pressure when the door water is used or the ice maker needs to make ice.
After replacing the line, test the line for leaks by using the door water so the solenoid fills the lines