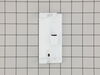
This OEM refrigerator filter is for french door and side-by-side door types and is located in the back, top-right of your appliance. By absorbing heavy metals, pharmaceuticals, pesticides, chlorine, a...
$107.30
In Stock
Order within the next 10 hrs and your part ships today!
This GREY magnetic door gasket is designed to help your 36-inch French-door refrigerator maintain a consistent internal temperature by forming a tight seal between the doors and the cabinet. Made from...
$112.61
In Stock
Order within the next 10 hrs and your part ships today!
This is a genuine Frigidaire part for your refrigerator. This is an ice maker, which connects to the water lines to provide fresh ice. The most common reason to replace this part is if your refrigerat...
$154.43
In Stock
Order within the next 10 hrs and your part ships today!
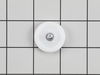
This replacement crisper pan roller helps your refrigerator drawer glide smoothly in and out, making it easy to access stored items. Made from durable plastic, the roller attaches to the sides of the ...
$15.17
In Stock
Order within the next 10 hrs and your part ships today!
Ensure your freezer operates efficiently with this replacement drawer gasket, designed to form a tight seal that keeps cold air in and warm air out. Made in light gray and compatible with select model...
$97.13
In Stock
Order within the next 10 hrs and your part ships today!
Keep your fruits and veggies fresh with this crisper drawer cover. It includes a sturdy plastic frame and a glass shelf that sits right above the crisper bins. Made for select Frigidaire refrigerators...
$167.22
In Stock
Order within the next 10 hrs and your part ships today!
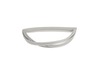
This mullion hinge pin is designed to secure the mullion in place within compatible refrigerator models, allowing it to pivot smoothly as the doors open and close. Measuring approximately 1.5 inches b...
$32.93
In Stock
Order within the next 10 hrs and your part ships today!
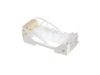
This clear plastic door bin is designed to fit securely inside the refrigerator door, offering a practical solution for storing bottles, jars, and other everyday items. It helps maximize space and kee...
$120.61
In Stock
Order within the next 10 hrs and your part ships today!
The water inlet valve supplies water to the refrigerator ice maker and water dispenser.
This part works with the following brands: Frigidaire, White Westinghouse, Kelvinator, Gibson, Kenmore, Sears...
$252.37
In Stock
Order within the next 10 hrs and your part ships today!
Sold individually.
This is a genuine part. The handle mounting shoulder screw (no.10 ab) is made for use with many refrigerators. The metal screw helps to fasten the handle assembly to the outer do...
$27.85
In Stock
Order within the next 10 hrs and your part ships today!
Questions And Answers for LFHB2751TF5
Ask our experts a question about this model and we'll get back to you as soon as possible!
3 questions answered by our experts.
< Prev
1
Next >
Sort by:
Search filter:
Clear Filter
Your search term must have 3 or more characters.
Keep searches simple. Use keywords, e.g. "leaking", "pump", "broken" or "fit".
Sorry, we couldn't find any existing answers that matched.Try using some different or simpler keywords, or submit your new question by using the "Ask a Question" button above!
Renee
October 8, 2025
I need help my water and ice dispenser is broken. The lever that dispenses the water and ice doesn't come back out if I use it it will keep dispensing either water or ice unless I lock it
For model number LFHB2751TF5
Hi Renee, thank you for your inquiry. According to the description of the issue, you will need to replace the dispenser funnel guide, part number PS12071009, to fix the issue. Glad to be of help!
I just ordered a Electrolux main circuit board from you, mine got wet and burned up. I replaced the board but i still don’t have lights inside and the front control is not lighting up. What should i check or now. Before the board got wet fridge worked perfectly . All lights worked and the front controls panel. Any ideas if so what’s parts will need replaced and price for oart
For model number LFHB2751TF5
Hi Joel,
Thank you for your question. If you have replaced the main electronic control board for your refrigerator and the display on the refrigerator door and the lights inside are not working, check the area around the board to see if it has dried out thoroughly. Also check the wiring connected to it to see if it is damaged. If it is, it will need to be replaced. If the wiring and the main electronic control board are fine, you will need to check the dispenser control board, the light switches and LED light boards. We hope this helps! If you have any questions, please let us know.
I have both the standard upper ice maker and the add-on ice maker in the lower freezer. Both ice makers are overflowing. Is this an inlet valve issue or is there a way to adjust water volume?
For model number LFHB2751TF5
Hello Paul, thank you for contacting us. Based on our understanding of the issue, we would suggest checking the water inlet valve. If this is not the issue, we would suggest replacing the control board, part number PS12176320, to solve the problem. Glad to be of help!
First I pulled the ice tray out so I could see the solenoid housing/ice tray support(1 unit). Below the ice tray there are 2 screws that hold the solenoid housing/ice tray support. After removing those the assembly lifts up so you can see the wiring harness to disconnect. I pulled it out and removed the 2 screws to open it up. There is 2 screws holding the solenoid in place and one ground wire. This was an easy fix and I know I saved a lot of money.
Simple three steps... 1) There's an front section to the ice-maker to take off. One Phillips screw is on the side, one screw is underneath near the inside of the refrigerator wall. Just unscrew and store. 2) There's a small plastic unit just inside the ice maker to take out. It's held in by a small nut that requires about a 4" extension to reach. (You may be able to unscrew the nut with small needle-nose pliers). Just unscrew and take out the unit - the unit functions just to keep the ice maker wiring in place. 3) The wiring looks a mess, but there's just one wiring connector to the ice maker assembly. Unsnap it. The ice maker is not screwed in, it just slides in -- reach in and pull the assembly straight out; when it stops, lower it a bit and it will come free. Reverse the instructions to install the new unit.
I checked the dampener, it worked. The compressor and fan worked. I knew because my freezer was still hovering around 10 degrees. Coils were clean. Thermistor was the only thing it could be. Took all my shelves out. Removed four screws. Took the back panel off. The thermistor sits tucked in on the side. I piped it out, in clipped it. Used my multimeter to test the numbers. Numbers were off just a bit. Ordered the part. Crossed my fingers.,took less then 5 minutes to put the part in. Plugged in the fridge. It was sitting at 33 degrees in about an hour and a half. I can’t believe I fixed it. I knew NOTHING about refrigerators. For how big my fridge is, it would have cost 3,000 and up to get a new one with the same cu ft size. Instead, it cost me $44. That includes shipping. Thank you Parts Select!! Made it so easy to pick the correct part for my model fridge!