This door basket is designed to fit securely on the inner panel of select refrigerator models, providing convenient storage for items such as condiment bottles and jars. Featuring both white and clear...
This pantry drawer cover is a genuine replacement part designed for select refrigerator models. Made from clear, durable plastic, it seals the front of the pantry drawer to help maintain internal cond...
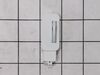
This ice maker assembly is for refrigerators. This Ice maker assembly contains the complete ice maker and housing. The assembly may include multiple parts; refer to your parts diagram for a complete ...
This 13-volt evaporator fan motor helps circulate air over the refrigerator coils. These coils will then convert the heat into cool air, which is then circulated from the freezer section to the fresh ...
This roller assembly supports smooth movement of drawers or internal components, reducing friction and strain. Quiet, easy motion improves usability and helps prevent wear. Replacing a worn roller res...
Introduce a flawless and remarkably reliable companion for your Samsung, LG, or Kenmore refrigerator, the Freezer Handle Support. A quintessential component uniquely designed to maintain the seamless ...
Keep your ice maker working smoothly with this replacement ice bucket. It holds the ice until you’re ready to dispense it, and fits neatly inside the freezer. If your old bin is cracked or broken, swa...
This refrigerator door gasket is a durable, flexible rubber seal designed to create a tight closure around the door, helping maintain proper temperatures and overall cooling efficiency. It replaces wo...
Looking for a reliable solution to keep your LG refrigerator or freezer in prime condition? Our genuine OEM Defrost Sensor Assembly from LG could be just what you need. Designed specifically to fit ...
Give your fridge a new lease on life with our top-notch LG Water Valve Assembly. This essential component ensures a consistent supply of water, critical for your ice maker and water dispenser to work ...
$177.27
In Stock
Questions And Answers for LFC24770ST
Ask our experts a question about this model and we'll get back to you as soon as possible!
4 questions answered by our experts.
< Prev
1
Next >
Sort by:
Search filter:
Clear Filter
Your search term must have 3 or more characters.
Keep searches simple. Use keywords, e.g. "leaking", "pump", "broken" or "fit".
Sorry, we couldn't find any existing answers that matched.Try using some different or simpler keywords, or submit your new question by using the "Ask a Question" button above!
Richard
February 9, 2022
Looking for vegetable crisper drawer
For model number LFC24770ST
Hello, Thank you for contacting us. We have researched the model you have provided and have found the part you are looking for is PartSelect Number PS11758494. If you need help placing an order, customer service is open 7 days a week. Please feel free to give us a call. We look forward to hearing from you!
I need the parts number for the fruit crisper drawer and the shelf above the deli drawer, and the frames with the labels. Help!
For model number LFC24770ST
Hello Stephanie, thank you for reaching out. The deli drawer cover you are looking for is part number PS10058957. The right side crisper drawer is part number PS11758494, the left side crisper drawer is part number PS11709249, and the crisper drawers shelf frame is part number PS9495758. Please reach out to customer service if you need help placing an order!
My LG refrigerator has door seals which keep getting moldy and now I can’t get the stains out of the refrigerator seals, ever since we bought it since day one, the seals never seemed right and I wondered if maybe because we bought a scratch and dent model, maybe the seals Are ripped where the center parts meet when the door closes. It almost looks like there is a piece of the seal missing and now I get moisture no matter what time of year it is, write down the center and it drips on the freezer door. I’ve had this refrigerator for quite a while now and it’s always had this problem. We never could seem to find an answer because no one would tell us anything. So I just dealt with it. But I’m getting tired of it and the seals look disgusting and the mold stains just will not come out. I want to replace the seals but I’m not sure where the parts are or how much they are, Can anyone help?
For model number LFC24770ST
Hello Valerie, thank you for your question. We do sell the Door Gasket for the Fresh Food side PS3639262 as well as the Freezer side PS11708200. Add one part of vinegar to two or three parts of water and either spray on to the gasket or apply using a soft cloth or damp sponge. Wait for 30 seconds and then wipe down the gasket. Wipe dry with a cloth or paper towel and repeat if necessary. We hope this helps.
Was this helpful?
Thank you for voting!
Richard
February 8, 2025
Need new top drawer for freezer compartment
For model number LFC24770ST
Hello Richard, thank you for reaching out. The upper freezer drawer you are looking for is part number PS11712273. We hope this helps!
Video makes it look easy. Kenmore refrigerator does not have "groove" along the right hand side of switch that allows for pushing down on release. Used a thin screwdriver to get under to push while holding switch edge with pliers. Kept slipping. Tape sides to avoid scratching inside of refrigerator.
This couldn't have been easier. Two tiny screws in the front needed unscrewed, and then two plastic clips in the middle just had to be popped lose. Finally, you unplugged the power cord. Then, you just needed to reverse the process by plugging the new ice maker in, popping the clips in place, and screwing the two holes back in and turning the whole thing on. Voila! Perfect ice cubes again. And for only a little over $100.
Soak new gasket in hot water in bathtub to soften while removing old gasket. No tools required, it was a little difficult pulling old gasket out but once you get it started part way out it will come out real easy. By the time you get the old gasket out the new gasket will be warm and easy to get started into the groove it pops into. Starting on back (hinged) side is of door, begin pushing new gasket into groove. Work up and down pushing gasket into place working towards the corners and around to the front side of door. Your all done. This is a job I went into a little nervous thinking I might be calling a service man out to fix, but it turned out to be really easy.